Supplies
1 tube of choice – I used the beautiful artwork of Lisa Cree which can
be purchased from her tube store PSP Tube Stop. You must have a license to use.
Font of choice - I used Olimpia here
Weescotlass Mask 208 here
Plug Ins Used:
Fantastic Machine – Paint Engine
My Supplies here:
Paper and element – they are to be used for this tutorial only.
This tutorial was written assuming you have a working knowledge of PSP.
~♥~ Let’s get started ~♥~
Open up a 700 x 700 blank canvas.
Flood fill white.
New Raster layer.
Make your Selection Tool active set on Circle.
Create a circle approximately 450 pixels.
Flood fill with #c25593
Adjust/Add Remove Noise/Add Noise:
Random checked
37%
OK
Selections/Modify/Contract by 5.
Open up the tube.
Highlight the bottom Image layer.
Make your Selection Tool active and section out the top right area –
just the sky.
Copy.
Make your Working canvas active.
Paste Into Selection.
Make the tube image active again.
Deselect.
Copy.
Make your working canvas active.
New Raster layer above the sky layer.
Paste Into Selection.
Deselect.
Change the Properties to Overlay.
Lower the Opacity to about 49.
New Raster layer.
Make your Selection Tool active set on Rectangle.
Make a rectangle approximately 50 x 500 pixels.
Make your tube active.
Highlight “The Gift Tube” layer.
Make your Selection Tool active, still set on Rectangle and section out
an area of the rainbow.
Copy
Make your working canvas active.
Paste Into Selection.
Duplicate
Apply Fantastic Machines – Paint Engine:
Use Default settings accept hit the Random Seed button twice (I believe
hitting it twice will give the same effect I have. If not, then hit the Random Seed button until
you have an effect you like.)
Merge Down.
Deselect.
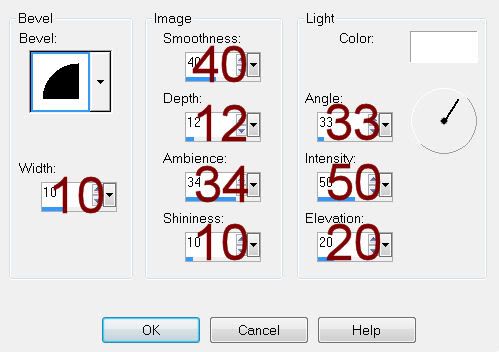
Give it a slight Inner Bevel:
Duplicate
Mirror
To each slat you just made:
Duplicate
Free rotate Left 90 degrees.
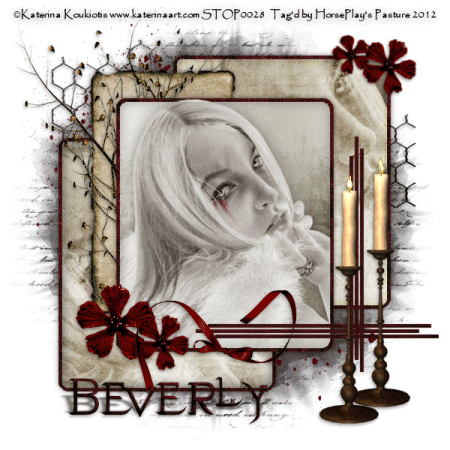
Move all slats into position – See my tag for reference.
Copy and paste your tube as a new layer.
Copy and paste the bubbles from the tube as new layers onto your
working canvas.
Resize one of them 80%
Add the element I supplied:
Add the element I supplied:
Position behind the circle. Erase the bottom of the stem that sticks out
from the circle.
Paste the element again. Resize 40%
Crop your image.
Highlight your white background.
New Raster layer.
Select All.
Copy and paste the paper that I supplied Into Selection.
Apply the mask.
Merge Group.
Add your credits.
Add your name.
Foreground: #c25593
Background: Pattern/the paper I supplied
Stroke: 0.8
Type your name.
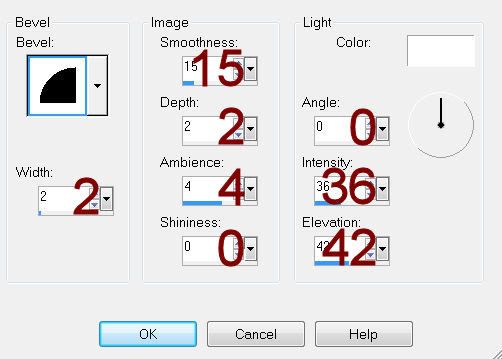
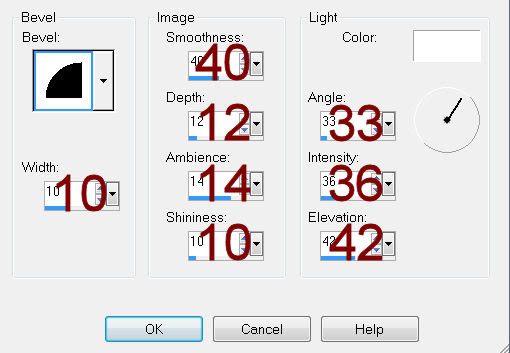
Apply a slight Inner Bevel:
Apply the same noise effect.
Resize all layers 80%.