Saturday, March 5, 2011

Delusional


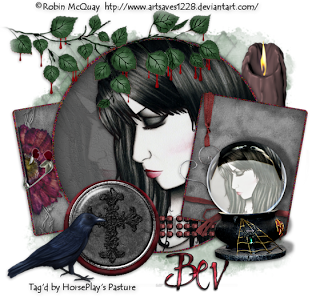
Clicking on the image will allow you to enlarge for bigger view.

Supplies

1 tube of choice - I used the beautiful artwork of Robin McQuay which can be purchased from Up Your Art. You must obtain a license to use.
Font of Choice - I used Clive Barker here
Becky Mask 22 here
Scrap Rebellion Template 39 here
Greg’s Factory Output Vol. II - Pool Shadow
“Delusional” is a tagger size scrap kit created by Jessica of Gothic Inspirations and can be purchased from her store Gothic Inspirations. You can visit her blog here. Thank you Jessica for another spectacular gothic kit!

This tutorial was written assuming you have a working knowledge of PSP.

~♥~ Let’s get started ~♥~

Open up the template.
Shift + D.
Close out the original.
Delete the top 5 layers and tag back layer.
Highlight and open up the background layer.

Open up Bow element.
Use your Selection Tool set on rectangle and section out a portion in the left side of the bow.
Set your foreground to Patten - look for the bow.
Set the scale to about 160 - or whatever you like.

Highlight L Glitter Square layer.
Select All/Float/Defloat.
New Raster layer.
Flood fill with the pattern.
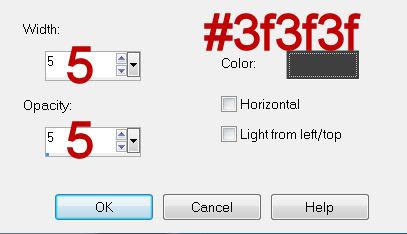
Adjust/Add Remove Noise/Add Noise:
Uniform checked
Noise: 75%
OK
Deselect
Delete the template layer.

Repeat the above step with:
Glitter Circle layer and R Glitter Square layer


Highlight White Circle layer.
Click on it with your Magic Wand.
New Raster layer,
Flood fill with the same pattern.
Deselect.
Delete the template layer.
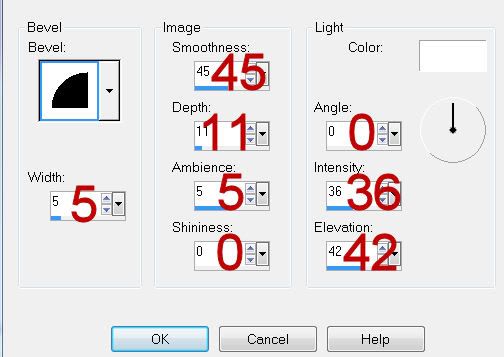
Give it a slight Inner Bevel:

Highlight R Square layer.
Click on it with your Magic Wand.
New Raster layer.
Copy and paste Paper 24 Into Selection.
Deselect.
Delete the template layer.

Highlight L Square layer.
Repeat the above step.
Be sure you’ve deselected.
Copy and paste Barbwire as a new layer.
Resize 60%/Free rotate Left 100 degrees.
Move into position over the paper.
Highlight the paper layer.
Click anywhere outside of it with your Magic Wand.
Highlight the element layer.
Tap the delete key.
Deselect.

Highlight Big Circle layer.
Select All/Float/Defloat
New Raster layer.
Copy and paste Paper 5 Into Selection.
Copy and paste your tube as a new layer over the circle.
Move into position.
Duplicate and move to the right a little.
Move the duplicate layer below the original.
Lower the Opacity to about 12
Selections/Invert
Highlight each tube layer and tap the delete key.
Deselect.
Delete the template layer.

Highlight Purple Circle layer.
Click on it with your Magic Wand.
New Raster layer.
Copy and paste Brad 2 Into Selection.
Deselect.
Delete the template layer.

Copy and paste Looking Globe as a new layer.
Click anywhere outside of it with your Magic Wand.
Copy and paste your tube as a new layer - position it over the glass part of the globe.
Tap the delete key.
Deselect.
Change the Properties to Soft Light
Use your Freehand Selection tool and section off the part of the tube that overlaps the base of the Looking Globe.
Tap the delete key.
Duplicate
Merge Visible the Looking Globe and both tube layers.
Resize 50%
Give it a drop shadow on it’s own layer.
At the top of the layers pallet click on Layer Link Toggle until it says None.
Move the drop shadow to the right a little to give a thrown shadow effect.

Reopen all layers.

Add your embellishments. I used:
Pinned Flower: Resize 50%/Free Rotate Left 100 degrees
Ribbon with Charm: Resize 40%
Ribbon: Resize 25%/Free rotate Right 10 degrees
Leaves: Resize 85%
Beads: Resize 40%
Candle: Resize 70%

Highlight your white background.
New Raster layer.
Select All.
Copy and paste Paper 7 Into Selection.
Deselect.
Apply the mask.
Merge Group.
Duplicate

Copy and paste Mesh as a new layer.
Resize 80%
Apply the mask.
Merge Group.
Duplicate.

Add your copyrights.

Add your name.
Apply Greg’s Factory Output Vol. II - Pool Shadow:
Default Settings.

Resize all layers 80%.

I hope you enjoyed this tutorial.
I’d love to see your results and show it off in my gallery.
Email me!
Hugs,
Bev

Friday, March 4, 2011

Steampunk Romance


Clicking on the tag will allow you to enlarge for bigger view.

Supplies

1 tube of choice - I used the artwork of Susan McKirvergan which can be purchased from Up Your Art. You must obtain a license to use.
Font of Choice - I used Aquarelle here
Weescotlass Mask 297 here
Scrap Rebellion Template 40 here
Greg’s Factory Output Vol. II - Pool Shadow
“Steampunk Romance” is a FS scrap kit created by Heppy of HF Projekte and can be purchased from Butterfly Blush Designs. You can visit his blog here to see more of his amazing talent.
Thank you Heppy for such a beautiful steam punk kit. This one is absolutely brilliant!

This tutorial was written assuming you have a working knowledge of PSP.

~♥~ Let’s get started ~♥~

Open up the template.
Shift + D.
Close out the original.
Delete the top 5 layers.
Highlight and open up the background layer.

Highlight Dotted Lines layer.
Select All/Float/Defloat.
New Raster layer.
Copy and paste Paper 11 Into Selection.
Deselect
Delete the template layer.

Highlight Left Square layer.
Click on it with your Magic Wand.
New Raster layer,
Copy and paste Paper 1 Into Selection.
Deselect.
Delete the template layer.

Highlight the paper from the kit.
Flip.
Copy.

Highlight RSquare layer.
Click on it with your Magic Wand.
New Raster layer.
Paste the paper Into Selection.
Deselect.
Delete the template layer.

Highlight Black Circle layer.
Click on it with your Magic Wand.
New Raster layer.
Copy and paste Paper 12 Into Selection.
Deselect.
Delete the template layer.

Highlight Shape layer.
Click on it with your Magic Wand.
New Raster layer.
Copy and paste Paper 11 Into Selection.
Apply Greg’s Factory Output Vol. II - Pool Shadow:
Use Default Settings accept change the Intensity bar to 53.
OK
Deselect.
Delete the template layer.

Copy and paste your tube as a new layer.
Position it in front of the left side of the circle.
Duplicate.
Use your right arrow key on your keyboard and move the tube over the shape on the right side of the circle - see my tag for reference.
In your layers pallet, move it just above the shape paper layer.
Highlight the shape paper layer.
Click anywhere outside of it with your Magic Wand.
Highlight the duplicated tube layer.
Tap the delete key.
Deselect.
Change the Properties to Soft Light.

Add your embellishments. I used:
32: Resize 25% and 80%
4: Resize 25% and 50%/Duplicate/Mirror
10: Resize 25% and 35%/Duplicate/Resize 70%
22: Resize 25% and 35%

Highlight your white background.
New Raster layer.
Select All.
Copy and paste Paper 6 Into Selection.
Deselect.
Apply the mask.
Merge Group.

Add your copyrights.

Add your name.

Resize all layers 80%.

I hope you enjoyed this tutorial.
I’d love to see your results and show it off in my gallery.
Email me!
Hugs,
Bev

Thursday, March 3, 2011

Just a Memory


Clicking on the image will allow you to enlarge for bigger view.

Supplies

1 tube of choice - I used the artwork of Joerg Warda and was purchased from MPT. I’m sorry but I don’t know where this artist sells at present.
Font of Choice - I used Hitalica here
Vix mask 452 here
Divine Intentionz Template 259 here
Eyecandy 3.1 - Glow
“Just a Memory” is a PTU tagger size scrap kit created by Shelle of Shellez Creations and can be purchased at TKO Scraps Please visit her blog here.
Thank you Shelle for a kit that screams "class" all the way!

This tutorial was written assuming you have a working knowledge of PSP.

~♥~ Let’s get started ~♥~

Open up the template.
Shift + D.
Close out the original.
Delete By Missy and Words layers.

Highlight Rectangle with Filter layer.
Click on it with your Magic Wand.
New Raster layer.
Copy and paste Paper 3 Into Selection.
Deselect.
Delete the template layer.
Apply Eyecandy 3.1 - Glow:
Width: 3
Opacity: 100
Opacity Dropoff: Fat
Color: White
OK

Highlight Circle layer.
Click on it with your Magic Wand.
New Raster layer.
Copy and paste Paper 10 Into Selection.
Deselect.
Delete the template layer.
Apply Eyecandy 3.1 - Glow:
Same Settings

Color Pallet:
Foreground: #000000
Background: #808080
Gradient Settings;
Style: Linear
Angle: 0
Repeats: 1
OK

Highlight Thin Rectangle 1 layer.
Click on it with your Magic Wand.
New Raster layer.
Flood fill with your gradient.
Deselect.
Delete the template layer.
Apply Eyecandy 3.1 - Glow:
Same Settings

Highlight Thin Rectangle 3 layer.
Merge Down.
Apply Eyecandy 3.1 - Glow:
Same Settings

Highlight Dotted Line 2 layer.
Merge Down.
Select All/Float/Defloat
New Raster layer.
Flood fill with #ffffff
Deselect.
Delete the template layer.

Highlight Frame layer.
Adjust/Add Remove Noise/Add Noise:
Uniform checked
Noise: 73%
OK

Highlight Frame Background layer.
Click on it with your Magic Wand.
New Raster layer.
Copy and paste Paper 1 Into Selection.
Deselect.
Delete the template layer.

Copy and paste your tube as a new layer.

Copy and paste Element 44 as a new layer.
Resize 25%
Shift + L
Hue: 0
Saturation: 0
OK
Move into position.

Add your embellishments. I used:
49: Resize 120% and 110%
27: Resize 40%/Flip
23: Resize 50%
28: Resize 40%
22: Resize 40%
21: Resize 25%/Duplicate/Resize 70%/Flip
20: Resize 40%
19: Resize 25% and 80%

Highlight your white canvas.
New Raster layer.
Select All.
Copy and paste Paper 2 Into Selection.
Deselect.
Apply the mask.
Use your Pick tool to pull the right side out and bottom down just a little.
Merge Group.

Add your copyrights.

Add your name.
Apply the same glow effect.

Resize all layers 80%.

I hope you enjoyed this tutorial.
I’d love to see your results and show it off in my gallery.
Email me!
Hugs,
Bev

Tuesday, March 1, 2011

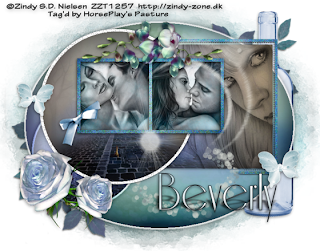
Memories Secreted Away


Clicking on the image will allow you to enlarge for bigger view.

Supplies

3 tubes of choice - I used the artwork of Zindy S.D. Nielsen here. Please do not use unless you have a license to do so.
Font of Choice - I used Riesling here
Vix Mask 451 here
Divine Intentionz Template 386 here
Eyecandy 3.1 - Glow
“Blue Without You” is a PTU size scrap kit created by Kesha of KnC Scrapz and can be purchased from her store Lollipops n Gumdrops. You can visit her blog here.

This tutorial was written assuming you have a working knowledge of PSP.

~♥~ Let’s get started ~♥~

Open up the template.
Shift + D.
Close out the original.
Delete the top 4 layers.
Highlight the background layer.
Image/Canvas Size
700 x 550
OK
Flood fill white.

Highlight Oval layer.
Click on it with your Magic Wand.
New Raster layer.
Copy and paste Paper 2 Into Selection.
Deselect.
Delete the template layer.
Apply Eyecandy 3.1 - Glow:
Width: 5
Opacity: 100
Dropoff Opacity: Fat
Color: White
OK

Highlight Circle 1 layer.
Click on it with your Magic Wand.
New Raster layer.
Copy and paste Paper 1 Into Selection.
Deselect.
Delete the template layer.

Highlight Circle 2 layer.
Click on it with your Magic Wand.
Paste Paper 1 as a new layer.
I realize you can’t see this paper on my tag because the roses cover it up, but what I did was move the paper so that the road matched up with the road in the circle above.
Selections/Invert
Tap the delete key.
Duplicate/Change the Properties to Overlay
Deselect.
Delete the template layer.

Highlight Rectangle layer.
Click on it with your Magic Wand.
Paste Paper 1 as a new layer.
Move into the position you like best.
Selections/Invert
Tap the delete key.
Copy and paste your tube as a new layer over the paper.
Tap the delete key.
Change the Properties to Multiply.
Deselect.
Delete the template layer.

Highlight Frame layer (there‘s 2 different ones…choose either one).
Select All/Float/Defloat
New Raster layer.
Copy and paste Paper 5 Into Selection.
Deselect
Delete the template layer.
Duplicate/Change the Properties to Multiply.
Adjust/Add Remove Noise/Add Noise:
Uniform checked
Noise: 55%
OK

Highlight the other Frame layer.
Repeat the above step.

Highlight Dotted Rec layer.
Select All/Float/Defloat
New Raster layer.
Flood fill with #0b1118
Deselect.
Delete the template layer.

Highlight Frame Back layer.
Click on the left square with your Magic Wand.
New Raster layer.
Copy and paste Paper 3 Into Selection.
Copy and paste a tube as a new layer above the paper.
Resize as needed.
Selections/Invert
Tap the delete key.
Deselect.

Highlight Frame Back layer again.
Click on the right square with your Magic Wand.
Repeat the above step.

Add your embellishments. I used:
Bottle: Resize 60%
Flower 1: Resize 25%
Bow 3: Resize 25%/Free rotate Left 35 degrees
Trail: Resize 30%
Light: Resize 50%/Lower the Opacity to 75
Butterflies: Choose the smallest one. Resize 80%/Duplicate/Mirror/Resize 90%
Blue Branch: Resize 40%/Free rotate Right 35 degrees/Duplicate/Mirror/Flip/Erase what leaves you don’t want.
Flower 3: Resize 25%/Flip/Erase the stem/Duplicate/Mirror/Resize 70%

Highlight your white background.
New Raster layer.
Select All.
Copy and paste paper 4 Into Selection.
Deselect.
Apply the mask.
Use your Pick Tool to pull all sides out - see my tag for reference.
Merge Group.

Add your copyrights.

Add your name.
Give it a Drop Shadow.
Give it a second Drop Shadow accept make sure this one is on a layer all it’s own. At the top of your layers pallet click on the Layer Link Toggle until it says "None". Use your Pick Tool and pull the top of the shadow down until you have a slanted shadow effect you like.

Resize all layers 80%.

I hope you enjoyed this tutorial.
I’d love to see your results and show it off in my gallery.
Email me!
Hugs,
Bev

Monday, February 28, 2011

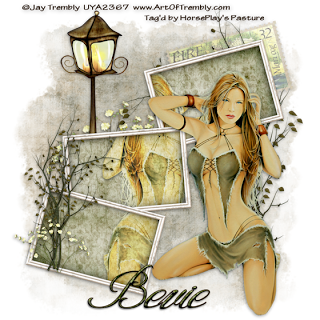
Tame the Wild


Clicking on the image will allow you to enlarge for bigger view.

Supplies

1 tube of choice - I used the artwork of Jay Trembly which can be purchased at Up Your Art. Please do not use unless you have a license to do so.
Font of Choice - I used Shit Happens (Yes, that is the name of the font!) here
Becky Mask 22 here
“Siochan” is a PTU full size scrap kit created by Artmama Made and can be purchased from Exquisite Scraps. You can visit her blog here.

This tutorial was written assuming you have a working knowledge of PSP.

~♥~ Let’s get started ~♥~

Open up a 700 x 700 blank canvas.
Flood fill white.

Copy and paste Embellie 23 as a new layer.
Resize 25% and 75%
Click inside of each from with your Magic Wand.
Selections/Modify/Expand by 4.
New Raster layer below the frame.
Copy and paste Paper 12 Into Selection.
Deselect.
Delete the template layer.

Copy and paste your tube as a new layer.
Position to the right of the frames.
Duplicate/Mirror/Move below the frame layer in your layers pallet.
Use the arrow keys on your keyboard to move the tube into position.
Highlight the paper layer.
Click anywhere outside of it with your Magic Wand.
Highlight the tube layer just below the frame.
Tap the delete key.
Deselect.
Change the Properties to Hard Light.
Lower the Opacity to 79.

Add your embellishments. I used:
14: Resize 25% and 70%
32: Resize 50%/Free rotate Left 15 degrees/ Lower the Opacity to 51
8: Resize 25%/Place behind the frame
8 again: Resize 25% and 60%/Place in front of the frame.
16: Resize 25% and 60%/Place behind the frame
16 again: Resize 25% and 25%/Place in front of the bush in front of the frame.

Highlight your white background.
New Raster layer.
Select All.
Copy and paste paper 10 Into Selection.
Deselect.
Apply the mask.
Merge Group.

Add your copyrights.

Add your name.

Resize all layers 80%.

I hope you enjoyed this tutorial.
I’d love to see your results and show it off in my gallery.
Email me!
Hugs,
Bev

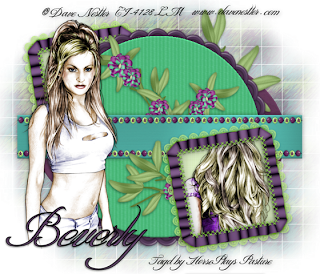
Seductive Thoughts


Clicking on the image will allow you to enlarge for bigger view.

Supplies

2 tubes of choice - I used the artwork of Dave Nester which can now be purchased at CDO
Font of Choice - I used Shit Happens (Yes, that is the name of the font!) here
Designs by Vayvs mask 72 here
Essence of Creativity Template 112 here
Mura’s Meister - Copies
Brush Strokes - Sprayed Strokes
“Cute as a Button” is a PTU tagger size scrap kit created by Nancy of GeoGirl Designs and can be purchased from Butterfly Blush Designs. You can visit her blog here.

This tutorial was written assuming you have a working knowledge of PSP.

~♥~ Let’s get started ~♥~

Open up a the template.
Shift + D.
Close out the original.
Delete Credit, Text, and Stars layers.
Highlight the background layer and open it up.
Image/Canvas size:
700 x 600 OK
Flood fill white.

Highlight Black Oval layer.
Click on it with your Magic Wand.
New Raster layer.
Copy and paste Paper 2 Into Selection.
Deselect.
Delete the template layer.
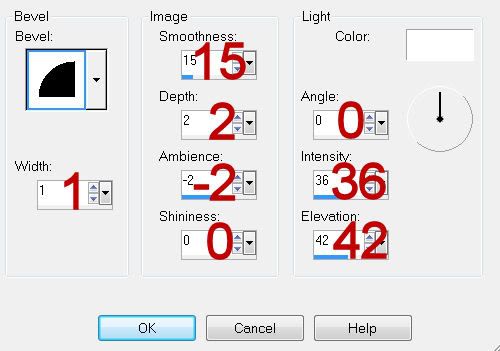
Give it a slight Inner Bevel:


Highlight Pink Circle layer.
Click on it with your Magic Wand.
New Raster layer.
Copy and paste Paper 4 Into Selection.
Deselect.
Delete the template layer.
Give it the same Inner Bevel.

Highlight Rectangle layer.
Click on it with your Magic Wand.
New Raster layer.
Copy and paste Paper 3 Into Selection.
Deselect.
Delete the template layer.
Give it the same inner Bevel.

Copy and paste Frame 1 as a new layer.
Resize 50%
Free rotate Left 10 degrees.
Move into position over Frame 1 template layer.
Delete Frame 1 and Square 1 template layers.

Duplicate the frame and move into position over Frame 2 template layer.
Delete Frame 2 and Square 2 template layers.
Click inside the frame with your Magic Wand.
Selections/Modify/Expand by 4.
New Raster layer below the frame.
Copy and paste Paper 9 Into Selection.
Deselect.

Highlight the bottom frame.
Click inside of it with your Magic Wand.
Selections/Modify/Expand by 4.
New Raster layer below the frame.
Copy and paste the same paper Into Selection.
Copy and paste a tube above the paper as a new layer.
Selections/Invert
Tap the delete key.
Deselect.

Copy and paste Element 14 as a new layer.
Resize 35%
Duplicate/Move to the end of the original to create one long line of beads.
Make Pick Tool active and move the sides in so that it’s the same length as the rectangle.
Move into position at the top of the rectangle - see my tag for reference.
Duplicate/Mirror/Move into position at the bottom of the rectangle.

Copy and paste Element 8 as a new layer.
Resize 25%
Apply Mura’s Mesiter - Copies:
Encircle
Change Number to 35
OK
Move into position behind the circle paper.
Use your Pick Tool to bring the bottom down and the sides in a bit so that it’s centered evenly around the circle.

Copy and paste Flower 4 as a new layer.
Resize 75%
Position behind the rectangle.
Duplicate/Mirror/Erase what you don’t want of the element.

Paste the element again.
Free rotate Left 10 degrees.
Position behind the button circle.
Erase what you don’t want of the element.

Highlight your white canvas.
New Raster layer.
Select All.
Copy and paste Paper 7 as a new layer.
Adjust/Blur/Gaussian Blur:
Radius: 5
OK
Apply Brush Strokes - Sprayed Strokes:
Stroke Length: 12
Spray Radius: 21
Stroke Direction: Right Diag
Apply the mask.
Merge Group.
Duplicate

Add your copyrights.

Add your name
Give it the same inner bevel accept change the bevel shape to 12.
Apply the bevel once more.

Resize all layers 80%.

I hope you enjoyed this tutorial.
I’d love to see your results and show it off in my gallery.
Email me!
Hugs,
Bev

Sunday, February 27, 2011

St. Patty's Day


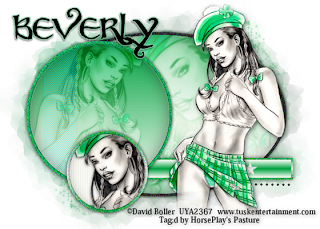
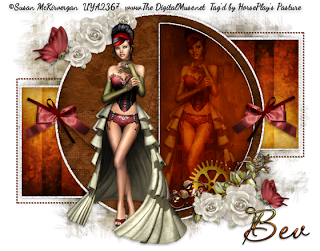
Clicking on the image will allow you to enlarge for bigger view.

Supplies

1 tube of choice - I used the amazing artwork of David Boller and can be purchased from Up Your Art. Please do not use without a license.
Font of Choice - I used Party Business here
Weescotlass Mask 161 here
Toxic Desirez Template 137 here
Xenofex 1.0 - Shower Door (optional)
Eyecandy 3.1 - Glow

This tutorial was written assuming you have a working knowledge of PSP.

~♥~ Let’s get started ~♥~

Open up the template.
Shift + D.
Close out the original.
Delete the following layers:
Credits
Words
Pixel Words
Highlight the background layer.
Image/Canvas size
700 x 500
OK
Flood fill white.

Highlight Glitter Oval layer.
Select All/Float/Defloat
New Raster layer.
Flood fill with #202020
Adjust/Add Remove Noise/Add Noise:
Uniform checked
Noise: 75%
OK
Deselect.
Delete the template layer.

Color pallet:
Foreground: #00a241
Background: #fcfcf6

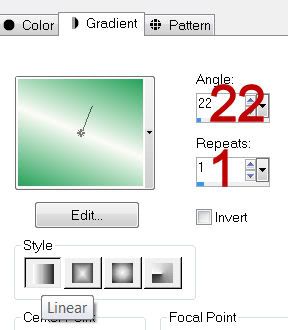
Set the foreground to gradient:


Highlight Oval layer.
Select All/Float/Defloat
New Raster layer.
Flood fill with your gradient.
Duplicate
Adjust/Blur/Gaussian blur:
Radius: 20
OK
Copy and paste your tube as a new layer.
Resize much large and move into position - see my tag for reference.
Deselect.
Change the Properties to Soft Light.

Highlight Glitter Rectangle layer.
Select All/Float/Defloat
New Raster layer.
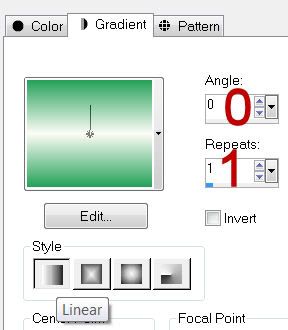
Change your Gradient to match mine:


Apply the same Noise.

Highlight Sm Glitter Circle.
Repeat the above step.

Highlight Rectangle layer.
Click on it with your Magic Wand.
New Raster layer.
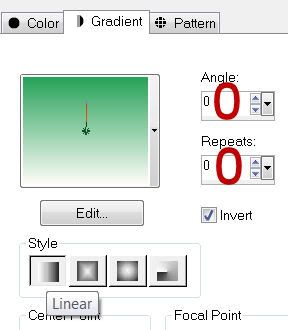
Change your gradient by just clicking Invert this time.
Flood fill the rectangle.
Deselect.

Highlight Stars layer.
Select All/Float/Defloat
New Raster layer.
Flood fill with your background color.
Give it the same Noise.
Deselect.
Delete the template layer.

Highlight Dotted Line layer.
Select All/Float/Defloat
New Raster layer.
Flood fill with #202020
Deselect.
Delete the template layer.

Highlight Lrg Glitter Circle layer.
Select All/Float/Defloat
New Raster layer.
Flood fill with #00a241
Apply the same Noise.
Deselect.
Delete the template layer.

Highlight Teal Circle layer.
Select All/Float/Defloat
New Raster layer.
Flood fill with the following Gradient:


Duplicate
Effects/Edge Effects/Enhance More
Selections/Invert
Selections/Modify/Inside Outside Feather:
Both checked
Feather amount: 43
OK
Tap the delete key.
Copy and paste your tube as a new layer over the gradient.
Tap the delete key.
Deselect.
Change the Properties to Soft Light.
Duplicate/Lower the Opacity to 48
Adjust/Sharpen/Sharpen More
Highlight Pink Circle layer.
Select All/Float/Defloat
New Raster layer.
Flood fill with #fcfcf6
Effect/Text Effects/Blinds:


Copy and paste your tube as a new layer over the blinds layer.
Move into position.
Selections/Invert
Tap the delete key.
Deselect.
Delete the template layer.

Color pallet:
Foreground: #26a259
Make your Target Tool active.
Highlight Glitter layer.
Recolor using your Target Tool.

Close out the glitter and background layers.
Merge Visible.
Duplicate
Adjust/Blur/Gaussian Blur:
Same settings
Reopen your white background.

Highlight the merged layer.
Apply Xenofex 1 - Show Door:
Default Settings.
If you don’t have Xenofex 1 then apply the mask.
Use your Pick Tool to pull the sides out a little.
Merge Group.

Copy and paste your tube as a new layer.

Add your copyrights.

Add your name.
Apply Eyecandy 3.1 - Glow:
Width: 3
Opacity: 100
Opacity Dropoff: Fat
Color: #93daae

Resize all layers 80%.

I hope you enjoyed this tutorial.
I’d love to see your results and show it off in my gallery.
Email me!
Hugs,
Bev