Saturday, August 15, 2009

Softly it Rains

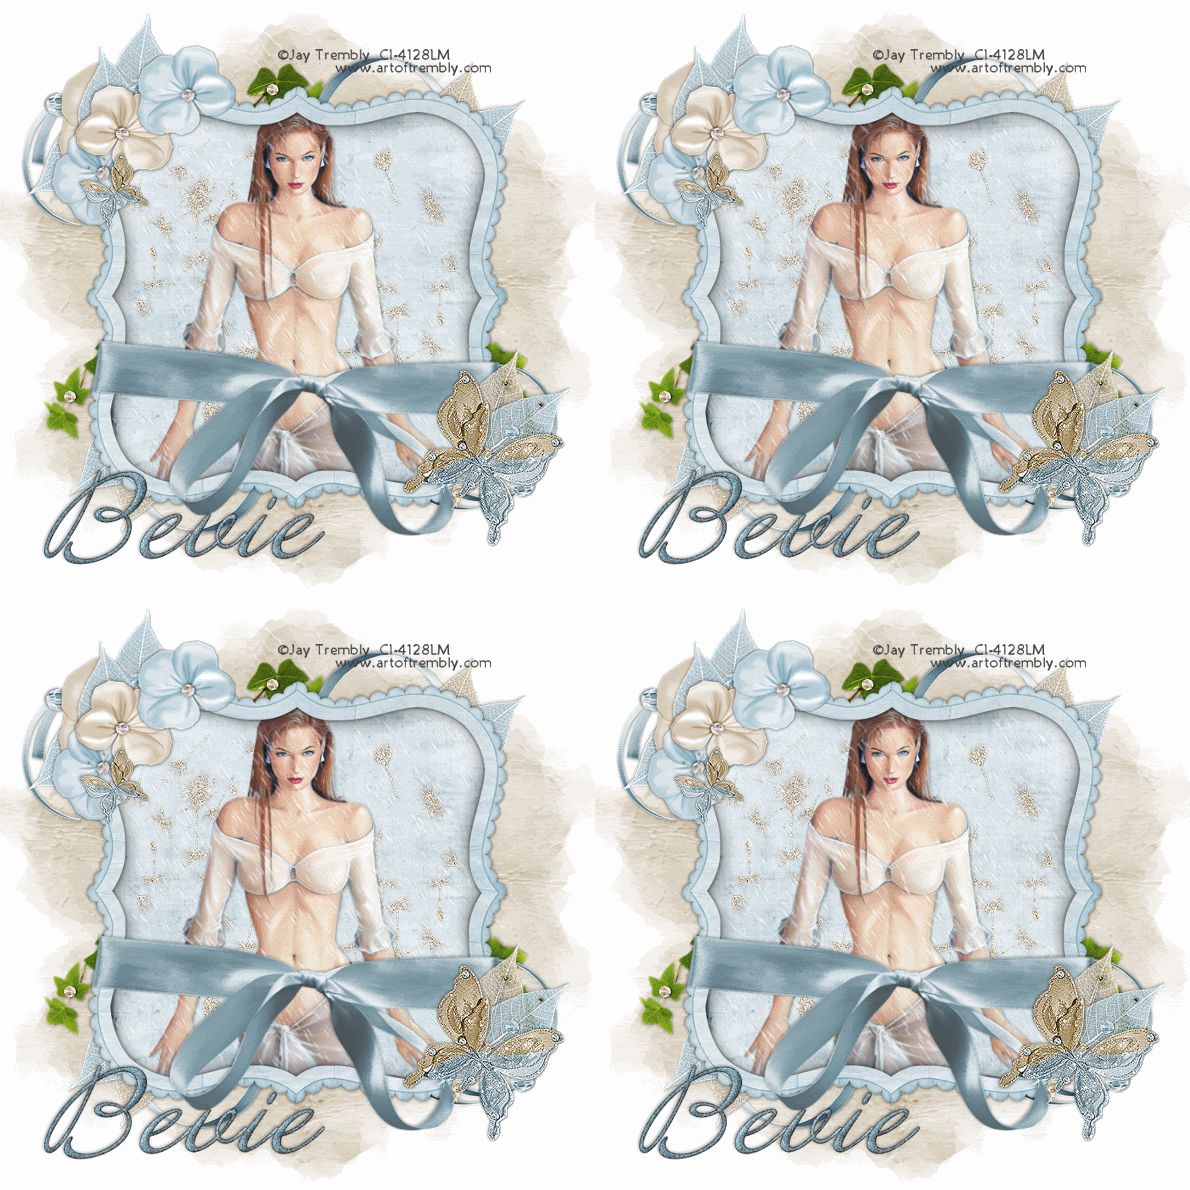
Clicking on the above image will enlarge to full view.
The image below shows the animation.

Supplies
1 tube of choice - I’m using the artwork of Jay Trembly which you can purchase here
Font of Choice - I’m using Annabelle here
Weescotlass Mask 220 here
VanDerLee Snowflakes here
Dsb Flux - Bright Noise
Animation Shop
“So Delicate” is a FTU size scrap kit by KatNKDA and can be downloaded from Kat’s blog here. Please leave a thank you when downloading. It’s a small gesture for hard work given freely.
Thank you Kat for such a pretty kit!

This tutorial was written assuming you have a working knowledge of PSP.

~♥~ Let’s get started ~♥~

Open up a 700 X 700 transparent image.
Flood Fill white.

Copy and paste Element 3 as a new layer.
Resize 65%.
Use your Magic Wand and click inside of it.
Selections/Modify/Expand by 4.
New Raster layer below frame.
Copy and paste a paper of choice Into Selection.
Copy and paste your tube above the paper layer.
Deselect.
Copy and paste Element 13 as a new layer behind your tube.
Resize 50%
Duplicate/Mirror/Flip

Now we’re going to create the rain effect and get the layers ready for animating later on….

Use your Magic Wand and click inside the frame again.
Selections/Modify/Expand by 4.
Create 4 new raster layers below the frame.
Rename each Rain 1, 2, 3, and 4.

Highlight Rain 1 layer.
Apply the Vanderlee Snowflakes with the following settings:
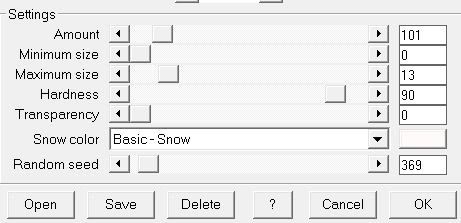

Repeat the plugin on the remaining 3 Rain layers accept on each layer move the Random Seed bar a bit.
DO NOT DESELECT YET.

Go back and highlight Rain 1 layer.
Adjust/Blur/Motion Blur.
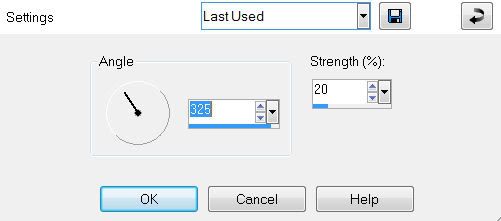

Repeat the above effect with the other 3 rain layers.
DO NOT DESELECT YET.

Highlight Rain 1 layer again.
Adjust/Sharpness/Sharpen.
Repeat.

Repeat the above step to the other 3 rain layers.
Deselect.

Once you’ve done that, close out Rain layers 2, 3, and 4.

Add your embellishments. I used:
Element 1 & 2: Resize 35%
Element 15: Resize 45% Free rotate right 30 degrees
Element 14: Resize 50%
Element 5: Resize 75%. Make your Pick Tool Active and hold down on the control button while you pull the lower right corner out just a tad to line up with the edge of the frame.
Element 12: Resize 80%
Element 9 & 10: Resize 35%

Highlight your white canvas.
New Raster Layer.
Select All.
Copy and paste a paper of choice Into Selection.
Apply the mask.
Merge Group.
Deselect.
Resize 110%

Add your copyrights.

Add your name.
Duplicate 3 times to have a total of 4 names layers.
Rename them Name 1, 2, 3, & 4
Highlight Name 1 and apply DSB Flux Bright Noise
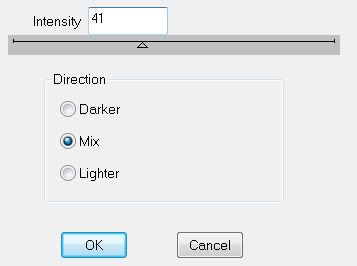
Repeat the above step accept for Name 2 hit the mix button twice. For Name 3 hit the mix button 3 times. For Name 4 hit the mix button 4 times.

Close out name layers 2, 3, and 4. Only keep Name 1 open.

Resize all layers 85%.

Time to Animate:

Copy Merge and carry into Animation Shop.
Edit/Paste/As New Animation

Go back into PSP
Close out Name 1. Open up Name 2
Close our Rain 1. Open up Name 2.
Copy Merge and Carry into AS.
Edit/Paste/After Current Frame.

Go back into PSP
Close out Name 2. Open up Name 3
Close our Rain 2. Open up Name 3.
Copy Merge and Carry into AS.
Edit/Paste/After Current Frame.

Go back into PSP
Close out Name 3. Open up Name 4
Close our Rain 3 Open up Name 4.
Copy Merge and Carry into AS.
Edit/Paste/After Current Frame.

View your animation.
If you’re happy with it then save.

I hope you enjoyed this tutorial.
I’d love to see your results and show it off in my Show Arena.
Email me!
Hugs,
Bev

My Oasis

Clicking on the image will enlarge to full view.

Supplies
1 tube of choice - I’m using the artwork of KatNKDA which you can purchase here
Font of Choice - I’m using XXII Arabian-Onenightstand here
Weescotlass Mask 39 here
Alien Skin - Xenofex 2: Burnt Edges
“Oasos” is a PTU full size scrap kit created by KatNKDA. It can be downloaded from her store NK Art Shop. You can visit Kat’s blog here.
Thank you Kat for another stunning kit!

~♥~ Let’s get started ~♥~

Open up a transparent 700 X 700 canvas.
Flood Fill white.

Copy and paste Element 23 as a new layer.
Resize 35%
Duplicate
Close out Raster 2
Outline the right side of the element.


Highlight Raster 2
Duplicate
Rename all layers starting at the bottom with the white canvas.
Background
Raster 1
Raster 2
Delete the top layer - you don’t need it any more.

Highlight Raster 2
Tap the delete key
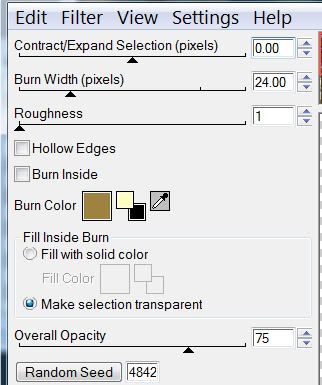
Apply Xenofex 2 - Burnt Edges


You’ll end up with only the center of the page.

Open up Raster 1.
Select None.

With Raster 2 still highlighted
Select All/Float/Defloat
Highlight Raster 1 and use the Eraser Tool to erase the center of the cutout area.
Deselect and carefully erase everything leftover in the center.

Using your Freehand Selection Tool, draw around the cutout. It doesn’t have to be neat.
New Raster layer above your white canvas.
Flood fill with a gradient.
DO NOT DESELECT YET.

Copy and paste your tube above your gradient layer.
I also pasted the camel, too.
Change the Properties to Luminescence.

Close out your white background.
Merge Visible.
Reopen the background.

Make sure your merged layer is highlighted.
Resize 85%
Free rotate right degrees.

Copy and paste your tube as a new layer.

Copy and paste the Camel as a new layer.
Resize 85%.

Add your embellishments. I used:
Elements 13 & 14: Resize 25% & 50%
Element 19: Resize 25% and 50%
Element 28: Resize 40%
Element 37: Resize 25% and 80%
Element 29: Resize 25% and 70%

Highlight your white background.
New Raster Layer.
Copy and paste a paper of choice Into Selection.
Deselect.
Copy and paste Element 34 as a new layer above the paper.
Resize 50%
Merge Down.
Apply the Mask.
In your layer pallet make sure the layer with the mask is highlighted.
Using your Pick Tool and pull all the sides out just a little.
Merge Group.

Add your copyrights.

Add your name.

Resize all layers 85%.

I hope you enjoyed this tutorial.
I’d love to see your results and show it off in my Show Arena.
Email me!
Hugs,
Bev


Friday, August 14, 2009

Dreams and Lullaby's

Clicking on the image will enlarge to full view
and show the animation.

Supplies
2 tubes of choice - I’m using the artwork of PinUpToons which you can purchase here
Font of Choice - I’m using Annabelle here
Becky Mask here
DSB Flux - Bright Noise
Animation Shop
“Dreams Take Flight” is a PTU tagger size scrap kit created by Nikki of Creative Intentionz. You can find it at Paradise4Scrappers. You can visit her blog here.
Thank you Nikki for such a dreamy kit!

This tutorial was written assuming you have a working knowledge of PSP.

~♥~ Let’s get started ~♥~

Open up a transparent 700 X 700 canvas.
Flood Fill white.

Copy and paste Frame 1 as a new layer.
Free rotate left 90 degrees.
Resize 60%
Duplicate
Move each frame into position.
See mine for reference.
Merge Down.

Use your Magic Wand and click inside of each frame.
Selections/Modify/Expand by 4
Selections/Invert
Copy and Paste a paper of choice below the frames.
Tap the delete key.
Deselect.

Copy and paste Curtain 2 as a new layer.
Resize 60%
Place in each window.
See my tag for reference.
Copy and paste your tubes as new layers in each frame.

Copy and Paste Berry Branch 3 as a new layer.
Resize 50%
Place at the corner of one of the frames.
Duplicate and put it at the corner of the other frame.

Copy and paste Butterfly 3 as a new layer.
Resize 35%
Free rotate Right 25 degrees.
Place over the Berry Branch.
Duplicate and place over the other berry branch.

Highlight your white canvas.
New Raster layer.
Copy and paste a paper of choice Into Selection.
Deselect.
Apply the mask.
Duplicate/Merge down.

Copy and paste Cloud 1 as a new layer just above the mask layer.
Lower the opacity to 53.

Copy and paste the Ladder as a new layer above the cloud.
Free rotate right 15 degrees
Lower the opacity to 24

Copy and paste the bed as a new layer just over the ladder.
Lower the opacity to 24
Select All/Float//Defloat
Highlight the ladder in your layers pallet and using your eraser, erase the parts of the ladder that you can see on the bed.
Deselect.

Copy and paste Sheep 1 as a new layer over the bed layer.
Image/Mirror
Resize 60%
Lower the opacity to 24
Select All/Float/Defloat
Highlight the bed layer and using your eraser tool, erase the part of the bed that’s covering the sheep.
Deselect.

Copy and paste the Moon as a new layer.
Image/Mirror
Resize 70%

Copy and paste Frog 2 as a new layer.
Image/Resize
Resize 40%

Open up the cluster of stars.
Using your Selection Tool choose stars to place on your tag wherever you like…resizing as you like.
I’ve added DSB Flux - Bright Noise to mine


Add your copyrights.

Add your name.
Duplicate twice for a total of 3 layers
Name them Name 1, 2, and 3.

Highlight Name 1 and apply the DSB Flux - same settings as before.

Highlight Name 2 and apply the DSB Flux accept his the mix button twice.

Repeat with Name 3 layer accept hit the mix button 3 times.

Close out Name 2 and Name 3 layers.

Resize all layers 85%.

Copy Merge

Time to Animate

Carry into Animation Shop
Edit/Paste/As New Animation

Back into PSP
Close out Name 1 and open up Name 2
Copy Merge

Carry Into AS
Edit/Paste/After Current Frame

Back into PSP
Close out Name 2 and open up Name 3
Copy Merge

Carry into AS
Edit/Paste/After Current Frame

View your animation.
If you’re happy then save.

I hope you enjoyed this tutorial.
I’d love to see your results and show it off in my Show Arena.
Email me!
Hugs,
Bev
Yeagle and Cuddly Friends

Clicking on the image will enlarge to full view.

Supplies
1 tube of choice - I’m using the artwork of Dean Yeagle which you can purchase here
Font of Choice - I’m using Dragonfly here
Weescotlass Mask 167 here
“My Cuddly Friends” is a PTU size scrap kit created by Brooke of Butterfly Blush Designs. It can be downloaded from her store Butterfly Blush Designs. You can visit her blog here.
Thank you Brooke for such a fun kit!

This tutorial was written assuming you have a working knowledge of PSP.

~♥~ Let’s get started ~♥~

Open up a transparent 700 X 700 canvas.
Flood Fill white.

Copy and paste Mat 3 as a new layer.
Select All/Float/Defloat

Copy and paste your tube as a new layer above the mat.
Selections/Modify/Feather
Number of Pixels: 23
Tap the delete key 2 to 3 times
Deselect.

Copy and paste Ribbon 7 as a new layer.
Resize 50%
Lower Opacity to around 50

Copy and paste Button 7 as a new layer.
Resize 50%

Copy and paste Knotted Ribbon 2 as a new layer.
Resize 60%
Add your embellishments. I used:
Butterfly 2: Resize 50% Free rotate right 30 degrees
Dragonfly 1: Resize 90%
Dragonfly 4: Resize 60%
Frog 3: Resize 50%
Flower Stick 3: Resize 40% Free Rotate Left 35 degrees
Buttons: Resize to various sizes
Ribbon 6: Resize 70%
Rose 1
Heart Stick 3: Resize 70%
Highlight your white canvas.
New Raster layer.
Select All.
Copy and paste a paper of choice Into Selection.
Deselect.
Apply the mask.
Merge Group.
Resize 110%
Duplicate/Mirror

Add your copyrights.

Add your name.

Crop your image.

Resize all layers 90%.
I hope you enjoyed this tutorial.
I’d love to see your results and show it off in my Show Arena.
Email me!
Hugs,
Bev


Thursday, August 13, 2009

The Gaze of the Wolf

Clicking on the image will enlarge to full view.

Supplies

1 tube of choice - I’m using the artwork of KatNKDA here. You must have a license to use her work.
Font of Choice - I’m using Aquarelle here
Becky Mask 22 here
Alien Skin - Xenofex 2: Burnt Edges
“Shape Shifter” is a PTU full size scrap kit created by KatNKDA. It can be downloaded from her store NK Art Shop. You can visit Kat’s blog here.
Thank you Kat for a most stunning kit! You definitely have an artistic gift!

This tutorial was written assuming you have a working knowledge of PSP.

VERY IMPORTANT:
This kit includes a wolf tube. You must have a license issued through KatNKDA in order to use it!!

Special Note:
The elements in this kit are also offered as “shadowed“.
If you choose to use the shadowed elements then you’ll have to adjust on your own the figures I give to expanding. Also, do not drop shadow anything unless you want the extra shadowing.

~♥~ Let’s get started ~♥~

Open up a transparent 700 X 700 canvas.
Flood Fill white.

Copy and paste Element 10 as a new layer.
Resize 25%
Free rotate 90 degrees.
Use your Magic Wand and click inside of it.
Selections/Modify/Expand by 4.

Copy and paste Element 20 below the frame.
Resize 30%.
Move into position.
Selections/Invert
Tap the delete button.
DO NOT DESELECT YET.

New Raster layer below the frame.
Selections/Invert
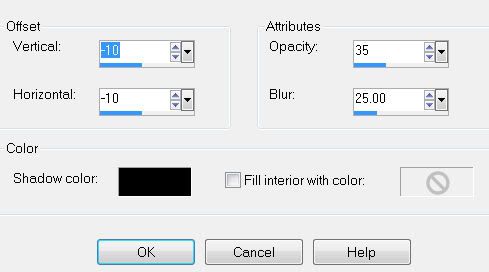
Effect/3D Effects/Cutout

Repeat the above step accept change the Horizontal and Vertical numbers to 10.
Deselect.

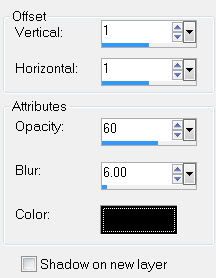
Give your frame a drop shadow.
I used:

Repeat the drop shadow accept change the vertical and horizontal numbers to -1.

Type out the words
“How lonely is the night without the howl of a wolf. `Unknown”
Or whatever you want to type.
Or you don’t have to type anything at all!
Move them into position.
Give them the same drop shadow accept don‘t repeat using the negative 1 numbers.
Close out your white canvas.
Merge Visible.
Rename Merged Frame
Free rotate right 8 degrees.
Reopen your white canvas.

Now close out your merged layer so you can have a plain white canvas to work with.
New Raster layer.
Select All.
Copy and paste Paper 18 Into Selection.
Deselect.
Apply Xenofex 2 - Burnt Edges


Resize 50%.

Type the words
“The gaze of the wolf reaches in our soul. ~Gary Lopez”
Move them into position and give them the same drop shadow.
Close out your white canvas and Merge Visible.
Rename Burnt Image
Free Rotate Left 8 degrees.
Apply the same drop shadow as you did for the frame.

Then you’ll want to apply the same drop shadow again but changing the horizontal and vertical numbers to 1 and changing the color to #ffffc0.

Reopen all your layers.
You should now have 3 layers:
Your white canvas
Merged Frame layer
Merged Burnt layer.

So we can figure out where to move these into position and to add the wolf tube lets go ahead and apply the mask by doing the following:
Highlight your white canvas.
New Raster layer.
Select All
Copy and paste Paper 17 Into Selection.
Deselect.
Apply the Mask.
Merge Group.

Now move your Burnt image and your Frame image into approximate position.
See mine for reference.
Copy and paste Element 37 (the Wolf tube) as a new layer.
Resize 80%
Lower the opacity down to 71.
Now move your layers into their exact positioning where you want them.

Add your elements using the same drop shadow as you‘ve been. (be sure the color is changed back to black). I used:
Element 12: Resize 30%
Element 13: Resize 30%
Element 11: Resize 30%. Free rotate left 15 degrees

Add your copyrights.

Add your name.

Resize all layers 85%.

I hope you enjoyed this tutorial.I’d love to see your results and show it off in my Show Arena.
Email me!
Hugs,
Bev

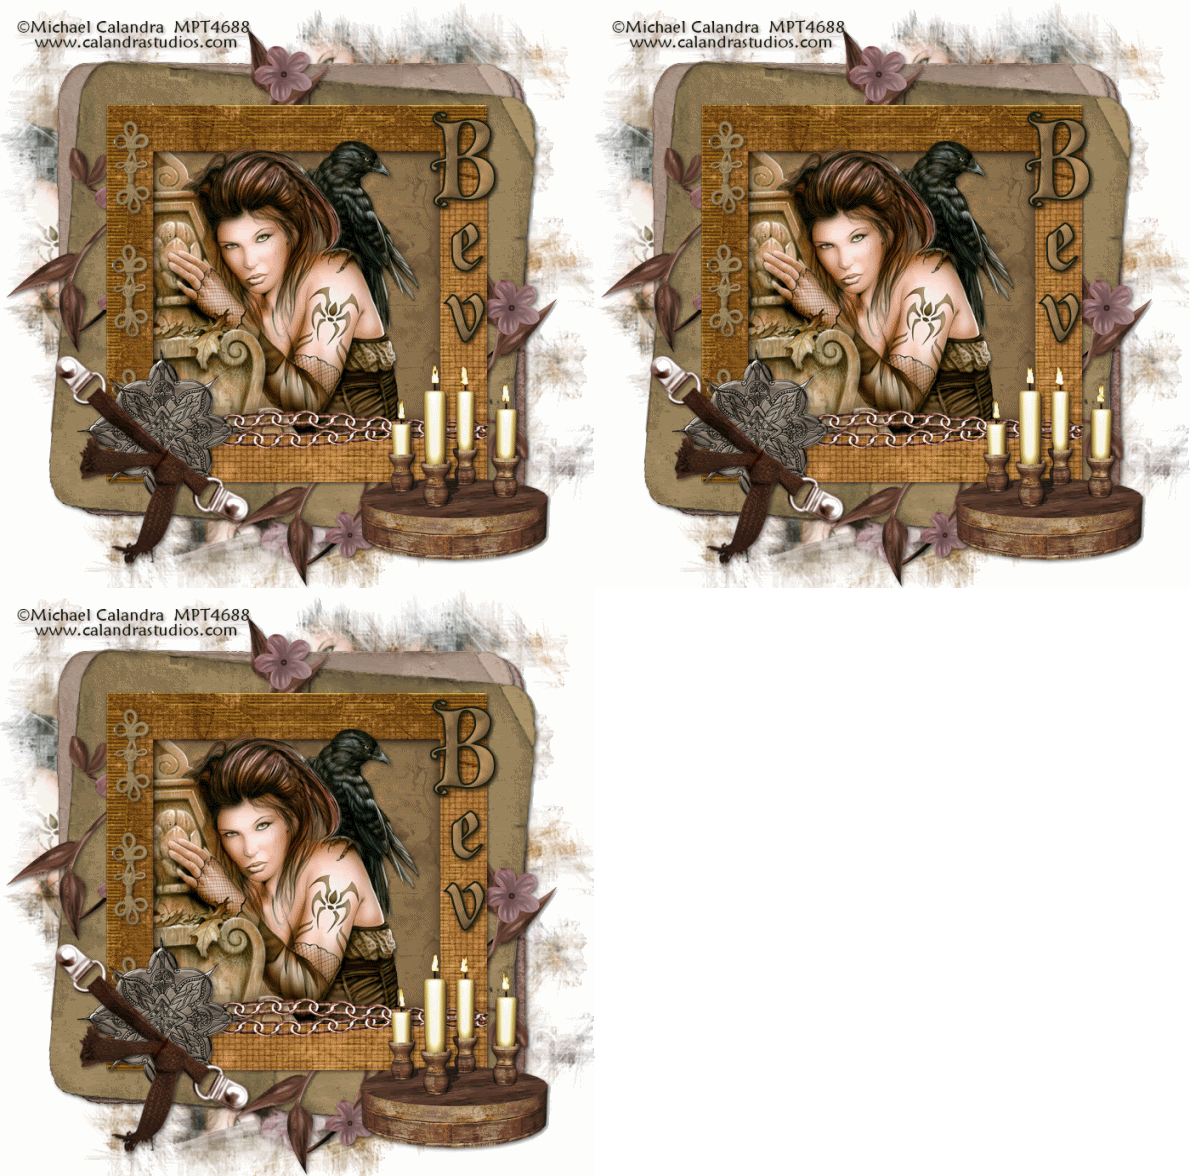
Mystery at Sea

Clicking on the above image will enlarge to full view.
The image below shows the animation.


Supplies
1 tube of choice - I’m using the artwork of Michael Calandra which you can purchase here
Font of Choice - I’m using Malvern here
Weescotlass Mask 297 here
Mura Meister - Copies
Eyecandy 5: Nature - fire
Animation Shop
“Grunge 3” is a FTU tagger size scrap kit created by Distinctively Auri Scraps. It can be downloaded from her blog here. Please be kind and leave a thank you when downloading. It’s a small gesture for hard work given freely.

This tutorial was written assuming you have a working knowledge of PSP.

~♥~ Let’s get started ~♥~

Open up a transparent 700 X 700 canvas.
Flood Fill white.

Copy and paste Frame 3 as a new layer.
Use your Magic Wand and click inside of it.
Selections/Modify/Expand by 6.

Copy and paste a paper of choice below the frame.
Selections/Invert
Hit the delete key.
Deselect.

Copy and paste your tube as a new layer.

Copy and paste a paper of choice just above your white canvas.
Free rotate left 5 degrees.

Copy and paste another paper of choice above that one.

Copy and paste another paper of choice above that one.
Free rotate right degrees.

Add your embellishments. I used:
Clasp 3: Resize 50%
Flower 4
Element 3: Resize 70%
Knot 2: Resize 20% Free rotate 90 degrees
Candle 1 - 60%

Close out your white canvas and the candle.
Merge Visible.
Reopen your white canvas.
Duplicate merged layer.
On the original apply Mura Meister Copies
Select Wallpaper (rotate)
Use the default settings.
OK.

Apply the mask.
Merge Group.
Resize 110%

Add your copyrights.

Add your name.

Resize all layers 85%.

Duplicate the candle two times for a total of 3.
Rename them Candle 1, 2, and 3.

Highlight Candle 1.
Using your Freehand Selection Tool, above each candle draw a flame.
It doesn’t have to be perfect or exact!!
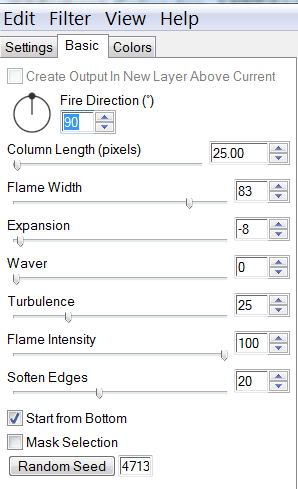
Apply Eyecandy 5: Nature - Fire


Highlight Candle 2 and repeat the Eyecandy plug in accept hit the random seed button once.

Repeat the above step for Candle 3.
Deselect.

Close out Candle layers 2 & 3. Make sure Candle 1 layer is open.
Copy Merge

Time to Animate:
Carry into Animation Shop
Edit/Paste/As New Animation.

Back into PSP.
Close out Candle 1 and open up Candle 2.
Copy Merge

Carry into AS
Edit/Paste/After current Frame.

Back into PSP.
Close out Candle 2 and open up Candle 3.
Copy Merge

Carry into AS
Edit/Paste/After current Frame.

Animation/Frame Properties
Change the display time to 20.

View your animation.
If you like it then save.

I hope you enjoyed this tutorial.
I’d love to see your results and show it off in my Show Arena.
Email me!
Hugs,
Bev


Tuesday, August 11, 2009

Timeless


Clicking on the image will enlarge to full view.

Supplies
1 tube of choice - I’m using the artwork of Armando Huerta which you can purchase here
Font of Choice - I’m using ConiScriptSSK here
Xenofex 1.0 - Shower Door
Or you can use a Mask of your choice
“Timeless” is a FTU tagger size scrap kit KatNKDA Scraps and can be downloaded here.
Thank you Kat for a beautiful kit!

This tutorial was written assuming you have a working knowledge of PSP.

~♥~ Let’s get started ~♥~

Open up a 700 X 700 transparent canvas.
Flood fill white.

Copy and paste Element 15 as a new layer.
Click inside of it with your Magic Wand.
Selections/Modify/Expand by 40.
New Raster layer below this element.
Flood fill with a gradient of your choice.
Copy and paste your tube as a new layer above your gradient.
Selections/Invert
Tap the delete key.
Deselect.

Close out your white background.
Merge Visible.
Reopen the background layer.

Highlight the merged layer.
Free rotate left 10 degrees.

Copy and paste Element 8 behind the merged layer.

Copy and paste Element 6 as a new layer.
Resize 40%
Duplicate/Resize 80%
Move them into position.

Copy and paste Element 8 again.
Resize 40% and move into position to decorate the roses.

Close out your white background.
Merge visible.
Reopen your white background.

Duplicate your merged layer.
On the Original layer apply Xenofex 1.0 - Shower Door
Using the default settings.
Copy and paste Element 16 above the Shower Door layer.
Duplicate/Mirror/Flip.

Add your name.
Duplicate.
On the original layer apply Xenofex 1.0 - Shower Door.
Use the same default settings.

You can decorate your name with elements if you like.

Add your copyrights.

Resize all layers 85%.

I hope you enjoyed this tutorial.
I’d love to see your results and show it off in my Show Arena.
Email me!
Hugs,
Bev

Monday, August 10, 2009

Capturing Nature's Beauty


Clicking on the image will enlarge to full view.

Supplies
1 tube of choice - I’m using the artwork of PinUpToons which you can purchase here
1 misted autumn image
1 autumn image
You can acquire the images by going onto the stock xchange site here. There are endless photo's to choose from!
Font of Choice - Papyrus here
Becky Mask 22 here
“Autumn Romance” is a PTU tagger size scrap kit created by Alyssa‘s Scraps & Such and is part of the store collaboration. It can be purchased at Twilight Scraps. At the end of the month the kit goes on sale in all Alyssa's stores.
Thank you Alyssa for a kit that truly made me wish I lived back up north!

This tutorial was written assuming you have a working knowledge of PSP.

~♥~ Let’s get started ~♥~

Open up a 700 X 700 transparent image.
Flood fill white.
Copy and paste Frame 1 as a new image.
Resize 80%
Use your Magic Wand and click inside of it.
Selections/Modify/Expand by 3
Copy and paste a paper of choice below the frame.
Selections/Invert
Tap the delete key.
DO NOT DESELECT.

Copy and paste you misted image as a new layer above your paper layer.
Tap the delete key.
Deselect.

Copy and paste your tube.
If you’re using the same tube as I did….
Use your Freehand Selection Tool and outline the Easel board and around her paint brush and around the color pallet she’s holding onto.
New Raster Layer.
Copy your autumn image Into Selection.
DO NOT DESELECT.
Duplicate.
Close out the original.
Highlight the copy.
Selections/Modify/Feather
Number of Pixels: 10
Selections/Invert
Tap the delete key until you have the feathered effect you want.
Deselect.

Highlight the original and open the layer up.
Use your eraser tool and erase along the outer edges of the easel board.

Add your embellishments.
Bow 7: Resize 25% Free rotate Left 25%
Butterfly 5: Resize 25%
Doodle
Ribbon 1: Resize 25% and 80%
I used all the leaves, resizing and rotating differently and placing them about.

Highlight your white canvas.
New Raster Layer.
Select All.
Copy and paste a paper of choice Into Selection.
Deselect.
Apply the Mask.
Merge Group.

Add your copyrights.

Add your name.

Resize all layers 85%.

I hope you enjoyed this tutorial.I’d love to see your results and show it off in my Show Arena.
Email me!
Hugs,
Bev

The Gift

Clicking on the image will enlarge to full view.

Supplies
1 tube of choice - I’m using the artwork of Jennifer Janesko which you can purchase here
Font of Choice - I’m using Annabelle here
Becky Mask 22 here
Divine Intentionz, Missy Template 89 here
“A Touch of Pink” is a PTU tagger size scrap kit Tootypup Scraps. It can be purchased at Dazzling Scraps.
Thank you Tootypup for such a beautiful kit!!
This tutorial was written assuming you have a working knowledge of PSP.

~♥~ Let’s get started ~♥~
Open up the template.
Shift + D.
Close out the original.
Delete the watermark layer.
Resize all layers 120%
Highlight the background layer.
Image/Canvas Size
700 X 700
Flood Fill white.

Highlight the Small Circle layer.
Select All/Float/Defloat
New Raster Layer.
Copy and paste Into Selection a paper of choice.
Deselect.
Delete the template layer.
Highlight the Large Circle layer and repeat the above step.

Copy and paste Circle Frame 1 as a new layer.
Resize 55% and 90%.
Move into position over the large circle layer.
Duplicate.
Resize 80% and move into position over the small circle layer.

Highlight the Rectangle layer.
Select All/Float/Defloat
Flood fill with a gradient of choice.
DO NOT DESELECT.
Copy and paste Leaves 4 as a new layer.
Resize 50%
Duplicate and move down to the lower part of the rectangle.
Selections/Invert
Tap the delete key on each leaf layer.
Deselect.
Merge visible both leave layers.
Change the Properties to Soft Light.

Copy and paste your tube above the leave layers.

Highlight Thin Rectangle 1 as a new layer.
Select All/Float/Defloat
Copy and paste a paper of choice as a new layer.
Selections/Invert
Tap the delete key.
Deselect
Delete the template layer.

Repeat the above step for Thin Rectangle 2 layer.

Copy and paste Beads 1 as a new layer.
Image/Free rotate 90 degrees.
Resize 60%.
Position over the Thin Rectangle.
Duplicate/Free rotate 90 degrees.
Position over the other thin rectangle.

Copy and paste Heart 5 as a new layer.
Resize 40%
Free rotate left 10 degrees.
Position over the heart template.
Delete the template layer.

Copy and paste Heart 7 as a new layer.
Resize 35%.
Free rotate right 10 degrees.

Add your embellishments. I used:
Butterflies - Resizing 25% and smaller.
Position them about your tag.

Crop your image but be sure to leave a small bit of room around your tag.
Highlight your white canvas.
New Raster Layer.
Select All.
Copy and paste a paper of choice Into Selection.
Deselect.
Apply the Mask.
Merge Group.

Add your copyrights.

Add your name.

I hope you enjoyed this tutorial.
I’d love to see your results and show it off in my Show Arena.
Email me!
Hugs,
Bev


Sunday, August 9, 2009

Tender Moments

Clicking on the image will enlarge to full view.

Supplies
3 tubes of choice - I’m using the artwork of Zindy S. D. Nielsen which you can purchase here
Font of Choice - I’m using Aquarelle here
Becky Mask 22 here
Dezigns by Ali Template 113 here
“Tendre Moment” is a PTU tagger size scrap kit created by Annie‘s Designs. It can be purchased at Paradise4Scrappers.
Thank you Annie for such an amazing kit!
This tutorial was written assuming you have a working knowledge of PSP.

~♥~ Let’s get started ~♥~

Open up the template.
Shift + D.
Close out the original
Delete the following layers:
Raster 5
Raster 4
Copy of Shape 2
Shape 2
 
Image/Canvas Size
700 x 700
New Raster Layer
Flood Fill white and send to bottom.
 
Highlight Shape 1.
Select All/Float/Defloat
Either Flood Fill with a gradient.
Copy and paste a tube above this layer.
Selections/Invert
Tap the delete key.

Repeat the above step with Shape 1 Copy 2 and Shape 1 Copy.

Close out all layers accept for Raster 1, 2, and 3.
Merge Visible.
Select All/Float/Defloat
New Raster layer.
Copy and paste a paper of choice Into Selection.
Deselect.
Delete the merged template layer.
Reopen all your layers.

Add your embellishments. I used:
Candle 2: Resize 40%
Candle: Resize 30%
Flower 4: Resize
Flower 4: Resize 40%
Bottle: Resize 40%
Papillion: Resize 20%
Flower 8: Resize 40%. Erase flower bud that protrudes way out
Feather
Feather 2
Flower 2: Resize 40% Free rotate 90 degrees
Floral Infusion Bottle: Resize 70%

Crop you image but leave a little play room around your tag.
Highlight your white canvas.
Select All.
Copy and paste a paper of choice Into Selection.
Deselect.
Copy and paste the fence as a new layer. Move it to your very top layer so that you can see what you’re doing….
Position it all the way to the left of your canvas.
Mirror.
Overlapping in the center is alright. Your tag will hide that part.
Merge Down.
Move this layer in your layer pallet so that it’s just above your paper layer.
Merge Visible the merged fence layer and your paper layer.
Apply your mask.
Merge Group.
Use your Pick Tool to bring the sides out slightly.

Type the words “Tender Moments” or whatever you choose and position it in the upper left corner.

Add your copyrights.

Add your name.

Resize all layers 85%.

I hope you enjoyed this tutorial.
I’d love to see your results and show it off in my Show Arena.
Email me!
Hugs,
Bev