Clicking on the image will enlarge to full view.
Supplies
1 tube of choice - I’m using the artwork of Ismael Rac which you can purchase
hereFont of Choice - I’m using Due Date
hereTemplate made by Charlii
hereThank you so much, Charlii!!
If you’re in the market for a terrific signature tag group, check out her group, Time4Tags
hereBecky Mask 9
hereDSB Flux - Bright Nloise (Optional)
Animation Shop (Optional)
“Don‘t Forget” is a FTU tagger size scrap kit by RebelChick’s Scraps and can be found
here. Please leave a thank you when downloading. It’s a small gesture for hard work given freely.
This tutorial was written assuming you have working knowledge of PSP.
~♥~ Let’s get started ~♥~
Open up the template. Shift + D.
Close out the original.
Delete the credit layer.
Image/Canvas Size
600 X 600
Flood fill the working canvas white.
Move layers Bottom D and Top D together to form a circle.
Merge Visible.
Move aside for now.
Merge Visible Bottom Oval, Middle Oval, and Top Oval
.
Move Raster 2 to the left side of our canvas.
Move the Barb Line layer to the left of the canvas.
Duplicate/Mirror.
Position to the right side of the canvas.
Merge Visible the 2 Barb Line layers.
Select All/Float/Defloat
New Raster layer.
Flood fill with a color of your choice.
(or you can multi color it with red, white, and blue)
Deselect.
Delete Template layer.
Duplicate twice for a total of 3 layers.
Rename Glitter 1, 2, and 3
Highlight Glitter 1
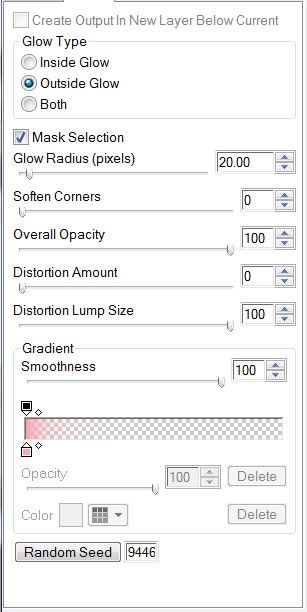
Apply DSB Flux
Intensity 48, Mix checked
OK
Repeat the above step with Glitter layers 2 and 3 accept on Glitter 2 hit the mix button twice, and on Glitter three hit the mix button 3 times.
Close out Glitter 2 and 3.
Highlight Raster 2.
Select All/Float/Defloat
Copy and paste a paper of choice as a new layer.
Selections/Invert
Hit the delete key.
Deselect.
Delete the template layer.
Use your Magic Wand and click inside the rectangle.
Selections/Modify/Expand by 4.
Copy and paste a paper of choice as a new layer.
Selections/Invert
Hit the delete key.
Deselect.
Highlight the merged oval circle layer.
Select All/Float/Defloat
New Rater Layer.
Flood Fill white.
Deselect.
Delete the template layer.
Copy and paste your tube to the right of the rectangle.
Move it into exact position of where you want it.
Duplicate/Mirror and move into position over the oval circles.
Highlight the oval circles layer.
Select All/Float/Defloat
Selections/Invert
Highlight the copy of the tube layer and hit the delete key.
Lower the opacity to around 63.
Give a drop shadow to the oval circles.
Highlight the little circles you merged-visible at the beginning of this tutorial.
To each of these layers do the following:
Select All/Float/Defloat
Copy and paste a paper of choice.
Selections/Invert
Hit the delete key.
Delete the template layer.
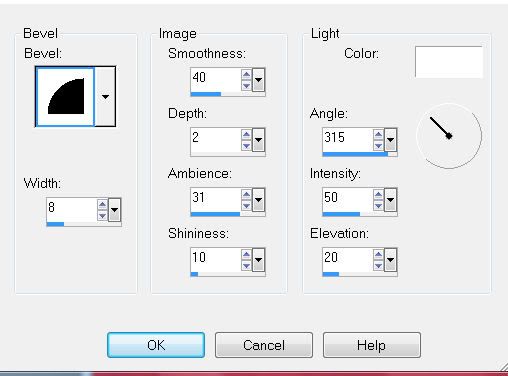
Give it a slight inner bevel:
Add your embellishments. I used:
Star 2 & 3: Resize 30%
Star 1: Resize 35%
Highlight your white canvas.
New Raster Layer.
Select All
Copy and Paste a paper of choice Into Animation.
Apply the mask.
Merge Group.
Add your copyrights.
Add your name.
Crop your tag.
If you don’t want to animate then save.
If you are animating….lets move on :)
Copy Merge and carry into Animation Shop.
Edit/Paste/As New Animation
Back into PSP.
Close out Glitter 1 and open up Glitter 2
Copy Merge and carry into Animation Shop.
Edit/Paste/After Current Frame.
Back into PSP.
Close out Glitter 2 and open up Glitter 3.
Copy Merge and carry into Animation Shop.
Edit/Paste/After Current Frame.
View your animation. If you’re happy with it then save.
I hope you enjoyed this tutorial.
I’d love to see your results.
Email me!
Hugs,
Bev

 Clicking on the image will enlarge to full view.