Supplies
1 tube of choice – I used the beautiful artwork of Karen Middleton which
can be purchased from CDO. You must have
a license to use.
Font of choice - I used Aquarelle here
Weescotlass Mask 362 here
Tracy F. Deisgnz Easter Template #9 here
“My Sweet Mother” is a full size scrap kit created by Norma of Swheat
Creations can be purchased from Scrappin Naturally. You can visit her blog here.
This tutorial was written assuming you have a working knowledge of PSP.
~♥~ Let’s get started ~♥~
Open up the template.
Shift + D.
Close out the original.
Image/Canvas Size
700 x 600
OK
New Raster layer.
Send to bottom.
Flood fill white.
Delete the top 5 layers and Egg layer.
Open up Glitter 5.
In your Color Pallet:
Foreground: Pattern/Look for Glitter 5.
Angle: 0
Scale: 10
Make your working canvas active.
Highlight Glitter Oval layer.
Click anywhere outside of it with your Magic Wand.
Selections/Invert
New Raster layer.
Flood fill with the glitter pattern.
Deselect.
Delete the template layer.
Highlight Glitter Circle layer.
Repeat the above step.
Highlight Oval layer.
Click anywhere outside of it with your magic Wand.
Selections/Invert
New Raster layer.
Copy and paste Bkg 8 Into Selection.
Deselect.
Delete the template layer.
Highlight Circle layer.
Click anywhere outside of it with your Magic Wand.
Selections/Invert
New Raster layer.
Copy and paste Bkg 6 Into Selection.
Deselect.
Delete the template layer.
Copy and paste your tube as a new layer.
Position it in front of the circle paper.
Paste your tube again.
Move into position over the Oval layer.
Highlight the Oval paper layer.
Click anywhere outside of it with your Magic Wand.
Highlight the tube layer.
Tap the delete key.
Deselect.
Change the Properties of the tube to Luminance Legacy and lower the
Opacity to about 16.
Add the elements. I used:
Button 2: Resize 10% and
30%/Duplicate 3x’s
Daisy 2: Resize 15%
Daisy 1: Resize 10%
Daisy 4: Resize 10%/Duplicate/Resize
70%/Duplicate
Dots 4: Resize 25%/Duplicate
Heart 4: Resize 15%/Free rotate
Left 15 degrees
Heart 1: Resize 15%/Free rotate
Right 15 degrees
Leaf 3: Resize 25% and
80%/Flip/Mirror/Duplicate/Mirror/Duplicate
Lil bow 4: Resize 20%
Scallop 3: Resize 20%/Free
rotate Left 50 degrees/Duplicate/Mirror/Free rotate Right 90 degrees
Crop your image so it’s a bit more centered.
Highlight your white background.
Select All.
New Raster layer.
Copy and paste Bkg 21 Into Selection.
Deselect.
Adjust/Blur/Gaussian Blur:
Radius: 4
OK
Apply the mask.
Resize 110%
Merge Group.
Add your credits.
Add your name.
Foreground: Null
Background: #404040
Type your name.
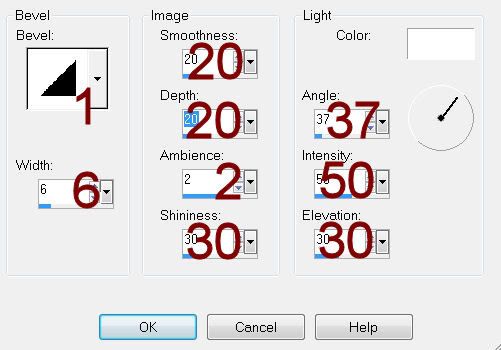
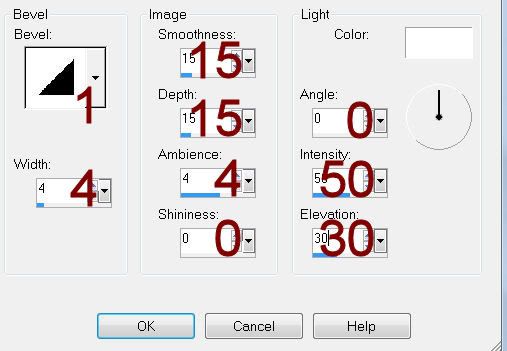
Give it a slight Inner Bevel:
Resize all layers 80%