Supplies
1 tube of choice – I used the awesome artwork of Ismael Rac which can
be purchased from his store here. You must have a license to use.
Font of choice - I used Nina Script here
Dee’s mask 18 here
Divine Intentionz template 447 here
Plug Ins Used:
Brush Strokes – Sprayed Strokes
Eyecandy 3.1 - Glow
“Cowgirl Gone Crazy” is tagger size scrap kit created by Barbie of A
CowGirl’s Creation and can be purchased from her store ScrappinNaturally. You can visit her blog here.
Thank you Barbie for a fantastic kit.
This tutorial was written assuming you have a working knowledge of PSP.
~♥~ Let’s get started ~♥~
Open up the template.
Shift + D.
Close out the original.
Resize all layers 85%
Image/Canvas Size:
700 x 500
OK
Open up the background layer.
Flood fill white.
Delete the top 7 layers, Thin Rectangle 1, Thin Rectangle 2 layers.
Highlight Circle 1 layer.
Click on it with your Magic Wand.
New Raster layer.
Copy and paste Wagon Wheel Into Selection.
Deselect
Delete the template layer.
Highlight Circle 2 layer.
Repeat the above step.
Open up Mini Frame.
Use your Selection Tool set on Rectangle and section off the area at
the bottom of the frame.
Set the Foreground in your color pallet to Pattern.
Highlight Frame layer.
Click on it with your Magic Wand.
New Raster layer.
Flood fill with the pattern.
Deselect.
Delete the template layer.
Adjust/Add Remove Noise/Add Noise:
Gaussian and Monochrome checked
Noise: 91%
OK
Highlight Copy of Frame layer.
Repeat the above step.
Highlight Rounded Edge Rectangle layer.
Click on it with your Magic Wand.
New Raster layer.
Copy and paste Paper 3 Into Selection.
Deselect.
Delete the template layer.
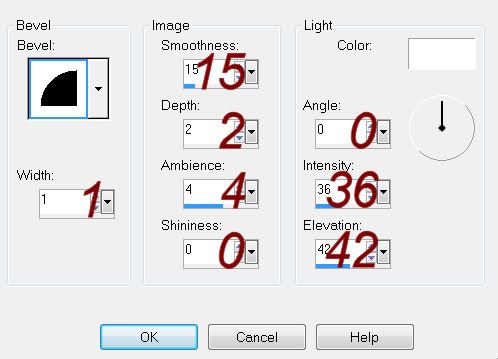
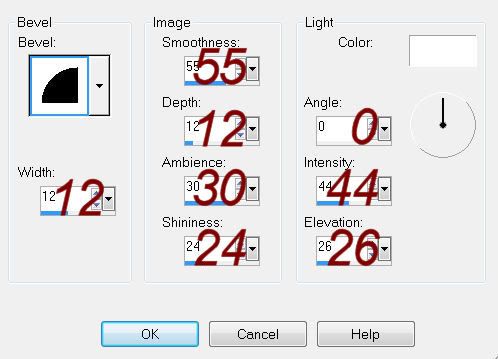
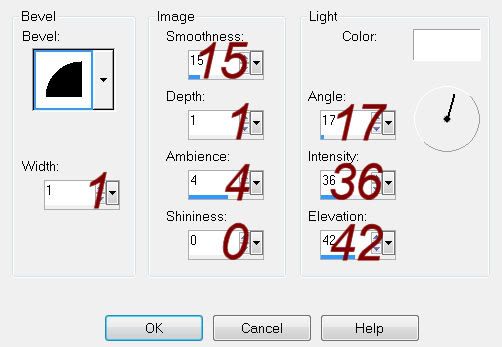
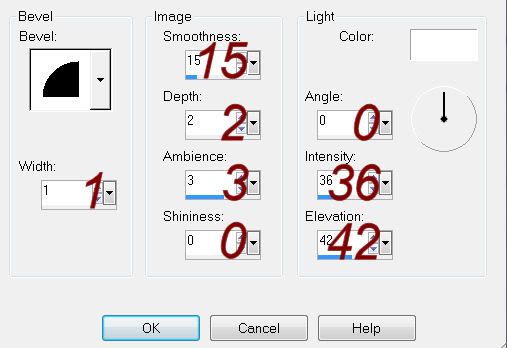
Give it a slight Inner Bevel:
Copy and paste Mini Frame as a new layer.
Resize 60%
Use your Freehand Selection Tool set on Rectangle and create one bit
rectangle around both openings.
New Raster layer below the frame.
Copy and paste Paper 3 Into Selection.
Deselect.
Merge Visible the frame and paper.
In your layers pallet move the merged layer Rounded Edge Rectangle 2
template layer.
Delete the template layer.
Highlight Rectangle 1 layer.
Click on it with your Magic Wand.
New Raster layer.
Copy and paste Paper 2 Into Selection.
Apply Brush Strokes – Sprayed Strokes:
Use Default settings.
Copy and paste Rodeo as a new layer.
Resize 60%
Position over the paper layer.
Selections/Invert
Tap the delete key.
Deselect.
Change the Properties to Soft Light.
Delete the template layer.
Give the paper layer the same slight Inner Bevel.
Highlight Rectangle 2 layer.
Repeat the above step.
Highlight Thin Rectangle 3 layer.
Click on it with our Magic Wand.
New Raster layer.
Copy and paste Paper 1 Into Selection.
Deselect.
Delete the template layer.
Give it the same slight Inner Bevel.
Highlight Small Thin Rectangle layer.
Click on it with your Magic Wand.
New Raster layer.
Copy and paste 3 Into Selection.
Deselect.
Delete the template layer.
Give it the same slight Inner Bevel.
Highlight Copy of Small Thin Rectangle layer.
Repeat the above step.
Copy and paste Oval frame as a new layer.
Resize 65%
Click inside of it with your Magic Wand.
New Raster layer below the frame.
Copy and paste Paper 3 Into Selection.
Copy and paste your tube as a new layer below the frame.
Selections/Invert
Tap the delete key.
Deselect.
Change the Properties to Luminance Legacy.
Lower the Opacity to about 34.
Copy and paste your tube as a new layer.
Add your elements. I used:
Ribbon 2: Resize
50%/Duplicate/Mirror
Cactus: Resize 70%
Fence: Resize 70%/Duplicate
Ferns: Resize
40%/Duplicate/Mirror
Colt: Resize 35%
Highlight your white canvas.
New Raster layer.
Select All.
Copy and paste the preview Into Selection.
Deselect.
Adjust/Blur/Gaussian Blur:
Radius: 20
OK
Apply the mask.
Use your Pick Tool to pull the sides out a little.
Merge Group.
Duplicate
Add your credits.
Add your name.
Rasterize the layer.
Apply Eyecandy 3.1 – Glow:
Width: 3
Opacity: 100%
Opacity Drop off: Fat
Color: #d6c08f
Resize all layers 80%