Supplies
Font of choice - I used Aquarelle here
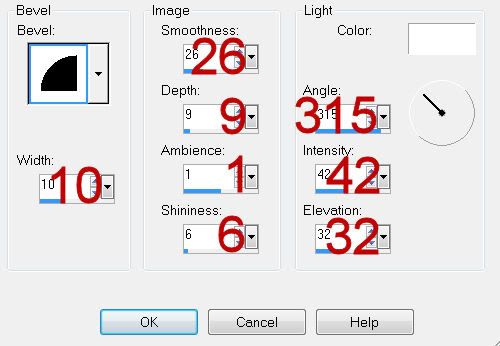
Dee’s Mask 26 here
Plug Ins:
Eyecandy 3.1 - Glow
“Home for the Holidays” is a tagger size scrap kit created by Shell of Shell’s Scraps and is part of a collaboration that can be purchased from Exquisite Scraps. You can visit her blog here.
Thank you Natalie for your adorable portion.
This tutorial was written assuming you have a working knowledge of PSP.
~♥~ Let’s get started ~♥~
Open up a 700 x 700 blank canvas.
Flood fill white.
New Raster layer.
Make your Selection Tool active set on Rectangle.
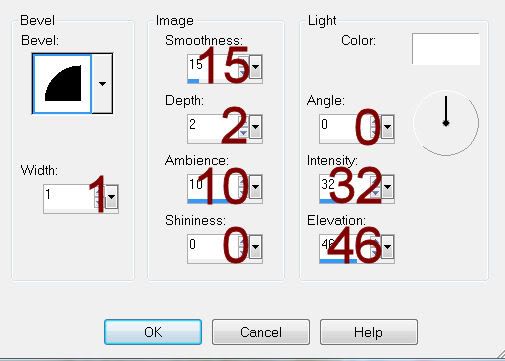
Create a rectangle approximately 325 x 400 pixels.
Flood fill with #5f040b
Adjust/Add Remove Noise/Add Noise:
Uniform & Monochrome checked
Noise: 25%
OK
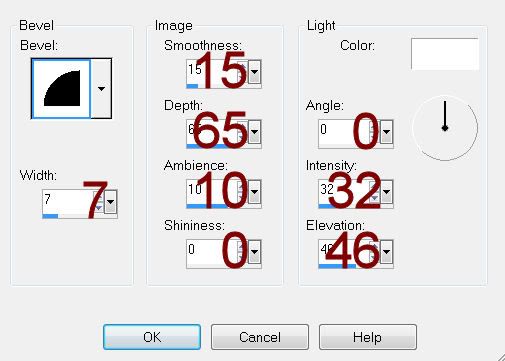
Selections/Modify/Contract by 4.
New Raster layer.
Flood fill with a gradient:
Foreground: #39bb5a
Background: #faeed4
Style: Linear
Angle: 66
Repeats: 2
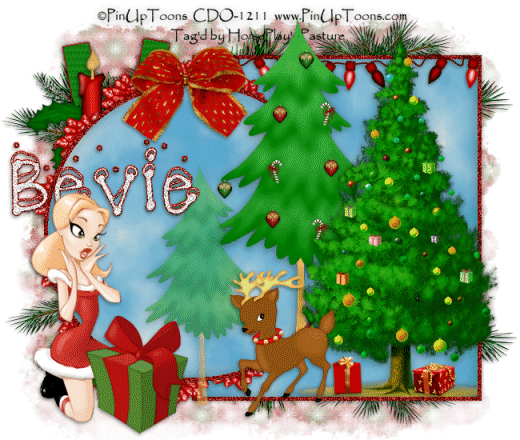
Copy and paste Tree 1 as a new layer - move into position - see my tag for reference.
Selections/Invert
Tap the delete key.
Deselect.
Highlight the glitter rectangle layer.
Duplicate
Move this layer up toward the top left corner just a little.
Make your Target Tool active and change the color to #404a1a.
Add your elements. I used:
Poser of choice: Resize 80%
Bauble 6: Resize 30%
Bauble 1; Resize 25%
Bow 2: Resize 25% and 70%/Duplicate twice
Candle 1: Resize 60%
Bauble 4: Resize 35%
Garland 1: To Feather the edges -
Make your Selection Tool active set on Circle.
Draw out a large Circle so that it’s where you’d like to see the edges of the curtain feathered.
Selections/Modify/Inside Outside Feather
Both checked
Feather amount: 48
OK
Selections/Invert
Be sure the curtain layer is highlight in your layers pallet and tap the delete key until you have the feathered look you want.
Highlight your white canvas.
New Raster layer.
Select All.
Copy and paste Paper 1 Into Selection.
Deselect.
Adjust/Blur/Gaussian blur:
Radius: 10.00
OK
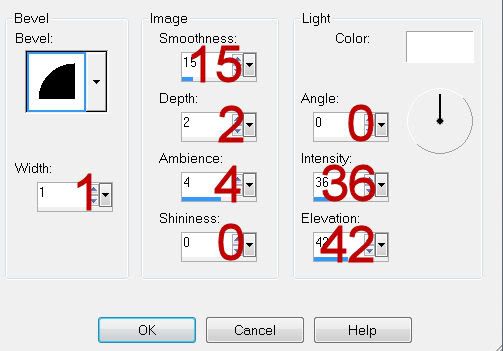
Apply the mask.
Merge Group.
Add your copyrights.
Add your name.
Apply Eyecandy 3.1 - Glow:
Width: 3
Opacity: 100%
Opacity Drop off: Fat
Color: White
Resize all layers 80%.
I’d love to see your results.
Email me!
Hugs,
Bev