Thursday, December 23, 2010

Stargazing


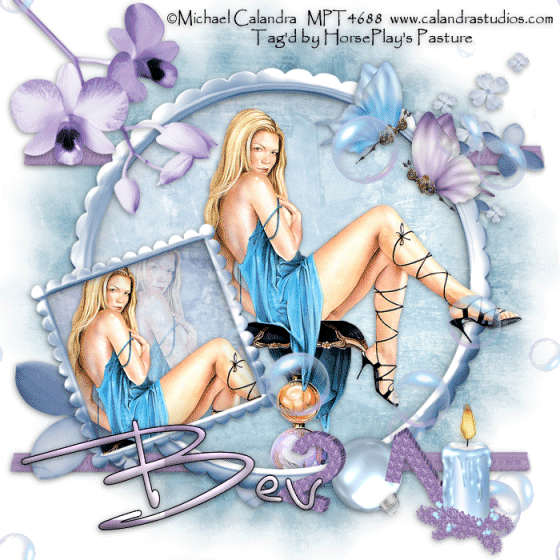
Clicking on the image will allow you to enlarge for bigger view.

Supplies

1 tube of choice - I used the artwork of Zindy S.D. Nielsen here
Font of Choice - I used Narnia here
Vaybs Mask 2 here
DSB Flux - Bright Noise
Greg’s Factory Output Vol. II - Pool Shadow
“Stargazing” is a FTU Sampler scrap kit created by Jo of A Taggers Scrap and is part of the amazing Stargazing Collaboration that can be purchased at Stargazer Scraps. You can visit A Taggers Scrap blog here to download the sampler. Be sure to check out the full scrap kit….it’s stunning! And always, please leave a thank you when downloading as it’s a small gesture for hard work given freely.
Thank you Jo!

This tutorial was written assuming you have a working knowledge of PSP.

~♥~ Let’s get started ~♥~

Open up a 700 x 700 blank canvas.
Flood fill white.

Copy and paste Frame 3 as a new layer.
Resize 70%
Click inside of it with your Magic Wand.
Selections/Modify/Expand by 6.
Copy and paste Paper 20 Into Selection.
Copy and paste your tube as a new layer below the frame.
Selections/Invert
Tap the delete key.
Deselect.

Add your embellishments. I used:
Wings
Frame 2: Resize 50%
Leaf Deco 2: Resize 70%
Star: Resize 65%/Free rotate Right 10 degrees
Star again: Resize 40%/Free rotate Left 10 degrees
Star again: Resize 25%/Duplicate/Resize 70%
Fairy Lights: Resize 70%
Butterflies
Fairy Dust: Mirror
Bird: Resize 50%

Highlight your white background.
Select All.
New Raster layer.
Copy and paste 21 Into Selection.
Deselect.
Apply the mask.
Merge Group.

Add your credits.

Add your name.
Foreground: Black
Background: Pattern/Paper 21
Stroke: 1.5

Type your name.
Convert to Raster layer.
Select All/Float/Defloat
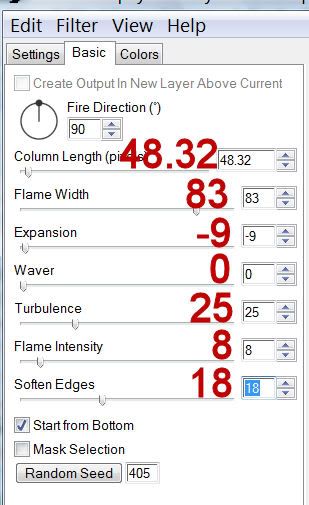
Apply Greg's Factory Output Vol. II - Pool Shadow:
Use Default Settings
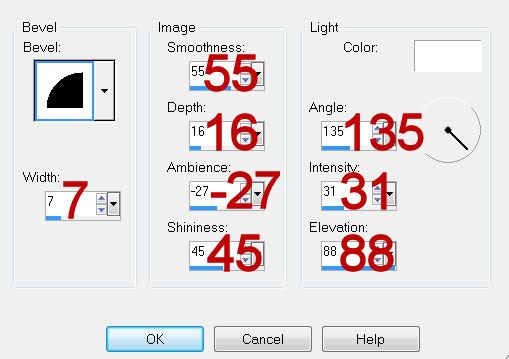
Give it a slight Inner Bevel:


Apply DSB Flux - Bright Noise:
Intensity: 34
Mix checked
OK
Deselect.

Resize all layers 80%.

I hope you enjoyed this tutorial.
I’d love to see your results and show it off in my gallery.
Email me!
Hugs,
Bev

Steam Dreams


Supplies

1 tube of choice - I used the artwork of Jennifer Janesko at CILM - this particular tube is a bonus tube.
Font of Choice - I used Starstruck here
Gem Mask 161 here
“Steam Dreams” is a PTU scrap kit created by Dianna of Digicats (& Dogs) and is part of the amazing Stargazing Collaboration that is offered at Stargazer Scraps. You can visit her blog here.
Thank you Dianna for a kit that more than wow‘d me!

This tutorial was written assuming you have a working knowledge of PSP.

~♥~ Let’s get started ~♥~

Open up a 700 x 700 blank canvas.
Flood fill white.

Copy and paste Frame 3 as a new layer.
Resize 65%
Click inside of it with your Magic Wand.
Selections/Modify/Expand by 6.
Copy and paste Paper 1 as a new layer.
Resize 60%
Selections/Invert
Tap the delete key.
Deselect.

Copy and paste your tube as a new layer beside the frame.
Move it into the exact position you want it.
Duplicate/Mirror/Move below the frame in your layer’s pallet and use your arrow key to move it into position below the frame.
Highlight the paper layer.
Click anywhere outside of it with your Magic Wand.
Highlight the tube just above the paper.
Tap the delete key.
Deselect.

Add your embellishments. I used:
Street Lamp 1: Resize 75%
Frozen Leaf: Resize 60%/Place behind frame
Frozen leaf again: Resize 50%/Mirror/Place behind frame
Sandglass: Resize 50%
Ribbon 2: Resize 70%/Mirror

Highlight your white background.
Select All.
New Raster layer.
Copy and paste 17 Into Selection.
Deselect.
Apply the mask.
Merge Group.

Copy and paste Fairy Moon as a new layer.
Resize 50%
Move into exact position.
Apply the Mask.
Merge Group.
Duplicate/Change the Properties to Multiply

Add your credits.

Add your name.
I decorated mine with a fly resized 25% and 80%.

Copy and paste Lights as a new layer.
Resize 50%
Position them over the mask layer and duplicate as many times as you like.

Resize all layers 80%.

I hope you enjoyed this tutorial.
I’d love to see your results and show it off in my gallery.
Email me!
Hugs,
Bev

Wednesday, December 22, 2010

Merry Christmas!


I would like to take this time to thank all of you who have happened to stumble along my blog. It means a lot to know you return time and again, and I look forward to another year of writing tutorials for you.

I wish you and yours a very Merry Christmas and will see you again before we all ring in the new year!

Hugs,
Bev

Resolution


Supplies

1 tube of choice - I used the artwork of Michael Calandra at MPT
Font of Choice - I used Luna Bar here
Weescotlass Mask 138 here
Mura’s Meister - Copies
Eyecandy 5: Nature - Fire
Animation Shop
“Resolution” is a PTU scrap kit created by Jay of Bello Scarto and can be purchased at her store Heartbeatz Creationz. You can visit her blog here.
Thank you Jay for such an elegant as well as beautiful scrap kit. I can’t think of a more beautiful way to express a New Year’s Resolution!

This tutorial was written assuming you have a working knowledge of PSP.

~♥~ Let’s get started ~♥~

Open up a 700 x 700 blank canvas.
Flood fill white.

Copy and paste 35 as a new layer.
Resize 85%
Click inside of it with your Magic Wand.
Selections/Modify/Expand by 6.
New Raster layer below the frame.
Copy and paste Paper 7 Into Selection.
Copy and paste your tube as a new layer above the paper.
Selections/Invert
Tap the delete key.
Deselect.

Copy and paste 36 as a new layer.
Resize 45%
Free rotate Left 20 degrees.
Move into position - see my tag for reference.
Click inside the frame with your Magic Wand.
Selections/Modify/Expand by 6.
New Raster layer below the frame.
Copy and paste Paper 6 Into Selection.
Copy and paste your tube as a new layer below the frame.
Selections/Invert
Tap the delete key.
Past your tube again but keep it a little bigger. In your layer’s pallet move below the other tube and move to the right a little.
Tap the delete key.
Change the Properties to Soft Light.
Duplicate/Change the Properties to Multiply and lower the Opacity to about 14.
Deselect.

Add your embellishments. I used:
19: Resize 70%/Duplciate
39: Resize 50%/Mirror
46
1: Resize 25%
2: Resize 25%
45: Resize 25% and 70%/Apply Mura’s Meister - Wallpaper(Prospective) - Default settings
4: Resize 45%

Duplicate the candle layer 2 times for a total of 3 layers.
Rename them Candle 1, 2, and 3..

Highlight Candle 1 layer.
Use your Freehand Selection Tool and outline the flame of the candle.
Apply Eyecandy 5: Nature - Fire:

Settings Tab:
Small, Candle

Basic Tab:

DO NOT DESELECT.

Highlight Candle 2 layer.
Apply the same fire effect accept hit the Random Seed button once.

Highlight Candle 3 layer.
Repeat the above step.
Deselect.

Close out Candle 2 & 3.
Only keep Candle 1 open.

Highlight your white background.
Select All.
New Raster layer.
Copy and paste 8 Into Selection.
Deselect.
Apply the mask.
Resize 120%
Merge Group.

Add your credits.

Add your name.

Resize all layers 80%.

Copy Merge

~Time to Animate~

Carry Into Animation Shop.
Edit/Paste/As New Animation.

Back in PSP.
Close out Candle 1 layer.
Open up Candle 2 layer.
Copy Merge

Carry into AS.
Edit/Paste/After Current Frame.

Back in PSP.
Close out Candle 2 layer.
Open up Candle 3 layer.
Copy Merge

Carry into AS.
Edit/Paste/After Current Frame.

Ctrl + A to highlight all frame.
Animation/Frame Properties
Change the display time to 26.
OK

View your animation.
If you’re happy then save.

I hope you enjoyed this tutorial.
I’d love to see your results and show it off in my gallery.
Email me!
Hugs,
Bev