

Clicking on the image will allow you to enlarge for bigger view.
Supplies
Font of Choice - I used Rat Infested Mailbox here
Vix Mask 404 here
DSB Flux - Bright Noise (Optional)
“Fur and Feathers” is a PTU scrap kit created by Wilma of Wilma4Ever and can be purchased from her store Wilma4ever. You can visit her blog here.
Thank you Wilma for such a beautiful kit that anyone for a love of furry and feathery critters will adore!
This tutorial was written assuming you have a working knowledge of PSP.
~♥~ Let’s get started ~♥~
Open up a 700 x 700 blank canvas.
Flood fill white.
Copy and paste EL 10 as a new layer.
Click inside of it with your Magic Wand - be sure to click inside of all the little gaps as well.
Selections/Modify/Expand by 6.
New Raster layer below the frame.
Copy and paste Paper 4 Into Selection.
Deselect.
You’re going to add the following elements below the frame. Don’t worry about what may be sticking out from behind the frame after you move them into position. We’ll clean that up in a bit.
EL 5: Resize 50%
EL 12: Resize 40%
EL 22: Resize 30%
EL 38: Resize 30%
Highlight the paper layer.
Click anywhere outside of it with your Magic Wand.
Highlight each element and tap the delete key.
Deselect.
If you like you can close out your white background and Merge Visible.
Reopen your white background.
Add your embellishments. I used:
EL 15
EL 16: Resize 40%
EL 14: Resize 25%
EL 2
EL 4: Resize 30%
EL 7: Resize 80%
EL 8: Choose one and resize if you like
EL 18: Choose one and resize if you like
Highlight your white background layer.
New Raster layer.
Select All.
Copy and paste Paper 1 Into Selection.
Deselect.
Image/Add Borders:
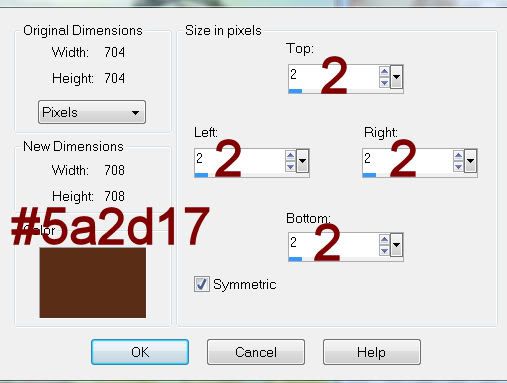
OK
Image/Add Borders:
Change the color to white
Change the numbers to 4
OK
Click on the white border with your Magic Wand.
Copy and paste Paper 5 Into Selection.
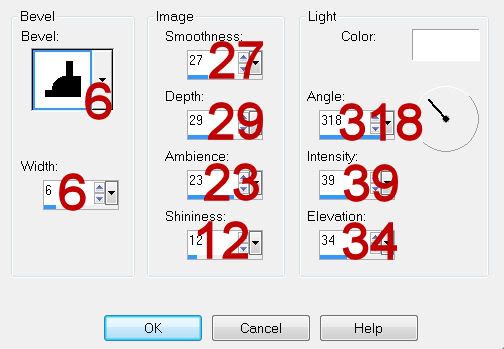
Give it a slight Inner Bevel:
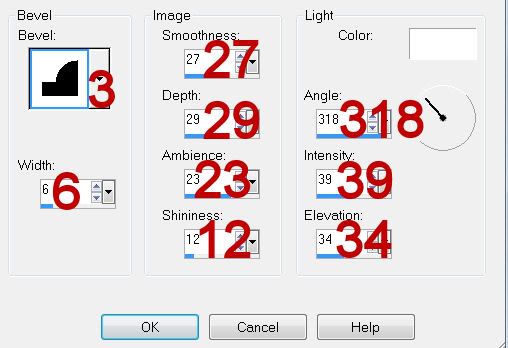
Deselect.
Image/Add borders:
Change the color back to #5a2d18=7
Change the numbers back to 2.
OK
Edit/Copy
Make a new 700 x 700 blank canvas.
Flood fill white.
Paste as a new layer - Don’t panic if you can’t see your border!
Resize 70%
Duplicate
Highlight the original
Free rotate left 5 degrees
Highlight your white background.
New Raster layer.
Select All.
Copy and paste Paper 2 Into Selection.
Deselect.
Apply the Mask.
Resize 130%
Merge Group.
Duplicate
Apply DSB Flux Bright Noise to the duplicated mask layer:
Intensity: 10
Mix checked
OK
Add the last few embellishments. I used:
EL 8: Choose one and resize as you like
EL 17: Resize 60%/Mirror
EL 1: Resize 35%
EL 3: Resize
EL 3: Resize 80%/Free rotate Left 5 degrees
Add your credits.
Add your name.
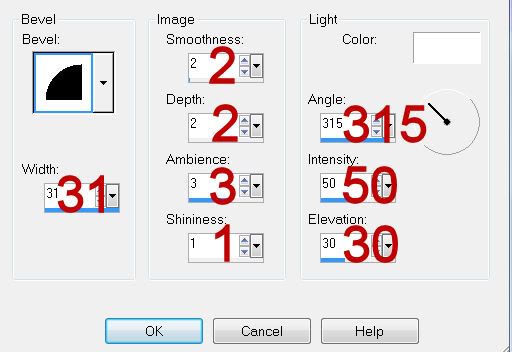
Give it a slight Inner Bevel:
Resize all layers 80%.
I hope you enjoyed this tutorial.
I’d love to see your results and show it off in my gallery.
Email me!
Hugs,
Bev
Supplies
Font of Choice - I used Rat Infested Mailbox here
Vix Mask 404 here
DSB Flux - Bright Noise (Optional)
“Fur and Feathers” is a PTU scrap kit created by Wilma of Wilma4Ever and can be purchased from her store Wilma4ever. You can visit her blog here.
Thank you Wilma for such a beautiful kit that anyone for a love of furry and feathery critters will adore!
This tutorial was written assuming you have a working knowledge of PSP.
~♥~ Let’s get started ~♥~
Open up a 700 x 700 blank canvas.
Flood fill white.
Copy and paste EL 10 as a new layer.
Click inside of it with your Magic Wand - be sure to click inside of all the little gaps as well.
Selections/Modify/Expand by 6.
New Raster layer below the frame.
Copy and paste Paper 4 Into Selection.
Deselect.
You’re going to add the following elements below the frame. Don’t worry about what may be sticking out from behind the frame after you move them into position. We’ll clean that up in a bit.
EL 5: Resize 50%
EL 12: Resize 40%
EL 22: Resize 30%
EL 38: Resize 30%
Highlight the paper layer.
Click anywhere outside of it with your Magic Wand.
Highlight each element and tap the delete key.
Deselect.
If you like you can close out your white background and Merge Visible.
Reopen your white background.
Add your embellishments. I used:
EL 15
EL 16: Resize 40%
EL 14: Resize 25%
EL 2
EL 4: Resize 30%
EL 7: Resize 80%
EL 8: Choose one and resize if you like
EL 18: Choose one and resize if you like
Highlight your white background layer.
New Raster layer.
Select All.
Copy and paste Paper 1 Into Selection.
Deselect.
Image/Add Borders:
OK
Image/Add Borders:
Change the color to white
Change the numbers to 4
OK
Click on the white border with your Magic Wand.
Copy and paste Paper 5 Into Selection.
Give it a slight Inner Bevel:
Deselect.
Image/Add borders:
Change the color back to #5a2d18=7
Change the numbers back to 2.
OK
Edit/Copy
Make a new 700 x 700 blank canvas.
Flood fill white.
Paste as a new layer - Don’t panic if you can’t see your border!
Resize 70%
Duplicate
Highlight the original
Free rotate left 5 degrees
Highlight your white background.
New Raster layer.
Select All.
Copy and paste Paper 2 Into Selection.
Deselect.
Apply the Mask.
Resize 130%
Merge Group.
Duplicate
Apply DSB Flux Bright Noise to the duplicated mask layer:
Intensity: 10
Mix checked
OK
Add the last few embellishments. I used:
EL 8: Choose one and resize as you like
EL 17: Resize 60%/Mirror
EL 1: Resize 35%
EL 3: Resize
EL 3: Resize 80%/Free rotate Left 5 degrees
Add your credits.
Add your name.
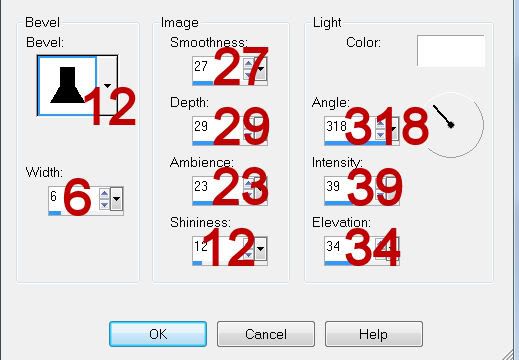
Give it a slight Inner Bevel:
Resize all layers 80%.
I hope you enjoyed this tutorial.
I’d love to see your results and show it off in my gallery.
Email me!
Hugs,
Bev


