Saturday, January 14, 2012

Breath of an Angel

Supplies

2 tubes of choice – I used the amazing artwork of Katerina Koukiotis which can be purchased from PSP Tube Stop.  You must have a license to use.

Font of choice - I used Before the Rain here

Weescotlass Mask 208 here

Divine Intentionz Template 379 here

Plug Ins used:
Eyecandy 3.1 -  Glow

“The Breath of an Angel” is a tagger size scrap kit created by Conchi of DnScraps and can be purchased from Butterfly Blush Designs.  You can visit her blog here.
Thank you Conchi for a truly breathtaking kit.

This tutorial was written assuming you have a working knowledge of PSP.

~~ Lets get started ~~

Open up the template.
Shift + D.
Close out the original.
Image/Canvas Size:
750 x 650
OK
Highlight and open up the background layer.
Flood fill white.
Delete the top 4 layers.

Highlight Square layer.
Click on it with our Magic Wand.
New Raster layer.
Copy and paste Paper 4 Into Selection.
Copy and paste dnLights as a new layer.
Resize 40%/Move into position over the rectangle.
Selections/Invert
Tap the delete key.
Deselect.
Delete the template layer.
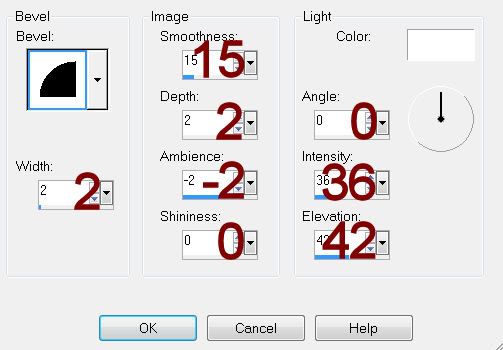
Give the paper a slight Inner Bevel:

Highlight Large Circle layer.
Click on it with your Magic Wand.
New Raster layer.
Copy and paste Paper 5 Into Selection.
Deselect.
Delete the template layer.
Apply Eyecandy 3.1 – Glow:
Width: 3
Opacity: 100%
Opacity Drop Off: Fat
Color: White
OK

Highlight Square 1 layer.
Click on it with your Magic Wand.
New Raster layer.
Copy and paste Paper 16 Into Selection.
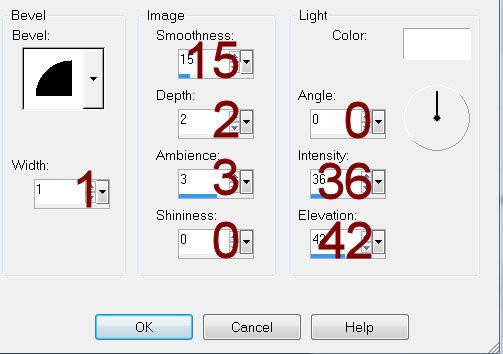
Give it the same slight Inner Bevel.
Duplicate
Change the Properties to Multiply.
Deselect.
Delete the template layer.

Highlight Square 2 layer.
Click on it with your Magic Wand.
New Raster layer.
Copy and paste Paper 3 Into Selection.
Deselect.
Delete the template layer.
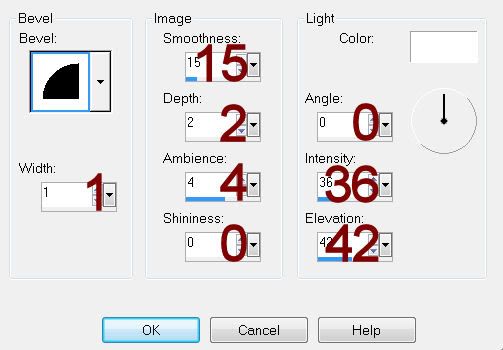
Give it the same Slight Inner Bevel.

Highlight Large Circle 4 layer.
Click on it with your Magic Wand.
New Raster layer.
Copy and paste Paper 2 Into Selection.
Deselect.
Delete the template layer.
Adjust/Add Remove Noise/Add Noise:
Uniform and Monochrome checked
Noise: 33%
OK

Highlight Large Circle 2 layer.
Click on it with your Magic Wand.
New Raster layer.
Copy and paste Paper 10 Into Selection.
Duplicate
Change the Properties to Multiply.
Deselect.
Delete the template layer.

Highlight Large Circle 3 layer.
Click on it with your Magic Wand.
New Raster layer.
Copy and paste Paper 12 Into Selection.
Copy and paste your tube as a new layer.
Selections/Invert
Tap the delete key.
Deselect.
Delete the template layer.
Change the Properties of the tube layer to Multiply.

Highlight Small Circle layer.
Click on it with your Magic Wand.
New Raster layer.
Copy and paste Paper 15 Into Selection.
Copy and paste your tube as a new layer.
Position it more on the right side of the circle.
Selections/Invert
Tap the delete key.
Lower the Opacity to about 26.
Paste your tube again, resize a little smaller than the other tube.
Position more on the right side of the circle.
Tap the delete key.
Deselect.
Delete the template layer.

Add your elements.  I used:
Charm:  Resize 80%/Duplicate/Resize 65%
Bow 2:  Resize 25% and 80%/Mirror.
Feathers:  Resize 30%
Glitter Angel:  Resize 35%
Swan:  Resize 40%
Lights 2:  Resize 25%
Dragonfly:  Resize 25%/Duplciate/Mirror
Stars

Highlight your white canvas.
New Raster layer.
Select All.
Copy and paste Paper 2 Into Selection.
Deselect.
Apply the mask.
Resize 115%
Merge Group.
Duplicate
Change the Properties to Multiply.
Lower the Opacity to about 44.

Add your name.

Resize all layers 80%

I’d love to see your results.
Email me!
Hugs,
Bev

Friday, January 13, 2012

His Valentine

Supplies

1 tube of choice – I used the wonderful artwork of Elias Chatzoudis which can be purchased from PSP Tubes Emporium.  You must have a license to use.

Font of choice - I used Anglo Saxon here

JWY_Mask 10 here

Plugs Ins:
Mura’s Meister - Copies

“Ambrosia Dream” is a tagger size scrap kit created by Pixie of KissedbyPix Designs and can be purchased from her store TKO Scraps  You can visit her blog here
Thank you Pixie for another fantastic kit.

This tutorial was written assuming you have a working knowledge of PSP.

~~ Lets get started ~~

Open upa 700 x 700 blank canvas.
Flood fill white.

New Raster layer.
Make your Selection Tool active set on Rectangle.
Create a rectangle approximately 350 x 500 pixels.
Copy and paste Paper 2 as a new layer.
Resize 70%
Selections/Invert
Tap the delete key.
Copy and paste Paper 4 as a new layer.
Resize 70%
Tap the delete key.
Deselect.

Give both papers a slight Inner Bevel:
Move both paper layers into position – see my tag for reference.

Copy and paste your tube as a new layer.
Position in front of the yellow rectangle.

Copy and paste your tube again.
Position this one in the upper left area of the yellow rectangle.
In your layers pallet move it just above the yellow rectangle.
Highlight the yellow rectangle.
Click anywhere outside of it with your Magic Wand.
Highlight the tube layer.
Tap the delete key.
Change the Properties to Multiply.
Lower the Opacity to about 44.

Add your elements.  I used:
Banner 3:  Resize 60%
Heart Frame 4:  Resize 10%/Duplicate
Heart Frame 2:  Resize 10%/Duplicate
Heart Frame 4:  Resize 40%/Duplicate
Beaded Heart 7:  Resize 25%/Free rotate Left 20 degrees/Duplicate/Mirror/Resize 70%
Curly 2:  Resize 45%

Close out your white canvas.
Merge Visible.
Reopen your white canvas.

Duplicate the merged layer.
Move the duplicate layer below the original.
Apply Mura’s Meister – Copies:
Set it on Wallpaper
OK
Adjust/Blur/Gaussian Blur:
Radius: 15
OK
Apply the mask.
Merge Group.

Add your name.
Color Pallet:
Foreground and Background: #ffefc6
Type each letter on their own layer and used the Pick Tool to slant each letter so it slants to match the ribbon.
Merge Visible all letter layers.
Apply the same slight Inner Bevel.

I’d love to see your results.
Email me!
Hugs,
Bev

Girls Night Out

Supplies

1 tube of choice – I used the wonderful artwork of Tim Lowery which can be purchased from PSP Tubes Emporium.  You must have a license to use.

Font of choice - I used Luna Bar here

Dee’s Sign Post Template “Cleavage” here under December 29, 2011

Weescotlass Mask 208 here

Plug Ins:
Eyecandy 3.1 – Glow

“Girls Night Out” is tagger size FTU scrap kit created by Lorraine of Artlor Deisgns and can be purchased from Lollipops n Gumdrops.  You can visit her blog here.
Thank you Lorraine for an awesome kit.

This tutorial was written assuming you have a working knowledge of PSP.

~~ Lets get started ~~

Open up the template.
Shift + D.
Close out the original.
Resize all layers 85%
Image/Canvas Size
700 x 600
OK
Open up Bg layer and flood fill white.
Delete the top 8 layers, Purple Shape, Dotted Rectangle, and White Rectangle.

Highlight Purple Oval layer.
Click on it with your Magic Wand.
New Raster layer.
Copy and paste Paper 6 Into Selection.
Deselect.
Delete the template layer.

Highlight Purple Rectangle layer.
Click inside of it with your Magic Wand.
New Raster layer.
Copy and paste Paper 14 Into Selection.
Deselect.
Delete the template layer.
Give it a slight Inner Bevel:

Highlight Drk Purple Strip layer.
Click on it with your Magic Wand.
New Raster layer.
Copy and paste Paper 13 Into Selection.
Deselect.
Delete the template layer.
Give it the same slight Inner bevel.

Highlight Black Strip layer.
Click anywhere outside of it with your Magic Wand.
Copy and paste Paper 9 as a new layer.
Tap the delete key.
Deselect.
Delete the template layer.
Give it the same slight Inner bevel.

Highlight Purple Strip layer.
Click on it with your Magic Wand.
New Raster layer.
Copy and paste Paper 15 Into Selection.
Deselect.
Delete the template layer.
Give it the same slight Inner bevel.

Copy and paste Frame 6 as a new layer.
Resize 33%
Duplicate twice for a total of 3 frames.
Position them over Dotted White Circles template layer.
Delete Dotted White Circle template layer, White Circles, and Purple Circles.

To each frame:
Click inside of it with your Magic Wand.
Selections/Modify/Expand by 4.
New Raster layer below the frame.
Copy and paste Paper 12 Into Selection.
Deselect.

To the left and right frames:
Highlight the paper layer.
Click anywhere outside of it with your Magic Wand.
Copy and paste your tube as a new layer above the paper.
Move into a position you like.
Tap the delete key.
Deselect.
Change the Properties to Luminance (Legacy).

Copy and paste your tube as a new layer.
Position in front of the center frame.

Add your elements.  I used:
Ipod:  Resize 95%/Free rotate Left 10 degrees
Bow 2:  Resize 25%/Duplicate/Mirror
Star Dangles 2:  Resize 25%/Duplicate/Mirror
Fan:  Resize 60%/Free rotate Right 10 degrees
Record and Discs:  Resize 40%
Tunes:  Circle around the group of notes with your Magic Wand/copy/Paste as a new layer on your canvas.  Resize 70%
Pearl Swag 1:  Resize 75%

Highlight your white canvas.
New Raster layer.
Select All.
Copy and paste Paper 4 Into Selection.
Deselect.
Apply the mask.
Merge Group.

Add your name.
Type your name.
Convert to Raster layer.
Apply Eyecandy 3.1 – Glow
Width: 3
Opacity: 100
Opacity Drop off: Fat
Color: White
OK

Resize all layers 80%

I’d love to see your results.
Email me!
Hugs,
Bev