Saturday, September 11, 2010

The Witching Hour

Clicking on the image will allow you to enlarge for bigger view.

Supplies

1 tube of your choice - I used the artwork of Anna Marine at CILM
Font of Choice - I used Treasure here
Vix Mask 403 here
Divine Intentions Template 358 here
Eyecandy 4000 - Gradient Glow
“The Witching Hour” is a PTU tagger size scrap kit created by Shani of Wicked Princess Scraps and can be purchased at Twilight Scraps. You can visit her blog here.
Thank you Shani for a stunning kit!

This tutorial was written assuming you have a working knowledge of PSP.

~♥~ Let’s get started ~♥~

Open up the template.
Shift +D.
Close out the Original.
Delete the following layers:
Top 2 layers, Heart 1, Heart 2, and Heart 3 layers.
Resize all layers 90%
Image/Canvas Size
700 X 600
OK
Highlight Raster 1 layer and flood fill white.

Highlight Glitter Circle 1 layer.
Click on it with your Magic Wand.
New Raster layer.
Copy and paste PP 3 Into Selection.
Adjust/Add Remove Noise/Add Noise:
Monochrome and Gaussian checked
Noise: 33%
OK
Deselect.
Delete the template layer.

Repeat the above step with Glitter Circle Left, Glitter Circle Right, and Glitter Circle Center.

Highlight Rectangle 1 layer.
Select All/Float/Defloat
Copy and paste Paper 3 Into Selection
DO NOT DESELECT.
Apply Eyecandy 4000 - Gradient Glow:
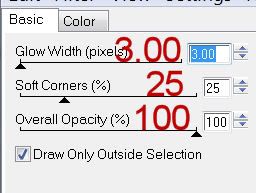

Color Tab:
Highlight "Fat"
Color: white

OK

Deselect.
Delete the template layer.

Highlight Rectangle 2 layer.
Click on it with your Magic Wand.
New Raster layer.
Copy and paste Paper 17 Into Selection.
Deselect.
Delete the template layer.

Highlight Circle 1 layer.
Click on it your Magic Wand.
New Raster layer.
Copy and paste Paper 7 Into Selection.
Deselect.
Delete the template layer.

Highlight Circle Left layer.
Click on it with your Magic Wand.
New Raster layer.
Copy and paste Paper 2 Into Selection.
Copy and paste Old Tree as a new layer above the paper.
Resize 130% and move into position - see my tag for reference.
Selections/Invert
Use your Eraser Tool and erase the trunk of the tree that overhangs the circle.
Deselect.
Delete the template layer.

Highlight Circle Right layer.
Click on it with your Magic Wand.
New Raster layer.
Copy and paste Paper 2 Into Selection.
Deselect.
Delete the template layer.

Highlight Circle Center layer.
Click on it with your Magic Wand.
New Raster layer.
Copy and paste Paper 12 Into Selection.
Deselect for now.
Delete the template layer.

Copy and paste your tube as a new layer.
Position it over the circle.

Copy and paste Bush 2 as a new layer.
Move into position behind the tube - see my tag for reference.

Copy and paste Creepy Ghost as a new layer.
Move into position behind the bush - see my tag for reference.

Highlight the paper layer.
Use your Magic Wand and click anywhere outside of the paper.
Highlight your tube and each of the element layers and using your eraser tool erase the areas you don’t want to overhang the circle.
Deselect.

Add your embellishments. I used:
PA Sign
Fang Pumpkin: Resize 50%
Pansy: Resize 50%

Highlight your white canvas.
New Raster layer.
Select All
Copy and paste a paper of choice Into Selection.
Deselect.
Apply the mask.
Merge Group.

Add your credits.

Add your name.

Resize all layers 80%.

I hope you enjoyed this tutorial.
I’d love to see your results and show it off in my gallery.
Email me!
Hugs,
Bev

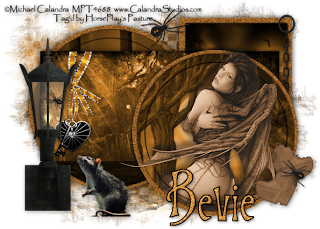
Kreepy Krawlers


Clicking on the image will allow you to enlarge for bigger view.
Supplies

1 tube of your choice and 1 close up - I used the artwork of Michael Calandra at MPT
Font of Choice - I used Burton’s Nightmare
Weescotlass Mask 297 here
Scrap Rebellion Template 48 here
Greg’s Factory Output Vol. II - Pool Shadow
“Kreepy Bitz” is a PTU tagger size scrap kit created by Shells Scraps and can be purchased from Aussie Scrap Designs.
This is a really festive kit!

This tutorial was written assuming you have a working knowledge of PSP.

~♥~ Let’s get started ~♥~

Open up the template.
Shift +D.
Close out the Original.
Delete Raster 7.
Resize all layers 90%.
Image/Canvas Size
700 X 500
OK
Highlight Raster 1 and flood fill white.

Highlight Raster 6 layer.
Click on it with your Magic Wand.
New Raster layer.
Flood fill with color #965f22
Image/Add Remove Noise/Add Noise:
Uniform and Monochrome checked
Noise: 45%
OK
Deselect.
Delete the template layer.

Repeat the above step with Raster 3 and Copy of Raster 3.

Highlight Copy of Raster 6 layer.
Click on it with your Magic Wand.
New Raster layer.
Copy and paste Paper 8 Into Selection.
Apply Greg’s Factory Output Vol. II - Pool Shadow
Default Settings.
Apply it once more.
Deselect.
Delete the template layer.

Highlight Ratser 4 layer.
Click on it your Magic Wand.
New Raster layer.
Copy and paste Paper 7 Into Selection.
Deselect.
Delete the template layer.

Highlight Raster 5 layer.
Select All/Float/Defloat
New Raster layer.
Flood fill with the color black.
Deselect.
Delete the template layer.

Repeat the above step with Copy of Raster 5 layer.

Highlight Raster 2 layer.
Click on it with your Magic Wand.
Copy and paste Paper 9 as a new layer.
Resize 70%
Move into position over the template - see my tag for reference.
Selections/Invert
Tap the delete key.
Deselect.
Delete the template layer.

Highlight Copy of Raster 4 layer.
Click on it with your Magic Wand.
New Raster layer.
Copy and paste Paper 10 Into Selection.
Copy and paste your tube as a new layer.
Selections/Invert
Tap the delete key.
Deselect.

Be sure your tube is highlighted.
Effects/Photo Effects/Sepia Toning:
Amount to age: 100%
OK

Add your embellishments. I used:
BNB - GJ 8: Resize 40%
BNB - GJ 7: Resize 50%/Apply the Pool Shadow Effect
Heart 4: Resize 30%
Rat 1: Resize 40%
Heart 2: Resize 25% and 70%
Spider 3: Resize 25% and 50%/Free rotate left 25 degrees/Duplicate and resize as many times as you like.

Highlight your white canvas.
New Raster layer.
Select All
Copy and paste a paper of choice Into Selection.
Deselect.
Apply the mask.
Merge Group.

Add your credits.

Add your name.
Give it a touch of noise.

I hope you enjoyed this tutorial.
I’d love to see your results and show it off in my gallery.
Email me!
Hugs,
Bev


Thursday, September 9, 2010

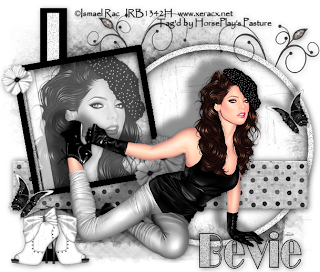
Black and White


Clicking on the image will allow you to enlarge to bigger view.
Supplies

1 tube of your choice and 1 close up - I used the artwork of Ismael Rac
Font of Choice - I used NewYorkDeco here
Vix Mask 403 here
Scrap Rebellion Template 21 here
“Black and White” is a PTU tagger size scrap kit created by Kristi of oOohlala Scraps and can be purchased from her store I Got Lucky Scraps. You can visit her blog here.
Thank you Kristi for a fabulous kit!

This tutorial was written assuming you have a working knowledge of PSP.

~♥~ Let’s get started ~♥~

Open up the template.
Shift +D.
Close out the Original.
Delete the top 3 layers.
Open up the background layer.

Highlight Circle layer.
Click on it with your Magic Wand.
New Raster layer.
Copy and paste Paper 11 Into Selection.
Deselect.
Delete the template layer.

Highlight Blue Rectanglelayer.
Click on it your Magic Wand.
Copy and paste Paper 2 as a new layer.
Move into position over the template layer.
Selections/Invert
Tap the delete key
Deselect.
Delete the template layer.
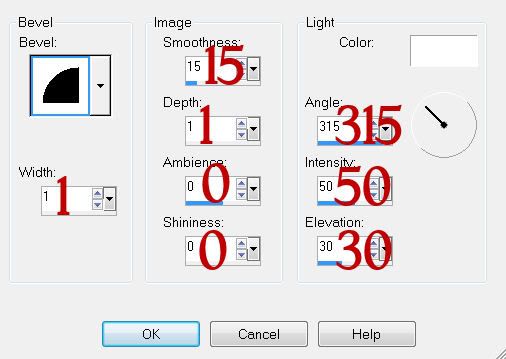
Give it a slight inner bevel:


Highlight Frame Background layer.
Click on it with your Magic Wand.
New Raster layer.
Copy and paste Paper 11 Into Selection.
DO NOT DESELECT.

Copy and paste your close up tube as a new layer above the paper.
Seletions/Invert
Tap the delete key.
Deselect.
Delete the template layer.

Highlight Blue Strip layer.
In your layers pallet change the foreground color to #d2d1d1.
Make your Target Tool active and change the color of the blue strip.

Highlight Square Frame layer.
Click on it with your Magic Wand.
New Raster layer.
Flood fill with the color black.
Deselect.
Delete the template layer.

Copy and paste your tube as a new layer.
Give it an exaggerated drop shadow.

Add your embellishments. I used:
Boot 1: Resize 25%/Duplicate/Mirror
Butterfly 2: Resize 30%/Duplciate/Mirror
Flower 3: Resize 25% and 70%/Duplictate/Resize 70%
Doodle 1 Flower: Duplicate/Mirror

Highlight your white canvas.
New Raster layer.
Select All
Copy and paste a paper of choice Into Selection.
Deselect.
Apply the mask.
Merge Group.

Add your credits.

Add your name.

I hope you enjoyed this tutorial.
I’d love to see your results and show it off in my gallery.
Email me!
Hugs,
Bev


Tuesday, September 7, 2010

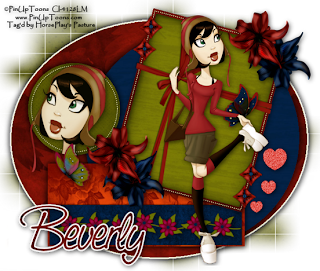
Darker Side of Autumn

Clicking on the image will allow you to enlarge for bigger view.

Supplies

1 tube of choice and 1 close up - I used the artwork of PinUpToons at CILM
Font of Choice - I used Saginaw here
Divine Intentionz Template 309 here
Weescotlass Mask 84 here
Eyecandy 4000 - Gradient Glow
“Fall Twine” is a tagger size scrap kit created by Sue of Wacky Winnie Designz and can be purchased at Butterfly Blush Designs. You can visit her blog here.
Thank you Sue for such a rich and beautiful autumn kit!

This tutorial was written assuming you have a working knowledge of PSP.

~♥~ Let’s get started ~♥~

Open up the template.
Shift + D.
Close out the original.
Delete the top 2 layers.
Image/Canvas Size
650 X 550
OK
Flood fill the background layer white.

Highlight Oval layer.
Click on it with your Magic Wand.
New Raster layer.
Copy and paste Paper 3 Into Selection.
Deselect.
Delete the template layer.
Apply Eyecandy 4000 - Gradient Glow:


Color tab:
Choose “Fat”
Color choice: white

Highlight Circle layer.
Click on it with your Magic Wand.
New Raster layer.
Copy and paste Paper 1 Into Selection.
Deselect.
Delete the template layer.

Highlight Small Circle layer.
Click on it with your Magic Wand.
New Raster layer.
Copy and paste Paper 12 Into Selection.
Copy and paste your close up as a new layer.
Selections/Invert
Tap the delete key.
Deselect.
Delete the template layer.

Highlight Dotted Circle layer.
Select All/Float/Defloat
New Raster layer.
Flood fill with #ffffc0
Deselect.
Delete the template layer.

Highlight Dotted Frame layer.
Repeat the above step.

Highlight Hearts layer.
Change the color in your pallet to a red shade taken from one of the papers.
Make your Target Tool active and change the colors of the hearts.

Highlight Rectangle layer.
Click on it with your Magic Wand.
Copy and paste Paper 15
Resize 50%
Position over the template.
Selections/Invert
Tap the delete key.
Deselect.
Delete the template layer.

Highlight Thin Rectangle 2 layer.
Click on it with your Magic Wand.
Copy and paste Paper 11 as a new layer.
Resize 50%
Position over the template layer.
Selections/Invert
Tap the delete key.
Deselect.
Delete the template layer.

Highlight Frame Background.
Click on it with your Magic Wand.
Open up Paper 2.
Shift + D
Close out the original.
Free rotate right 10 degrees
Copy
Make your working canvas active.
Edit/Paste/Resize 60%
Position over the template layer.
Selections/Invert
Tap the delete key.
Deselect.
Delete the template layer.

Highlight Frame layer.
Click on it with your Magic Wand.
New Raster layer.
Copy and paste Paper 13 Into Selection.
Deselect.
Delete the template layer.

Copy and paste your tube as a new layer.

Add your embellishments. I used:
Wrappin 2: Resize 40%/Free rotate right 15 degrees/Use your Pick Tool to bring the ribbon on the side in to fit the frame.
Sachet 2: Resize 25% and 40%
Flower 1 & 2: Resize 25%
Fstring 1: Resize 40%
Butterflies 1 & 2: Resize 25% and 70%

Highlight your white background.
Select All.
Copy and paste a paper of choice Into Selection.
Deselect.
Apply the mask.
Resize 120%
Merge Group.

Add your credits.

Add your name.
Apply Eyecandy 4000 - Gradient Glow:
Same settings

Resize all layers 85%

I hope you enjoyed this tutorial.
I’d love to see your results and show it off in my gallery.
Email me!
Hugs,
Bev
Monday, September 6, 2010

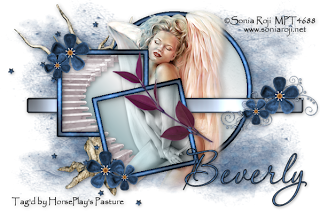
Magic III


Clicking on the image will allow you to enlarge for bigger view.

Supplies

1 tube of choice - I used the artwork of Sonia Roji at MPT
Font of Choice - I used Aquarelle here
Scraps of Enchantment Template 109 here
Gem’s Mask 161 here
Dsb Flux - Bright Noise
Filters Unlimited 2.0 - Optional
“It‘s a Kind of Magic” is a tagger size scrap kit and part of a beautiful collaboration. This portion was created by Dark Kat‘s Kreationz. The collaboration can be purchased at Heartbeatz Creationz.
Thank you Dark Kat, your portion is beautiful!

This tutorial was written assuming you have a working knowledge of PSP.

~♥~ Let’s get started ~♥~

Open up the template.
Shift + D.
Close out the original.
Delete the top 2 layers.
New Raster layer.
Send to bottom.
Flood fill white.

Highlight Circle Background layer.
Click on it with your Magic Wand.
New Raster layer.
Flood fill with a gradient of your choice.
Deselect.
Delete the template layer.
Give the gradient a texture.
I used Filters Unlimited 2.0 - Wallpaper Fine:
Intensity: 20
Lightness: 110
OK

Highlight Grey Strip layer.
Click on it with your Magic Wand.
New Raster layer.
Copy and paste Paper 9 Into Selection.
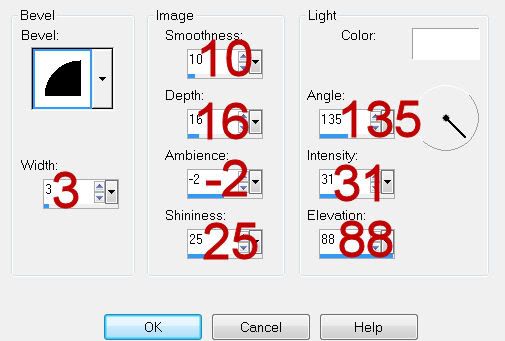
Apply a slight inner bevel:

Deselect.

Highlight Top Background layer.
Click on it with your Magic Wand.
New Raster layer.
Flood fill with the same gradient.
Deselect.
Delete the template layer.

Highlight Bottom Background layer.
Repeat the above step.

Highlight Top Frame layer.
Click on it with your Magic Wand.
New Raster layer.
Copy and paste Paper 6 Into Selection.
Apply the same inner bevel.
Deselect.
Delete the template layer.

Highlight Bottom Frame layer.
Repeat the above step.

Copy and paste your tube as a new layer just above the round frame layer.
Move it into exact position.
Duplicate twice.
In your layers pallet move each tube below each of the square frame layers.

To each Square paper layer:
Click anywhere outside the square.
Highlight the tube that’s just above the paper.
Tap the delete key.
Deselect.
Change the Properties to Luminance Legacy.

Highlight the tube in the bottom layer and use your Freehand Selection Tool to outline the part of the tube where you can see the staircase.
Highlight the staircase.
Tap the delete key.

Copy and paste Element 24 as a new layer.
Image/Mirror
Move it into exact position behind one of the frames - see my tag for reference.
Duplicate/Move it beneath the other frame in your layers pallet.
Click anywhere outside the square paper.
Highlight each of the stairs layers and tap the delete key.

Highlight Stars layer.
Select All/Float/Defloat
New Raster layer.
Flood fill with a dark color of choice.
Apply DSB Flux - Bright Noise:
Intensity: 32
Mix checked.
OK

Add your embellishments. I used:
Element 6: Resize 85%
Element 20: Resize 70%
Element 8: Resize 25%/Duplciate/Resize 70%
Element 27: Resize 60%

Highlight your white background.
Select All.
Copy and paste a paper of choice Into Selection.
Deselect.
Apply the mask.
Merge Group.

Add your credits.

Add your name.
Give it the same slight inner bevel.

I hope you enjoyed this tutorial.
I’d love to see your results and show it off in my gallery.
Email me!
Hugs,
Bev
Here I am


Supplies

Font of Choice - I used Dream Orphans here
Creative by Nature Template 39 here
DSB flux - Bright Noise
Weescotlass Mask 22 here
Filters Unlimited 2.0 - Optional
“Mon Beau Jordan” is a PTU tagger size scrap kit created by Pixie of Kissed By Pix Design and can be purchased at TKO Scraps. You can visit her blog here.
Thank you Pix for such a beautiful kit!

This tutorial was written assuming you have a working knowledge of PSP.

~♥~ Let’s get started ~♥~

Open up the template.
Shift + D.
Close out the original.
Image/Canvas size 700 x 550
OK
Highlight Raster 1 and flood fill white.
Delete the top 3 layers and Raster 6 layer.

Highlight Raster 2 layer.
Click on it with your Magic Wand.
New Raster layer.
Copy and paste Paper 5 Into Selection.
Deselect.
Delete the template layer.
Adjust/Add Remove Noise/Add Noise:
Uniform and Monochrome checked
Noise: 45%
OK

Highlight Raster 3 layer.
Repeat the above step.

Highlight Copy of Vector 1 layer (the large pink rectangle).
Click on it with your Magic Wand.
New Raster layer.
Flood fill with a gradient of choice.
Give it a texture of choice -
I used Filters Unlimited 2.0 - Wallpaper Fine:
Intensity: 20
Lightness: 110

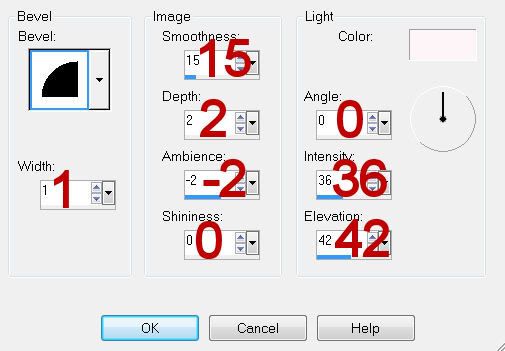
Give it a slight inner bevel:


Highlight Raster 5 layer.
Click on it with your Magic Wand.
New Raster layer.
Copy and paste Paper 7 Into Selection.
Deselect.
Delete the template layer.
Give it the same slight inner bevel.

Highlight Copy of Vector 1 layer (the light gray thin rectangle strip).
Repeat the above step accept use Paper 4.

Highlight Copy of Vector 1 layer (the light pink circle)
Click on it with your Magic Wand.
New Raster layer.
Flood fill with a gradient of choice.
Copy and paste Jardin Custom 3 as a new layer.
Resize 70%
Move into position over the circle - see my tag for reference.
Selections/Invert
Tap the delete key.
Deselect.
Delete the template layer.
Change the Properties to Soft Light.
Duplicate.
Give the Circle layer the same slight inner bevel.

Add your embellishments. I used:
Jardin Custom 3: Resize 70% and 70%
Leaf: Resize 40%
Bright Lights 2
Pearl Flake: Resize 40%/Duplicate/Resize 70%
Leaf Spray: Resize 40%
Teardrop Flower: Resize 50%/Give it a slight inner bevel
Butterflies 2 & 3: Resize 30%
Shrooms 1: Resize 40%

Highlight your white background.
Select All.
Copy and paste a paper of choice Into Selection.
Deselect.
Apply the mask.
Merge Group.

Add your credits.

Add your name.
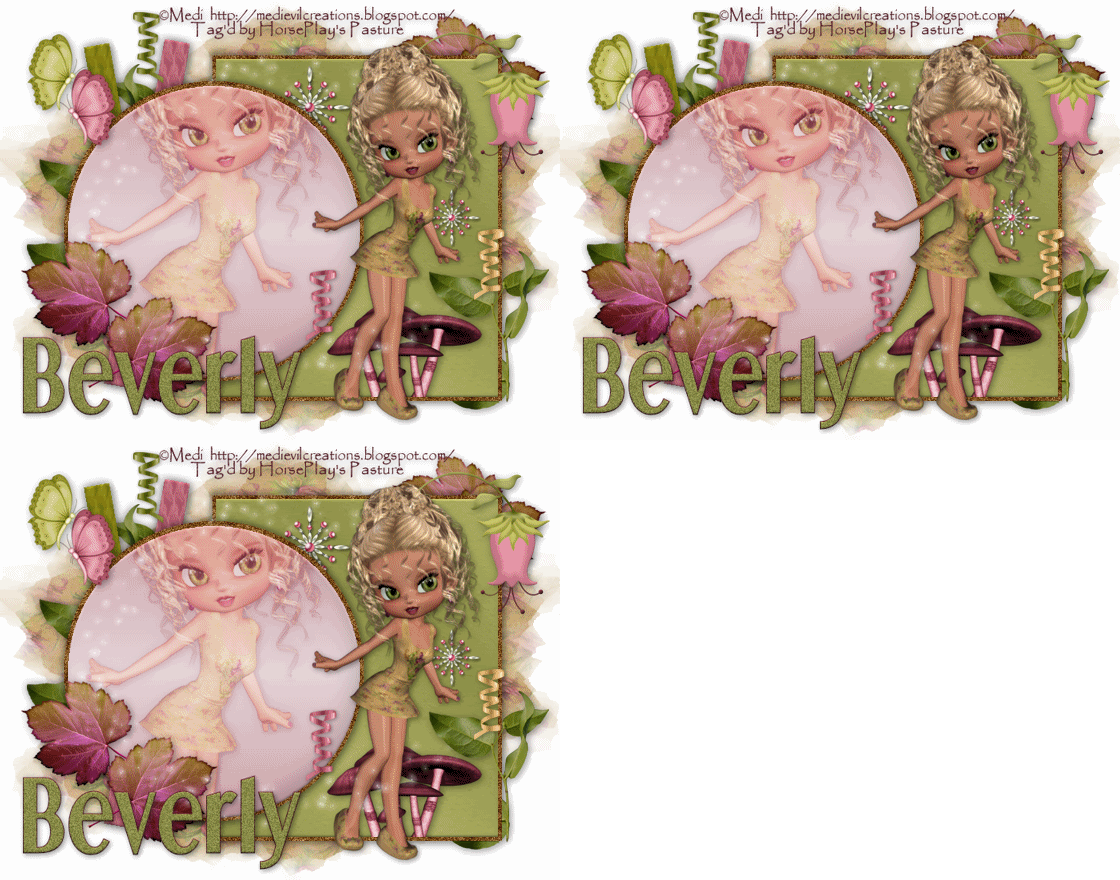
Duplicate it 2 times for a total of 3.
Rename them Name 1, Name 2, and Name 3.
Highlight Name 1 and apply DSB Flux - Bright Noise:
Intensity: 22
Mixed checked
OK

Highlight Name 2.
Apply DSB Flux - Bright Noise:
Hit the Mix button twice.
OK

Highlight Name 3.
Apply DSB Flux - Bright Noise:
Hit the Mix button 3 times.
OK

Close out Name 2 & Name 3 layers.

Resize all layers 80%.

Copy Merge

~Time to Animate~

Open up Animation Shop.
Edit/Paste/As new Animation

Back in PSP.
Close out Name 1
Open up Name 2
Edit/Copy Merge

Back in AS.
Edit/Paste/After Current Frame

Back in PSP.
Close out Name 2.
Open up Name 3.
Edit/Copy Merge

Back in AS.
Edit/Paste After Current Frame.

View your animation.
If you’re happy then save.

I hope you enjoyed this tutorial.
I’d love to see your results and show it off in my gallery.
Email me!
Hugs,
Bev