Thursday, May 31, 2012

Vintage Attic

Supplies

1 tube of choice – I used the artwork of Jennifer Janesko which can be purchased from CDO.  You must have a license to use.

Font of choice - I used Sverige Script here

Monti Circular Mask here

“Grandpa’s Attic” is a FTU tagger size scrap kit created by Brandy of BLTs DeZignZ and can be purchased from Country Corner Creations.  You can visit her blog here.
Thank you Brandy for such a beautiful kit!

This tutorial was written assuming you have a working knowledge of PSP.

~~ Lets get started ~~

Open up a 700 x 700 blank canvas.
Flood fill white.

Copy and paste Frame 1 as a new layer.
Resize 35%
Click inside of it with your Magic Wand.
Selections/Modify/Expand by 4.
New Raster layer below the frame.
Copy and paste Paper 13 Into Selection.
Copy and paste your tube as a new layer below the frame.
Selections/Invert
Tap the delete key.
Deselect.

Close out your white background.
Merge Visible
Reopen your background layer.

Copy and paste Frame 1 again.
Resize 35%
Free rotate Left 10 degrees.
Move into position behind the merged frame – see my tag for reference.
Click inside of it with your Magic Wand.
Selections/Modify/Expand by 4.
New Raster layer below the frame.
Copy and paste Paper 13 Into Selection.
Copy and paste your tube below the frame.  Resize it just a little bigger than what you used in the merged layer.
Selections/Invert
Tap the delete key.
Deselect.
Change the Properties to Burn.

Close out your white background layer and the merged layer.
Merge Visible.
Reopen all layers.
Duplicate the newest merged layer and move into position – see my tag for reference.

Add your elements.  I used:
Wrap 3:  Resize 32%
Flower 3:  Resize 95%
Weathervane:  Resize 70%
Branch:  Resize 35%
Lamp:  Resize 55%/Mirror
Chicken Wire:   Position behind the merged frames/Apply Monti Circular Mask

Highlight your white background.
New Raster layer.
Select All.
Copy and paste Paper 10 Into Selection.
Deselect.
Apply the mask.
Merge Group.

Highlight the chicken wire layer.
Change the Properties to Overlay.

Add your credits.

Add your name.

Resize all layers 80%.

I’d love to see your results.
Email me!
Hugs,
Bev

Dark Lady

Supplies

1 tube of choice – I used the beautiful artwork of Carrie Hall which can be purchased from Up Your Art.  You must have a license to use.

Font of choice - I used Party Business here

Weescotlass Mask 362 here

Plug Ins used:
Greg’s Factory Output Vol II – Pool Shadow

“Dark Lady” is a tagger size scrap kit created by Sandrine of Rebellious Scraps and can be purchased from Butterfly Blush Designs.  You can visit her blog here.
Thank you Sandrine for a really awesome kit.

This tutorial was written assuming you have a working knowledge of PSP.

~~ Lets get started ~~

Open up a 700 x 700 blank canvas.
Flood fill white.

Copy and paste Frame 1 as a new layer.
Resize 70%
Duplicate/Resize 80

Copy and paste Razor Blade as a new layer.
Resize 70%
Free rotate Left 90 degrees

Move both frames and razor blade into position – see my tag for reference.

Highlight the largest frame.
Click inside of it with your Magic Wand.
Selections/Modify/Expand by 3.
New Raster layer below the frame.
Copy and paste Paper 7 Into Selection.
Duplicate
Adjust/Blur/Motion Blur:
Angle: 49
Strength: 84.77%
OK
Apply Greg’s Factory Output Vol. II – Pool Shadow:
Use Default Settings
OK
Copy and paste your tube below the frame – If you’re using the same tube I did, resize 110%
Selections/Invert
Tap the delete key.
Deselect.

Highlight the smaller frame.
Click inside of it with your Magic Wand.
Selections/Modify/Expand by 2.
New Raster layer below the frame.
Copy and paste Paper 7 Into Selection.
Duplicate
Adjust/Blur/Motion Blur:
Angle: 49
Strength: 85%
OK
Apply Greg’s Factory Output Vol. II – Pool Shadow:
Use Default Settings
OK
Copy and paste your tube below the frame.
Selections/Invert
Tap the delete key.
Change the Properties to Multiply.
Deselect.


Add your elements.  I used:
Netting 2:  Resize 90%/Duplicate/Flip/Miror
Crystal Ball:  Resize 35%
Leaves:  Resize 30%/Mirror
Rose 4:  Resize 35%/Duplicate/Mirror
Cross:  Resize 50%/Free rotate Left 10 degrees
Crow:  Resize 35%
Lantern:  Resize 50%
  
Highlight your white background.
New Raster layer.
Select All.
Copy and paste Paper 1 Into Selection.
Deselect.
Apply the mask.
Use your Pick Tool and pull the sides out just a little.
Merge Group.

Crop your image.

Add your credits.

Add your name.
Foreground: Pattern/Paper 4
Angle: 0
Scale: 27
Background: #202020
Stoke: 1.0
Type your name.
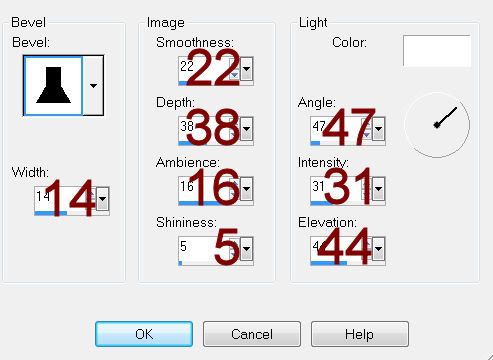
Give it a slight Inner Bevel:

Apply the Inner Bevel 2 more times.

Resize all layers 80%.

I’d love to see your results.
Email me!
Hugs,
Bev

Tuesday, May 29, 2012

Snips & Snails & Tall Cattails


Supplies

Font of choice - I used Bubble 1 which came with my PSP program

Weescotklass Mask 208 here

Scrap Rebellion Template 62 here   

“Snips & Snails & Tall Cattails” is a tagger size scrap kit created by me, Bev of HorsePlay’s Pasture Designs and can be purchased from either of my stores – Lollipops‘n Gumdrops or ButterflyBlush Designs.  You can visit my designing blog here.

This tutorial was written assuming you have a working knowledge of PSP.

~~ Lets get started ~~

Open up the template.
Shift + D.
Close out the original.
Image/Canvas Size:
700 x 700
OK
Highlight the background layer.
Flood fill white.
Delete the top layer, Dotted Circle, and 3 lines layer.

Highlight Small Circle layer.
Click on it with your Magic Wand.
New Raster layer.
Copy and paste Paper 13 Into Selection.
Deselect.
Delete the template layer.

Highlight the other Small Circle layer.
Repeat the above step.

Highlight Top Rectangle layer.
Click anywhere outside of it with your Magic Wand.
Selections/Invert
New Raster layer.
Copy and paste 12 Into Selection.
Copy and paste element 40 as a new layer.
Move into position over the rectangle – see my tag for reference.
Selections/Invert
Tap the delete key.
Deselect.

Highlight Btm Rectangle layer.
Click anywhere outside of it with your Magic Wand.
Selections/Invert
New Raster layer.
Copy and paste Paper 12 Into Selection.
Deselect.
Delete the template layer.

Highlight Frame layer (choose the bottom one in your layers pallet).
Select All/Float/Defloat
New Raster layer.
Copy and paste Paper 14 Into Selection.
Adjust/Add Remove Noise/Add Noise:
Uniform and Monochrome checked
Noise: 55%
OK
Deselect.
Delete the template layer.

Repeat the above step with:
Remaining Frame layers
Circle 1 layer
Noise Circle

Highlight Gradient Circle layer.
Click anywhere outside of it with your Magic Wand.
Selections/Invert
New Raster layer.
Copy and paste Paper 4 Into Selection.
Copy and paste 88 as a new layer above the paper.
Resize 80%
Move into position – see my tag for reference.
Selections/Invert
Tap the delete key.
Copy and paste 73 as a new layer.
Resize 40%
Tap the delete key.
Deselect.

Add your elements.  I used:
78:  Resize 70%/Duplicate
87:  Resize 70%/Duplicate/Erase what you don’t want to overhang the rectangle
40
4:  Resize 30%
4 again:  Resize 25%
26:  Resize 30%
61:  Resize 35%
28:  Resize 65%
35:  Resize 12%
41:  Resize 40%
31:  Resize 30%
16:  Resize 10%
66:  Resize 30%
  
Highlight your white background.
New Raster layer.
Select All.
Copy and paste Paper 14 Into Selection.
Deselect.
Apply the mask.
Merge Group.

Add your credits.

Add your name.
Color Pallet:
Foreground: #28110b
Background: #fb8715
Stroke Width: .80
Type your name.
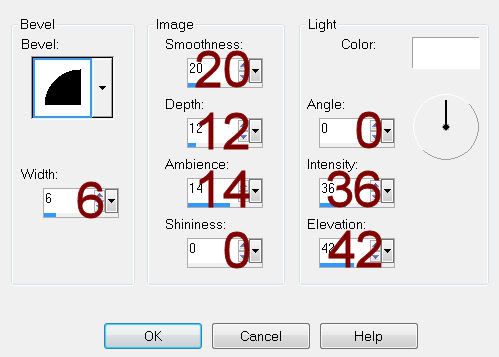
Give it a slight Inner Bevel:

Resize all layers 80%.

I’d love to see your results.
Email me!
Hugs,
Bev