Supplies
Plug Ins used:
Font of choice - I used Burton’s Nightmare here
Plug Ins used:
Xenofex 2: Burnt Edges
Eyecandy 3.1 - Glow
“Nevermore” is a tagger size collaboration scrap kit created by the
artists of PSP Tube Stop - Lisa Cree, Costanza Ehrenhaus, Katarina Koukiotis, and Jenny Heidewald.
This tutorial was written assuming you have a working knowledge of PSP.
~♥~ Let’s get started ~♥~
Open up a 700 x 700 blank canvas.
Flood fill white.
New Raster layer.
Select All.
Copy and paste Bakcground Fog Into Selection.
Deselect.
Copy and paste the following elements as new layers, moving them into position
– see my tag for reference:
Halloween Gothic Wall Frame with Grass
Spooky Tree 1
Spooky Tree 2
Semi Transparent Clouds
Creepy Tree
Tomb Light: Resize 50%
Tomb: Resize 35%/Lower the
Opacity to about 44
Elegant Witch
Raven: Resize 30%/Duplicate/Mirror
Bats Cluster
Gothic Feather: Resize 30%/Free
rotate Left 35 degrees/Duplicate/Free rotate Right 10 degrees
Black Cat: Resize 50%
Once all elements are in position close out your white background.
Merge Visible.
Reopen your white background.
Highlight the merged layer.
Resize 85%
Use your Magic Wand and click anywhere outside of the merged layer.
New Raster layer.
Copy and paste Background Cobweb 2 Light Into Selection.
Deselect.
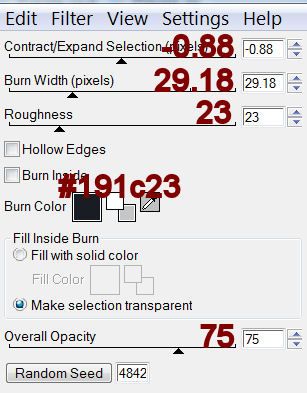
Apply Xenofex 2 – Burnt Edges:
Free Rotate Left 10 degrees
Move below the merged layer.
Highlight the Merged Layer.
Apply Xenofex – Burnt Edges:
Use same settings accept hit the random seed button once.
Move the merged layer slightly up and to the right.
Move the bottom paper layer slightly down and to the left.
Give each layer a drop shadow.
Copy and paste Roses Blue Frame as a new layer.
Move into position – see my tag for reference.
Duplicate/Mirror/Flip
Move into position – see my tag for reference.
Close out your white background.
Merge Visible.
Reopen your white background.
Resize the merged layer 85%
Copy and paste Spider Web Dark Frame as a new layer.
Position behind the merged layer.
Copy and paste Raven as a new layer.
Resize 60%
Give it a drop shadow.
Apply Eyecandy 3.1 – Glow:
Width: 20
Opacity: 20
Opacity Drop Off: Thin
Color: White
Highlight your white background.
New Raster layer.
Select All.
Copy and paste Stars Background as a new layer.
Deselect.
Apply the Mask.
Resize 110%
Merge Group.
Add your credits.
Add your name.
Color Pallet:
Foreground: #000000
Background: #374158
Stroke: 2.0
Type your name.
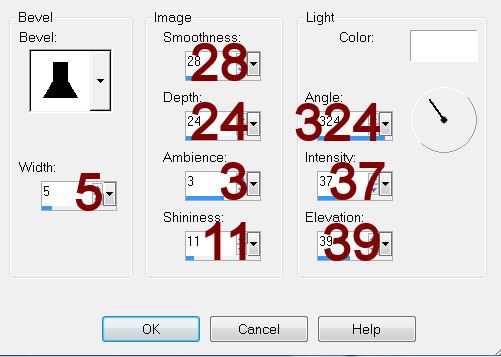
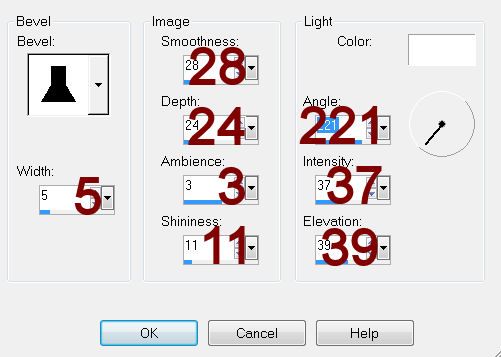
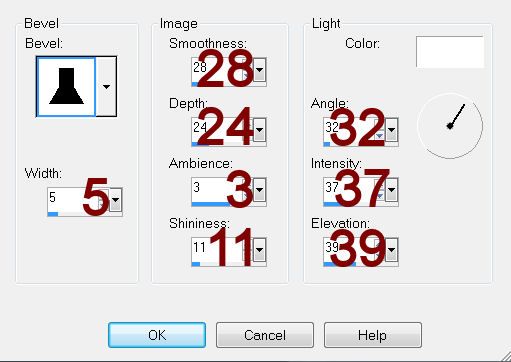
Give it a slight Inner Bevel:
Resize all layers 80%.