Supplies Needed
One tube of choice – I used the incredibly adorable
artwork of Lisa Victoria which can be purchased from Digital Art Heaven here.
Font of choice – I used Alien here
Weescotlass Creations Mask 466 here
My Template 1 here
Plug-Ins used:
Brush Strokes – Spatter
Greg’s Factory Output
Vol II – Pool Shadow
Snaggables can be
downloaded here
“Out of this World” is a PTU Tagger Size scrap kit designed by Tagcatz
Design and can be purchased from The Digital Scrapbook Shop here.
This tutorial was written assuming you have a
working knowledge of PSP.
~♥~ Let’s
get started ~♥~
Open up the template.
Shift + D.
Close out the original.
Delete the credit layer.
Highlight Rectangle layer.
Click on it with your Magic Wand.
New Raster layer.
Copy and paste Paper 6 Into Selection.
Apply Brush Strokes – Spatter:
Spray Radius; 15
Smoothness: 5
OK
Apply same effect once more.
Deselect.
Delete the template layer.
Highlight Rectangle 2 layer.
Click on it with your Magic Wand.
New Raster layer.
Copy and paste Paper 5 Into Selection.
Apply Brush Strokes – Spatter:
Use same settings
OK
Copy and paste Element 104 as a new layer over
the paper and move into position – see my tag for reference.
Selections/Invert
Tap the delete key.
Deselect.
Delete the template layer.
Highlight Circle layer.
Click on it with your Magic Wand.
New Raster layer.
Copy and Paste Paper 6 Into Selection.
Lock the layer by clicking on the lock icon at
the top of the layers pallet.
Adjust/Blur/Radial Blur:
Match your settings to mine –
OK
Copy and paste Element 30 as a new layer over
the paper layer.
Resize 55%
Move into position over the paper.
Selections/Invert
Tap the delete key.
Change the Blend mode of the element to Dodge.
Highlight the paper layer.
Selections/Modify/Select Selections Border:
Click “Both Sides” and “Anti Alias”
Border Width: 4
OK
Adjust/Add Remove Noise/Add Noise:
Uniform and Monochrome checked
Noise: 20%
OK
Effects/Edge Effects/Enhance
Deselect.
Delete the template layer.
Create a 700 x 700 blank canvas
Flood fill with #f2b000
Copy.
Do Not close this out as we’re going to use it again later on.
Make your working canvas active.
Highlight Stitches layer.
Select All/Float/Defloat.
New Raster layer.
Paste (the yellow canvas you copied) Into
Selection.
Deselect.
Delete the template layer.
Highlight Large Rectangle Layer.
Click on it with your Magic Wand.
Copy and paste Paper 7 as a new layer.
Move into a position you like – just make sure
to keep the flare image out of the rectangle.
In your layers pallet right click on the paper and choose “Promote Section to
Layer”.
Delete the original paper layer.
Highlight the Promoted layer in your layers
pallet.
Selections/Modify/Select Selections Border –
Use same settings.
OK
Adjust/Add Remove Noise/Add Noise:
Use same settings
OK
Effects/Edge Effects/Enhance
Deselect.
Delete the template layer.
Copy and paste Element 15 as a new layer over the paper.
Resize 70% and change the Blend Mode to Luminance
(Legacy)
Copy and paste Element 82 as a new layer.
Resize 30% and chance the Blend Mode to
Exclusion.
Make your Pick Tool active and turn the
spaceship slightly – see my tag for reference.
Copy and paste your Tube as a new layer.
If you’re using the same tube as I did, resize
45%
Add your elements. I used: (see tag for placement reference)
El 67:
Resize 60%/Duplicate 3x’s
El 35:
Resize 20%/Duplicate 2x’s/Mirror and flip one of them.
El 63:
Resize 70%
El 76:
Resize 60%/Duplicate/Mirror
El 74:
Duplicate/Mirror
El 34:
Resize 40%/Duplicate/Mirror
Highlight the white background.
New Raster layer.
Select All.
Copy and paste Paper 1 Into Selection.
Deselect.
Copy and paste Element 105 as a new layer just
above the paper. Move into a position
you like.
Merge Down.
Apply the mask.
Merge Group.
Add your copyrights.
Add your name.
Color Pallet:
Foreground and Background: #000000
Set the stroke to 1.0
Type your name.
Convert
to Raster Layer.
Select All/Float/Defloat
Selections/Modify/Expand by 2.
Copy and paste that yellow canvas you made
earlier as a new layer just below your name.
Right click on it and choose “Promote Section
to Layer”.
Close out the original yellow layer.
Be sure the yellow name is highlighted.
Apply Noise effect accept change the Noise
amount to 40
Ok.
Highlight the black name layer.
Merge Down.
Copy and paste Element 102 as a new layer.
Move into position near the bottom - see my tag for reference.
Select All/Float/Defloat
Move the original yellow layer just above this layer. (keep it closed out)
Right click on it in your layers pallet and choose "Promote Section to Layer".
Adjust/Add Remove Noise/Add Noise:
Random and Monochrome checked
Noise: 40%
OK
Delete the original element layer.
I hope you enjoyed this
tutorial.
I’d love to see your results.
Email me!
Hugs,
Bev

 Clicking on the image will enlarge to full view.
 Add your embellishments. I used:
Lamp: Resize 40%
Ant Ribbon: Resize 30%
Keys: Resize 40%
Bow 5: Resize 30%
Buttons of choice: Resize 30%
Candy Corn: Resize 25% & 70%
Pumpkin Sticker: Resize 40%
Add your embellishments. I used:
Lamp: Resize 40%
Ant Ribbon: Resize 30%
Keys: Resize 40%
Bow 5: Resize 30%
Buttons of choice: Resize 30%
Candy Corn: Resize 25% & 70%
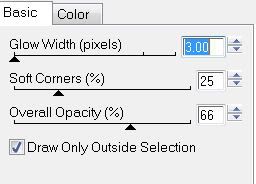
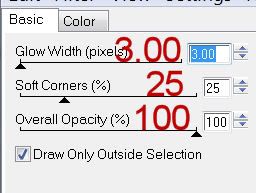
Pumpkin Sticker: Resize 40%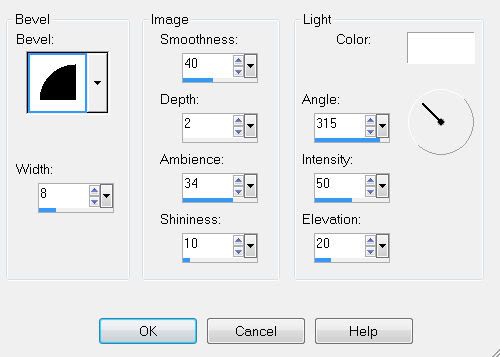 Apply Eyecandy 4000 Gradient Glow
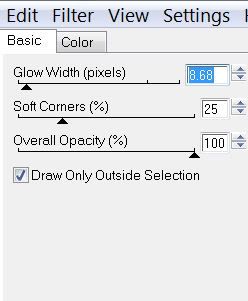 Resize all layers 85%.
 Resize all layers 80%.
I hope you enjoyed this tutorial.
I’d love to see your results and show it off in my gallery.
Resize all layers 80%.
I hope you enjoyed this tutorial.
I’d love to see your results and show it off in my gallery.


 Add your embellishments. I used:
Bow 4: Resize 50%
Butterfly 1: Resize 25%. Free rotate right 15 degrees
Flower 5: Resize 30%
Floral Cluster
Candle: Resize 30% Duplicate/resize 70%
Merge Visible the 2 candles.
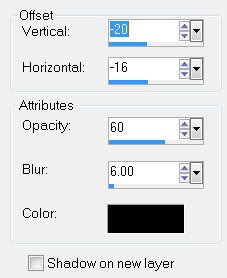
Give it the same drop shadow as your tube.
Duplicate twice for a total of 3 candle layers.
Rename Candle 1, Candle 2, and Candle 3.
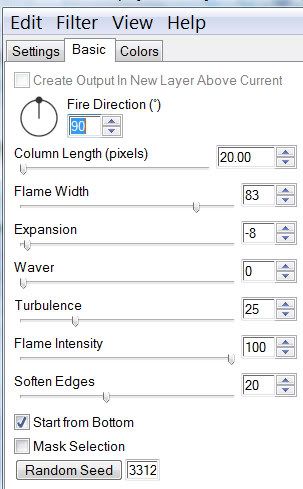
Highlight Candle 1 and using your Freehand Selection Tool, draw a candle flame above each wick. It doesn’t have to be perfect!!
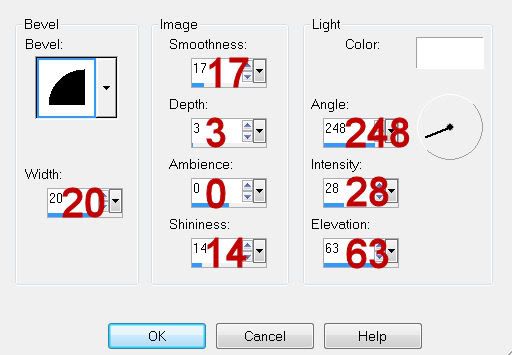
Apply Eyecandy 5: Nature - Fire with these settings:
Add your embellishments. I used:
Bow 4: Resize 50%
Butterfly 1: Resize 25%. Free rotate right 15 degrees
Flower 5: Resize 30%
Floral Cluster
Candle: Resize 30% Duplicate/resize 70%
Merge Visible the 2 candles.
Give it the same drop shadow as your tube.
Duplicate twice for a total of 3 candle layers.
Rename Candle 1, Candle 2, and Candle 3.
Highlight Candle 1 and using your Freehand Selection Tool, draw a candle flame above each wick. It doesn’t have to be perfect!!
Apply Eyecandy 5: Nature - Fire with these settings:


 Highlight Copy of Vector 1 layer (the black circle).
Click on it with your Magic Wand.
Copy and paste Paper 10 as a new layer.
Move into position over the circle.
Selections/Invert
Tap the delete key.
Deselect.
Delete the template layer.
Highlight Copy of Vector 1 layer (the pink circle).
Click on it with your Magic Wand.
Copy and paste Paper 10 as a new layer.
Move into position over the circle.
Selections/Invert
Tap the delete key.
Copy and paste your tube as a new layer.
Position it over the circle.
Tap the delete key.
Deselect.
Delete the template layer.
Add your embellishments. I used:
Pumpkin 3: Resize 80%
Creepy Trees 3: Resize 65%
Trees 1: Resize 50%
Vulture 1
Cat 1: Resize 50%
Skulls 2: Resize 30%
Spooky Eyes: Resize 90%/Lower the Opacity to 36
Spider 1: Resize 25%/Mirror/Duplicate and resize as many times as you like.
Highlight your white background.
Select All.
Copy and paste a paper of choice Into Selection.
Deselect.
Apply the mask.
Merge Group.
Add your credits.
Add your name.
Resize all layers 80%
I hope you enjoyed this tutorial.
I’d love to see your results and show it off in my gallery.
Highlight Copy of Vector 1 layer (the black circle).
Click on it with your Magic Wand.
Copy and paste Paper 10 as a new layer.
Move into position over the circle.
Selections/Invert
Tap the delete key.
Deselect.
Delete the template layer.
Highlight Copy of Vector 1 layer (the pink circle).
Click on it with your Magic Wand.
Copy and paste Paper 10 as a new layer.
Move into position over the circle.
Selections/Invert
Tap the delete key.
Copy and paste your tube as a new layer.
Position it over the circle.
Tap the delete key.
Deselect.
Delete the template layer.
Add your embellishments. I used:
Pumpkin 3: Resize 80%
Creepy Trees 3: Resize 65%
Trees 1: Resize 50%
Vulture 1
Cat 1: Resize 50%
Skulls 2: Resize 30%
Spooky Eyes: Resize 90%/Lower the Opacity to 36
Spider 1: Resize 25%/Mirror/Duplicate and resize as many times as you like.
Highlight your white background.
Select All.
Copy and paste a paper of choice Into Selection.
Deselect.
Apply the mask.
Merge Group.
Add your credits.
Add your name.
Resize all layers 80%
I hope you enjoyed this tutorial.
I’d love to see your results and show it off in my gallery.

 Highlight Frame Right layer.
Repeat the above step.
Highlight Frame Back layer.
Click on it with your Magic Wand.
New Raster layer.
Copy and paste Paper 3 Into Selection.
Deselect.
Delete the template layer.
Repeat the above step with the other Frame Back template layer.
Highlight the frame paper on the right.
Click anywhere outside of it with your Magic Wand.
Copy and paste your tube as a new layer.
Position over the paper.
Tap the delete key.
Deselect.
Highlight the frame back paper on the bottom.
Click anywhere outside of the paper with your Magic Wand.
Copy and paste Watering Can 1 as a new layer.
Resize 80%
Move into position - see my tag for reference.
Tap the delete key.
Deselect.
Paste the watering can again.
Resize 60%
Position in front of the frame.
Add your embellishments. I used:
Butterfly 1: Resize 25%
Staple 2: Resize 25% and 70%/Duplicate
Painted Bird 1: Resize 40%
Feather 1: Resize 40%
Ribbon 1: Resize 60%
Natural Bloom 3: Resize 25% and 80%/Duplicate/Flip/Resize 80%/Duplicate/Mirror
Highlight your white canvas.
New Raster layer.
Select All.
Copy and paste Paper 4 Into Selection.
Deselect.
Apply the mask.
Merge Group.
Add your copyrights.
Add your name:
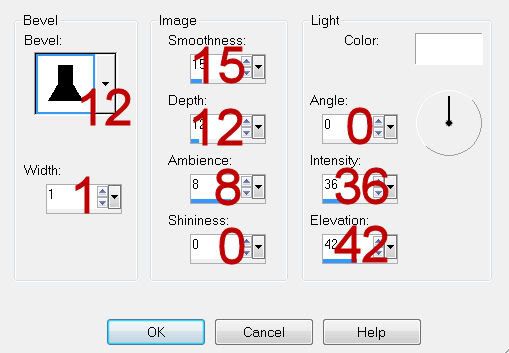
Give it the same Inner Bevel.
I hope you enjoyed this tutorial.
I’d love to see your results and show it off in my gallery.
Email me!
Hugs,
Highlight Frame Right layer.
Repeat the above step.
Highlight Frame Back layer.
Click on it with your Magic Wand.
New Raster layer.
Copy and paste Paper 3 Into Selection.
Deselect.
Delete the template layer.
Repeat the above step with the other Frame Back template layer.
Highlight the frame paper on the right.
Click anywhere outside of it with your Magic Wand.
Copy and paste your tube as a new layer.
Position over the paper.
Tap the delete key.
Deselect.
Highlight the frame back paper on the bottom.
Click anywhere outside of the paper with your Magic Wand.
Copy and paste Watering Can 1 as a new layer.
Resize 80%
Move into position - see my tag for reference.
Tap the delete key.
Deselect.
Paste the watering can again.
Resize 60%
Position in front of the frame.
Add your embellishments. I used:
Butterfly 1: Resize 25%
Staple 2: Resize 25% and 70%/Duplicate
Painted Bird 1: Resize 40%
Feather 1: Resize 40%
Ribbon 1: Resize 60%
Natural Bloom 3: Resize 25% and 80%/Duplicate/Flip/Resize 80%/Duplicate/Mirror
Highlight your white canvas.
New Raster layer.
Select All.
Copy and paste Paper 4 Into Selection.
Deselect.
Apply the mask.
Merge Group.
Add your copyrights.
Add your name:
Give it the same Inner Bevel.
I hope you enjoyed this tutorial.
I’d love to see your results and show it off in my gallery.
Email me!
Hugs,


