Saturday, March 13, 2010

Spring Beauties

Clicking on the image will enlarge to full view.

Supplies
5 tubes of choice - I’m using the wonderful artwork of Keith Garvey here
Font of Choice - I’m using Angelina here
Becky Mask 22 here
Eye Candy 5 Impact - Gradient Glow
“Wishing for Spring” is a PTU tagger size scrap kit created by Danielle of Dazzling Scraps and can be purchased at Twilight Scraps. You can visit her blog here.
Thank you Danielle for an awesome kit!!

This tutorial was written assuming you have a working knowledge of PSP.

~♥~ Let’s get started ~♥~

Open up a 700 X 700 blank canvas.
Flood Fill white.

Copy and paste Frame 2 as a new layer.
Resize 150%
Use your Magic Wand and click inside of each frame.
New Raster Layer below the frame.
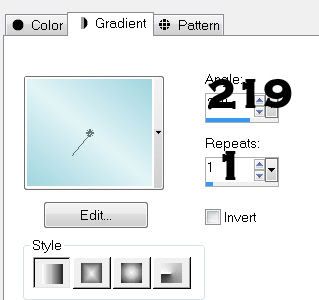
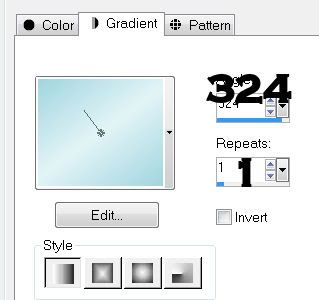
Flood fill with a gradient of choice.
Deselect.

Highlight the frame layer again.
Using your Magic Wand and click inside the first frame.
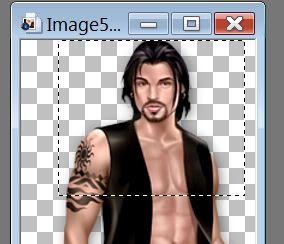
Copy and paste a tube below the frame.
Selections/Invert
Tap the delete key.
Deselect.

Repeat the above step with the remaining 3 squares.

Close out your white background and merge visible.
Reopen your white background.
Position the merged layer toward the bottom of your canvas.

Highlight your white background.
New Raster layer.
Copy and paste a paper of choice Into Selection.
Deselect.
Adjust/Blu4/Gaussian Blur
Radius: 5
OK
Apply your mask.
Merge Group.
 
Now copy and paste each of your tubes again just above the mask layer.
Move each of the tubes into position.
To each tube layer do the following:
Apply the Mask
Merge Group.
Lower the Opacity to 28

Add your embellishments. I used:
Swing 2: Resize 120%
Bow 3: Resize 30% Free rotate right 25 degrees
Dragonfly 1: Resize 25%
Bird 2: Resize 30%
Frog 1: Resize 30%
Frog 2: Resize 25%
Daisy 1 & 2: Resize 25% and 80%

Add your copyrights.

Add your name.
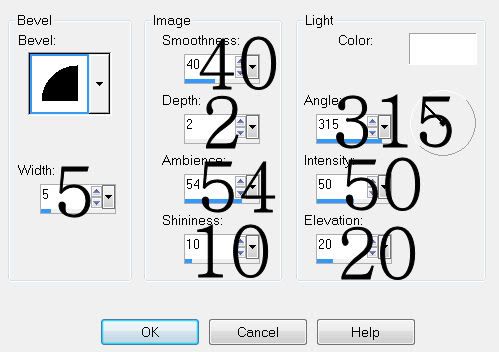
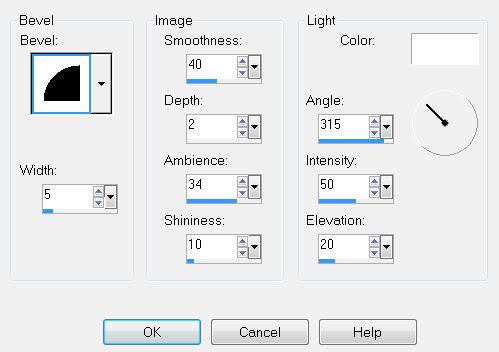
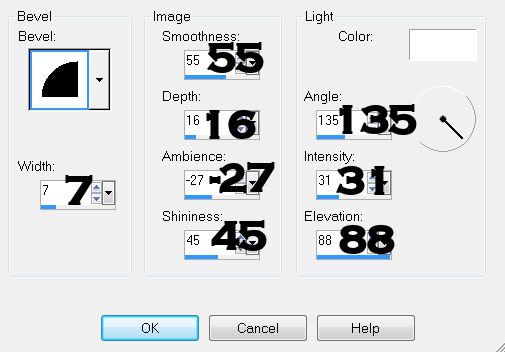
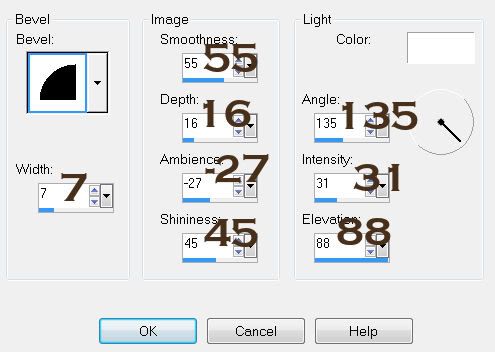
Give it the same inner bevel:


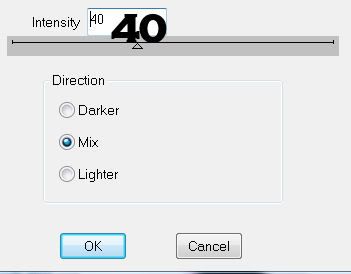
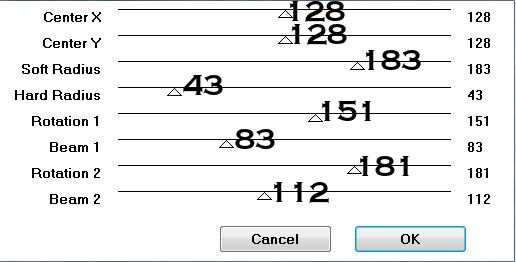
Apply Eye Candy 5 - Impact: Gradient Glow:


Resize all layers 80%.

I hope you enjoyed this tutorial.
I’d love to see your results and show it off in my gallery.
Email me!
Hugs,
Bev

Spring's Arrival

Clicking on the image will enlarge to full view.

Supplies
1 tube of choice - I’m using the wonderful artwork of Caron Vinson here
Font of Choice - I’m using Felt Tip here
Vix mask 350 here
Scraps of Enchantment Template 66 here
“Spring has Sprung” is a PTU tagger size scrap kit created by Sarah of Lady Raven Creations Scraps and can be purchased at Lollipops n Gumdrops. You can visit her blog here.

This tutorial was written assuming you have a working knowledge of PSP.

~♥~ Let’s get started ~♥~

Open up the template.
Shift + D.
Close out the original.
Delete the Info layer.

Highlight Brush layer.
Select All/Float/Defloat.
New Raster layer.
Flood fill with a gradient of choice.
Deselect.
Delete the template layer.

Highlight Dark Gray Rectangle layer.
Use your Magic Wand and click on it.
Copy and paste a paper of choice.
Resize 75%
Selections/Invert
Tap the delete key.
Deselect.
Delete the template layer.

Highlight Light Grey Rectangle layer.
Repeat the above step.
Highlight Black Square layer.
Click on it with your Magic Wand.
New Raster layer.
Flood fill with a gradient of choice.
Deselect.
Delete the template layer.

Copy and paste your tube as a new layer.
Move it into position where you want it.
Duplicate your tube.
Resize the original tube to be a bit larger and move it slight toward the right corner of the square layer.
Highlight the square layer.
Select All/Float/Defloat
Selections/Invert
Highlight the tube you made a bit larger.
Tap the delete key.
Selections/Modify/Feather
Number of Pixels:
43
OK
Tap the delete key until you have a nice feathered effect.
Deselect.
Change the Properties to Multiply.

Add your embellishments. I used:
Flower 5: Resize 30%
Flower 3: Resize 25%
Word Art
Doodle 4: Resize 50%
Butterfly 3: Resize 25% Free rotate right 20 degrees
Butterfly 2: Resize 25% and 80% Free rotate left 20 degrees

Highlight your white background.
New Raster layer.
Select All.
Copy and paste a paper of choice Into Selection.
Deselect.
Apply the Mask.
Resize 120%
Merge Group.

Add your copyrights.

Add your name.
Give it the same inner bevel:


Resize all layers 85%

I hope you enjoyed this tutorial.
I’d love to see your results and show it off in my gallery.
Email me!
Hugs,
Bev

Friday, March 12, 2010

Kiwi Fantasy

Clicking on the image will enlarge to full view.

Supplies
Font of Choice - I’m using Oh Lara - a pay font here
Weescotlass Mask 241 here
Scraps of Enchantment Template 53 here
“Kiwi Fantasy” is a PTU tagger size scrap kit created by Julie of Bits n Bobs and can be purchased at Exquisite Scraps. You can visit her blog here.

This tutorial was written assuming you have a working knowledge of PSP.

~♥~ Let’s get started ~♥~

Open up the template.
Shift + D.
Close out the original.
Image/Canvas Size
650 X 650
OK
Flood fill the background layer white.
Delete the Info layer, Word Art, and Hearts layers.

Highlight Black Rectangle layer.
Use your Magic Wand and click on it.
New Raster layer.
Copy and paste a paper of choice Into Selection.
Deselect.
Delete the template layer.

Highlight Scallop layer.
Repeat the above step.

Highlight Grey Rectangle layer.
Repeat the above step.

Highlight White Tag layer.
Use your Magic Wand and click on it.
New Raster layer.
Copy and paste a paper of choice Into Selection.
Selections/Modify/Contract by 10
Tap the delete key.
Selections/Modify/Expand by 3
New Raster layer below the frame you just created.
Copy and paste a paper of choice Into Selection.
Deselect.
Delete the template layer.

Give a slight Inner Bevel to the frame:


Highlight RibbonJoLuvsDogs Layer.
Select All/Float/Defloat
New Raster layer.
Copy and paste a paper of choice Into Selection.
Deselect.
Change the Properties to Overlay.
Give the template layer the drop shadow - not the Overlay layer.

Highlight Ribbon Layer.
Select All/Float/Defloat
New Raster layer.
Copy and paste a paper of choice Into Selection.
Deselect.
Delete the template layer.

Highlight RicRac layer.
Repeat the above step.

Highlight the Heart layer.
Repeat the above step.
Give it the same inner bevel.

Add your embellishments. I used:
Element 35
Element 8: Resize 65%
Element 61: Resize 50% Mirror
Element 13: Resize 70%
Element 11: Resize 60%
Elements 37 & 39: Resize 35%
Element 29: Resize 25% and 80%
Poser

Highlight your white background.
New Raster layer.
Select All.
Copy and paste a paper of choice Into Selection.
Deselect.
Apply the Mask.
Merge Group.

Add your copyrights.

Add your name.
Give it the same inner bevel.

Resize all layers 85%

I hope you enjoyed this tutorial.
I’d love to see your results and show it off in my gallery.
Email me!
Hugs,
Bev

Springtime Fantasy

Clicking on the image will enlarge to full view.

Supplies
3 tubes of choice - I’m using the wonderful artwork of PinUpToons here
Font of Choice - I’m using MaSexy here
Weescotlass mask 241 here
“Kiwi Fantasy” is a PTU tagger size scrap kit created by Julie of Bits n Bobs and can be purchased at Exquisite Scraps. You can visit her blog here.
This tutorial was written assuming you have a working knowledge of PSP.

~♥~ Let’s get started ~♥~

Open up a 700 X 700 blank canvas.
Flood Fill white.

Copy and paste Element 53 as a new layer.
Click inside all the frames with your Magic Wand.
Selections/Modify/Expand by 3.
New Raster layer below the frames.
Copy and paste a paper of choice Into Selection.
Deselect.

Use your Magic Wand and click inside the left frame.
Selections/Modify/Expand by 3.
Copy and paste your tube as a new layer.
Leave it slightly large and slide it to the upper corner.
See my tag for reference.
Duplicate/Resize to make a little smaller.
Highlight the larger sized tube and change the Properties to Mulitply. Lower the opacity to around 39 or so.
Selections/Invert
Tap the delete key.
Highlight the smaller tube.
Tap the delete key.
Deselect.

Repeat the above step with the remaining frames.

Once you’re done, close out your white canvas.
Merge Visible.
Reopen your white canvas.

Add your embellishments. I used:
Element 62: Resize 40%
Element 10: Resize 85%
Element 14: Resize 70%
Element 13: Resize 60% Lower the Opacity to 26
Element 7

Highlight your white background.
New Raster layer.
Select All.
Copy and paste a paper of choice Into Selection.
Deselect.
Apply the Mask.
Merge Group.

Add your copyrights.

Add your name.

Give it a slight inner bevel:


Resize all layers 80%.

I hope you enjoyed this tutorial.
I’d love to see your results and show it off in my gallery.
Email me!
Hugs,
Bev

Thursday, March 11, 2010

Easter Secrets

Clicking on the image will enlarge to full view.

Supplies
2 tubes of choice - I’m using the wonderful artwork of Elias Chatzoudis here
Font of Choice - I’m using Piano Light here
Monti’s Circular Mask here
Divine Intentions Template 309 here
“Hoppit” is a PTU tagger size scrap kit created by Julie of Bits n Bobs and can be purchased at Exquisite Scraps. You can visit her blog here.
Thank you so much Julie for such an adorable kit!

This tutorial was written assuming you have a working knowledge of PSP.

~♥~ Let’s get started ~♥~

Open up the template.
Shift + D.
Close out the original.
Image/Canvas Size
700 X 600
OK
Flood fill the background layer white.
Delete By Missy layer and Word Art by Missy layer.

Highlight Oval layer.
Use your Magic Wand and click on it.
New Raster layer.
Copy and paste a paper of choice Into Selection.
Deselect.
Delete the template layer.

Highlight Circle layer.
Repeat the above step.
Highlight Rectangle 2 layer.
Use your Magic Wand and click on it.
New Raster layer.
Flood fill with a color of choice.
DO NOT DESELECT

Copy and paste one of your tubes as a new layer.
Move into position over the circle.
Duplicate - shut this layer off.
Highlight the original tube layer.
Selections/Modify/Feather
Number of Pixels:
43
OK
Selections/Invert
Tap the delete key until you have a nice feathered look.
Deselect.
Reopen the duplicate tubr layer.
Using your Eraser Tool erase any on the bottom of the tube that covers the feathered effect.

Highlight Hearts Layer.
Select All/Float/Defloat
New Raster layer.
Flood fill with a gradient of your choice.
Deselect.
Delete the template layer.
Give it a slight inner bevel:


Highlight Rectangle layer.
Using your Magic Wand click it.
New Raster layer.
Flood fill with a color of choice.
Deselect.
Delete the template layer.

Highlight Thin Rectangle 2 layer.
Using your Magic Wand click it.
New Raster layer.
Flood fill with a contrasting color of choice.
Deselect.
Delete the template layer.

Highlight Frame Background layer.
Select All/Float/Defloat
New Raster layer.
Flood fill with a gradient of choice.
Deselect.
Delete the template layer.

Highlight Frame layer.
Use your Magic Wand and click on it.
New Raster layer.
Flood fill with a contrasting color.
Deselect.
Delete the template layer.
Give it the same inner bevel.

Copy and paste Element 29 as a new layer.
Resize 50%
Free rotate right 90 degrees
Move into position at the top right corner of the thin rectangle.
See my tag for reference.
Duplicate,
Erase the bow off of the end.
Mirror.
Move it into alignment of the other stitched layer so that it creates a running cross stitch row.
Duplicate the original stitch layer and move toward the end.
Erase any that overhangs the side.

Add your embellishments. I used:
Element 2: Resize 60%
Element 1: Resize 50%
Element 3: Resize 40%
Element 42: Resize 40% Free rotate Left 10 degrees
Element 45: Resize 40% Free rotate right 15 degrees
Element 44: Resize 40% Free rotate right 80 degrees
Element 41: Resize 70%
Element 39
Element 47: Resize 50%
Element 22: Resize 80% Free rotate right 10 degrees. Duplicate/Mirror/Flip
Element 16: Resize 70%

Highlight your white background.
New Raster layer.
Select All.
Copy and paste a paper of choice Into Selection.
Deselect.
Apply the Mask
Resize 105%
Merge Group.

Add your copyrights.

Add your name.

Resize all layers 80%

I hope you enjoyed this tutorial.
I’d love to see your results and show it off in my gallery.
Email me!
Hugs,
Bev

New Relationships

Clicking on the image will enlarge to full view.

Supplies
2 tubes of choice - I’m using the wonderful artwork of Keith Garvey here
Font of Choice - I’m using Piano Light here
Artmama’s Mask 2 here
Divine Intentions Template 271 here
DSB Flux - Bright Noise
Tramages - Starmaker
“Butterflies” is a PTU tagger size scrap kit created by Lynne of Baby Cakes Scraps and can be purchased at Kreative Kreations Korner. You can visit her blog here.
Thank you so much Lynne for another beautiful kit!

This tutorial was written assuming you have a working knowledge of PSP.

~♥~ Let’s get started ~♥~

Open up the template.
Shift + D.
Close out the original.
Resize all layers 90%
Image/Canvas Size
700 X 650
OK
Flood fill the background layer white.

Highlight Oval layer.
Use your Magic Wand and click on it.
New Raster layer.
Copy and paste a paper of choice Into Selection.
Deselect.
Choose a dark color from the paper and using your Target Tool color the template layer.

Highlight Rectangle 1 layer.
Use your Magic Wand and click on it.
New Raster layer.
Copy and paste a paper of choice Into Selection.
Deselect.
Using your Target Tool again, color the template layer.

Highlight Rectangle 2 layer.
Use your Magic Wand and click on it.
New Raster layer.
Flood fill with white.
Apply DSB Flux - Bright Noise:


Highlight Rectangle 3 Layer.
Using your Magic Wand click it.
New Raster layer.
Copy and paste a paper of choice Into Selection.
Deselect.
Delete the template layer.

Highlight Circle layer.
Using your Magic Wand click it.
New Raster layer.
Copy and paste a paper of choice Into Selection.
Deselect.
Delete the template layer.

Highlight Circle Half layer.
Using your Magic Wand click it.
New Raster layer.
Copy and paste a paper of choice Into Selection.
Deselect.
Delete the template layer.

Highlight Small Circle layer.
Select All/Float/Defloat
New Raster layer.
Flood fill with a gradient made of matching colors to the paper.


Highlight Small Circle 2 layer.
Select All/Float/Defloat
New Raster layer.
Flood fill with a gradient made of matching colors to the paper.


Merge Visible both small circle layers.

Highlight Circle Frame layer.
Using your Target Tool again, colorize.

Repeat the above step with Circle Frame 2 layer.

Highlight Thin Rectangle layer.
Flood fill with any gradient of your choice.
I just changed Angle and Repeats to zero.

Highlight Stars layer.
You can colorize using your Target Tool
Or
Select All/Float/Defloat
New Raster layer.
Flood fill with a color of choice.
Apply DSB Flux - Bright Noise:
Same Settings.

In order to get the right effect from Tramages - Starmaker you must follow this next step.

Copy and paste as a new layer the tube you want to have in the small circles.
Move it into position below the small circle - you must do all your resizing to it now.
Once you have it resized as you like:
Edit/Copy
Edit/Paste as New Image
Using your Selection Tool select the part of the tube that will go below the frame. See the example of mine.


Edit/Copy
Make your working canvas active.
Edit/Paste as New Raster.
Delete your other tube - you no longer need it.
You should now just have the headshot of your tube as the only tube layer on your working canvas.
Duplicate.
Move the duplicated tube into position below the other circle frame.
Highlight the small circles layer.
Select All/Float/Defloat
Selections/Invert
Highlight each of the tube layers and tap the delete key.
Change the Properties on both tube layers to Soft Light.
Merge Visible with the circles layer.
Apply Tramages - Starmaker


Copy and paste your tube as a new layer.
Move it into position.
Duplicate
Highlight the circle layer.
Select All/Float/Defloat
Selections/Invert
Highlight the original tube layer and tap the delete key.
Highlight the Duplicate layer and use your Eraser Tool to erase any that overhangs the bottom of the circle.

Add your embellishments. I used:
Staple: Resize 25%. Duplicate/Free rotate Left 30 degrees.
Stitched Ribbon: Resize 35% Use your Pick Tool to move the sides in slightly
Branch: Resize 50%
Glass Bfly: Resize 25%
Blue Clipped: Resize 40% Free rotate right 120 degrees
Bow: Resize 25%
Baby’s Breath: Resize 70% Duplicate/Resize 80%
Lace FL 2: Resize 65%
Sheer Bfly 2: Resize 25%
Shere Bfly: Resize 30%

Highlight your white background.
New Raster layer.
Select All.
Copy and paste a paper of choice Into Selection.
Deselect.
Apply the Mask.
Merge Group.
Duplicate.
Merge Down.
Duplicate.

Add your copyrights.

Add your name.
Give it a slight inner bevel:


Resize all layers 80%.

I hope you enjoyed this tutorial.
I’d love to see your results and show it off in my gallery.
Email me!
Hugs,
Bev

Wednesday, March 10, 2010

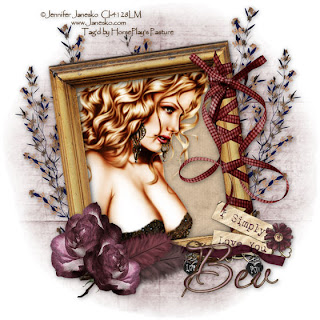
I Simply Love You

Clicking on the image will enlarge to full view.

Supplies
1 tube of choice - I’m using the wonderful artwork of Jennifer Janesko here
Font of Choice - I’m using Aquarelle here
Monit Circular mask here
“Antique Romance” is a PTU full size scrap kit created by Jay of Heartbeatz Creationz and can be purchased at her store here. You can visit her blog here.
Thank you Jay for a stunningly beautiful kit!

This tutorial was written assuming you have a working knowledge of PSP.

~♥~ Let’s get started ~♥~

Open up a 700 X 700 blank canvas.
Flood fill white.

Copy and paste Element 18 as a new layer.
Resize 25% and 40%
Free rotate left 8 degrees.
Use your Magic Wand and click inside of it.

Copy and paste a paper of choice below the frame.
Resize to your liking.
Selections/Invert
Tap the delete key.
DO NOT DESELECT.

Copy and paste your tube as a new layer below the frame.
Tap the delete key.
Deselect.

Close out your white background.
Merge Visible.
Reopen your white background.

Add your embellishments. I used:
Element 3: Resize 30%
Element 19: Resize 25% and 70%
Element 21: Resize 2% and 50%
Element 26: Resize 25% and 40% Free rotate right 90 degrees
Element 17: Resize 25% and 35% Duplicate/Resize 80%
Element 16: Resize 25% and 50% Free rotate right 80 degrees
Element 15: Resize 255 and 45% Free rotate right 60 degrees
Element 23: Resize 25% and 40% Free rotate right 25 degrees

Highlight your white background.
New Raster layer.
Select All.
Copy and paste a paper of choice Into Selection.
Deselect.
Apply the Mask.
Merge Group.
Duplicate.

Add your copyrights.

Add your name.
Give it a slight inner bevel:


I hope you enjoyed this tutorial.
I’d love to see your results and show it off in my gallery.
Email me!
Hugs,
Bev

Spring Celebration

Clicking on the image will enlarge to full view.

Supplies
1 tube of choice - I’m using the wonderful artwork of Chris de Lara here
Font of Choice - I’m using Felt Tip here
Becky mask 22 here
“Giving” is a PTU tagger size scrap kit created by Connie of Connie’s Creative Chaos and can be purchased at Sunflower Scraps Boutique. You can visit her blog here.

This tutorial was written assuming you have a working knowledge of PSP.

~♥~ Let’s get started ~♥~

Open up a 700 X 700 blank canvas.
Flood fill white.

Copy and paste Giving box as a new layer.
Resize 80%
Using your Magic Wand click inside of it.
Selections/Modify/Expand by 6
New Raster layer below the box.
Copy and paste a paper of choice Into Selection.
Deselect.

Add your embellishments. I used:
Grape 1: Resize 50%/Mirror
Blue 1: Resize 70%
Humming 1: Resize 35%
Purpleaa: Resize 30%
Givingfly 4 & 5: Resize 25%

Highlight your white background.
New Raster layer.
Select All.
Copy and paste a paper of choice Into Selection.
Deselect.
Apply the Mask.
Merge Group.
Using your Pick Tool push the bottom up so the mask is squared around the tag.

Copy and paste Fence 2 as a new layer above the mask.
Resize 80%
Move it into position so the right side is touching the right side of your canvas.
Duplicate
Slide the duplicate to the left and into position so that there’s barely a gap between the right side of duplicated fence and left side of the original fence.
Merge Down.
Apply the mask.
Merge Group.
Duplicate
Change the Properties to Overlay.

Add your copyrights.

Add your name.
Give it an inner bevel:


Resize all layers 80%.
I hope you enjoyed this tutorial.
I’d love to see your results and show it off in my gallery.
Email me!
Hugs,
Bev

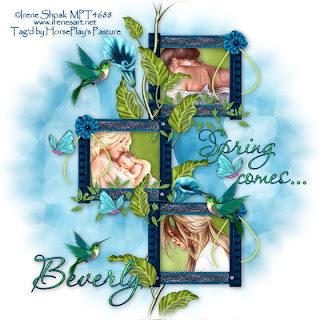
Spring Comes...


Supplies
3 tubes of choice - I’m using the beautiful artwork of Irene Shpak here
Font of Choice - I’m using Aquarelle here
Weescotlass Mask 138 here
Greg’s Factory Output Vol. II - Pool Shadow
“Giving” is a PTU tagger size scrap kit created by Connie of Connie’s Creative Chaos and can be purchased at Sunflower Scraps Boutique. You can visit her blog here.

This tutorial was written assuming you have a working knowledge of PSP.

~♥~ Let’s get started ~♥~

Open up a 700 X 700 blank canvas.
Flood fill white.

Copy and paste Frame 4 as a new layer.
Resize 70%
Using your Selection Tool, outline each frame box.
New Raster layer below the frame.
Copy and paste a paper of choice Into Selection.
Deselect.

Using your Selection Tool again, outline the top frame.
Copy and paste your tube below the frame.
Selections/Invert
Tap the delete key.
Deselect.

Repeat the above step with the remaining 2 boxes.

Once you’ve done that, close out your white canvas and merge visible.
Reopen your white canvas.

Copy and paste Flower 7 as a new layer.
Resize 80%
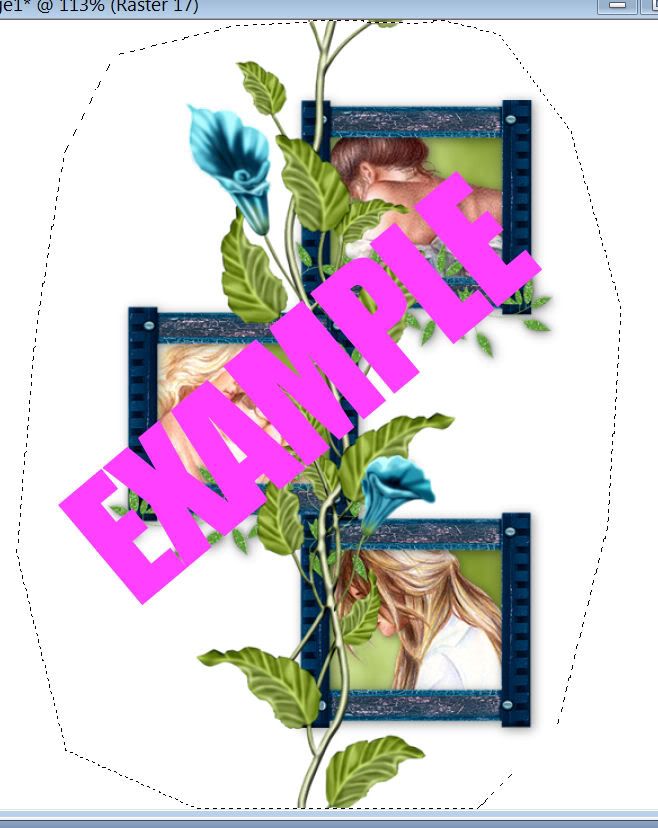
Using your Freehand Selection Tool outline the flower vine:


Selections/Modify/Feather:
Number of Pixels:
43
OK
Selections/Invert
Tap the delete key until you have a nice feathered look.
Deselect.
Duplicate.
Move the Duplicate behind the merged frame layer.
Highlight the top vine layer and erase anything you don’t want overlapping the frame.

Add your embellishments. I used:
Tied in Green bb: Resize 25%
Humming 1: Resize 40%
Givingfly 4: Resize 25% and 50%

Highlight your white background.
New Raster layer.
Select All.
Copy and paste a paper of choice Into Selection.
Deselect.
Apply the Mask.
Resize 130%

Type out the words
“Spring comes…”
Be sure the words are on separate layers.
Move them into position and then merge visible.
Give it an inner bevel:


Add your copyrights.

Add your name.
Give it the same inner bevel.
Apply Greg’s Factory Output Vol II - Pool Shadow.

Resize all layers 80%.

I hope you enjoyed this tutorial.
I’d love to see your results and show it off in my gallery.
Email me!
Hugs,
Bev

Monday, March 8, 2010

Rebel Yell


Supplies
1 tube of choice - I’m using the wonderful artwork of Ismael Rac here
Font of Choice - I’m using Bambino here
Weescotlass mask 297 here
Divine Intentions Template 194 here
“Rebel Yell” is a PTU tagger size scrap kit created by Missy of Scraps with Attitude and can be purchased at her store Scraps with Attitude. You can visit her blog here.
Thank you Missy for such a wicked kit packed with your talent!

This tutorial was written assuming you have a working knowledge of PSP.

~♥~ Let’s get started ~♥~

Open up the template.
Shift +D.
Close out the original.
Delete By Missy layer.

Highlight Large Circle layer.
Use your Magic Wand and click on it.
New Raster layer.
Copy and paste a paper of choice Into Selection.
Deselect.

Copy and paste your tube over Square One.
Resize to your liking and move it into the exact position you want it.
Duplicate/Mirror
Move the duplicated layer into the exact position you want it.

Highlight Square One layer.
Use your Magic Wand and click on it.
New Raster layer.
Flood fill with a gradient of your choice.
Selections/Invert
Highlight the tube layer that’s over it.
Tap the delete key.
Change the Properties to Soft Light.

Highlight Square 2 layer.
Repeat the above step.

Highlight Circle layer.
Click on it with your Magic Wand.
New Raster layer.
Copy and paste a paper of choice Into Selection.
Copy and paste your tube of choice as a new layer.
Selections/Invert
Tap the delete key.
Deselect.
Delete the template layer.

Highlight Dotted Circle layer.
Select All/Float/Defloat
Flood fill with a contrasting color of the paper you used.
Deselect.
Delete the template layer.

Add your embellishments. I used:
RYE38: Resize 40%
RYE8: Resize 25%
RYE98: Resize 25% and 50% Free rotate left 20 degrees
RYE46: Resize 25% and 50% Free rotate right 20 degrees
RYE47: Resize 25% and 40% Free rotate left 20 degrees
RYE34: Resize 25% and 50%
RYE79: Resize 25% and 50%
RYE31: Resize 70%

Highlight your white background.
New Raster layer.
Select All.
Copy and paste a paper of choice Into Selection.
Deselect.
Apply the Mask.
Resize 105%
Merge Group.

Add your copyrights.

Add your name.

Resize all layers 90%.

I hope you enjoyed this tutorial.
I’d love to see your results and show it off in my gallery.
Email me!
Hugs,
Bev

Spring Into Easter


Supplies
2 tubes of choice - I’m using the wonderful artwork of PinUpToons here
Font of Choice - I’m using Dragonfly here
Weescotlass mask 297 here
Divine Intentions Template 218 here
Greg’s Factory Output Vol. II - Pool Shadow
Animation Shop - Optional
“Spring Into Easter” is a PTU tagger size scrap kit created by MoMo of Country Style Designs and can be purchased at Scraps with Attitude. You can visit her site here.
Thank you MoMo for such a precious Spring/Easter kit!

This tutorial was written assuming you have a working knowledge of PSP.

~♥~ Let’s get started ~♥~

Open up the template.
Shift +D.
Close out the original.
Delete By Missy layer.
Image/Canvas Size
650 X 550
OK
Flood fill background layer white.

Highlight Frame Backgrounds layer.
Use your Magic Wand and click on all 3 circles.
New Raster layer.
Copy and paste a paper of choice Into Selection.
Deselect.
DO NOT DELETE THE TEMPLATE LAYER.

Highlight Circle Frames layer.
Select All/Float/Defloat
New Raster layer.
Open up Frame 4 from the kit.
Zoom in on it. Using your Selection Tool choose out a small section of the frame.
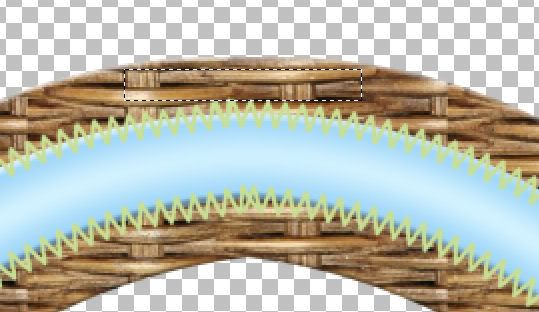

In your Color pallet set the foreground to pattern and find the basket pattern.
Angle: 0
Scale: 100
Make your canvas active and flood fill.
Deselect.
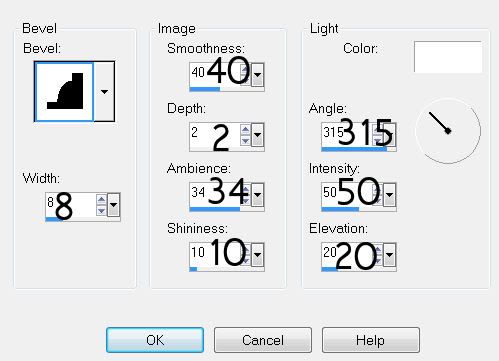
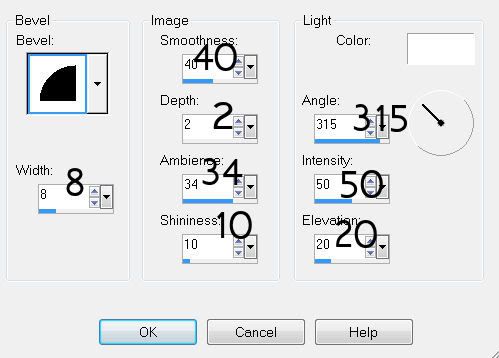
Give the frames a slight inner bevel:
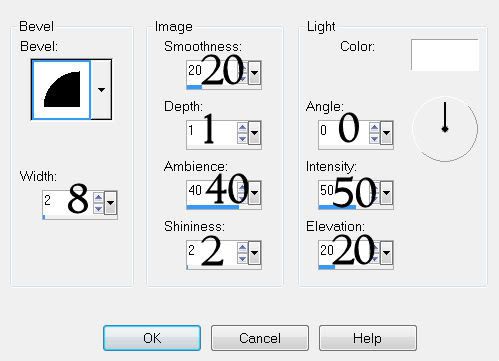

Delete the frame template layer.

You can now close out Frame 4 image as you’ll no longer need that pattern for this tutorial.

Highlight the Frame Background template layer.
Using your Magic Wand, click on the top circle.
Copy and paste your tube above the paper.
Selections/Invert
Tap the delete key.
Deselect.

Repeat the above step with the large circle.

Now we’re going to put all those tulips in the bottom circle.
For now:
Copy/Paste/Resize all the tulips 25%
Move them into position over the lower circle.
Once you’ve got them all where you want them, merge visible all tulips.
Highlight the template layer.
Use your Magic Wand and click on the bottom circle.
Highlight your merged tulip layer.
Selections/Invert
Tap the delete key.
Deselect.

Highlight Large Rectangle layer.
Use your Magic Wand and click on it.
New Raster layer.
Copy and paste a paper of choice Into Selection.
Deselect.
Delete the template layer.

Repeat the above step with Rectangle, Rectangle 2, and Rectangle 3.

Add your embellishments. I used:
Flower 2: Resize 40% Free rotate right 10 degrees
Egg 1: Resize 25% Free rotate right 5 degrees
Egg 2: Resize 25% and 80% Free rotate left 10 degrees
Flowers 3 & 5: Resize 25%
Flowers 4 & 6: Resize 25% and 85%

Highlight your white background.
New Raster layer.
Select All.
Copy and paste a paper of choice Into Selection.
Deselect.
Apply the Mask.
Merge Group.

Add your copyrights.

Add your name.
Choose your colors, but make your stroke set at 1.5.
Convert to Raster layer.
Select All/Float/Defloat
Selections/Modify/Contract by 1
OK
Give it the same inner bevel.
Apply Greg’s Factory Output Vol. II - Pool Shadow:
Default Settings.
Deselect.

If you don’t want to animate then resize all your layers 80%.
Save your tag.

If you DO want to animate DO NOT RESIZE YET!

Activate your Ellipse Tool set on “Draw Ellipse”
In your Layers Pallet:
Foreground: white
Background: Null
Line Style: Dashed
Width: 2
Draw out an oval circle near the spout of the watering can:
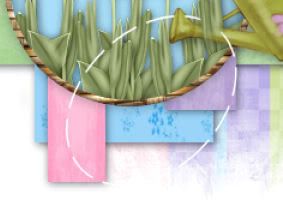
Convert to Raster layer.
Free rotate to make the side of the oval at a slant.
Diplicate 5 times for a total of 6 oval layers.
Rename them Water 1, 2, 3, 4,5, and 6.

Try to only concentrate on where the lines are coming out of the spout, and free rotate each circle layer a bit to form a “shower”.

Highlight Frame Background template layer.
Click on the bottom circle with your Magic Wand.
Selections/Invert
Highlight Water 1 layer.
Tap the delete key.
Repeat that with each water layer.
Deselect.

Using your Freehand Selection Tool, on the right side of the spout section out the area where the circles are:
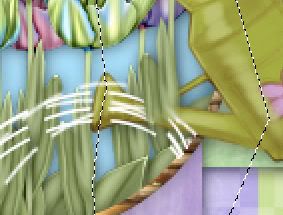

Highlight Water 1 and tap the delete key.
Repeat this with each of the water layers.
Deselect.

Highlight Water 1.
Adjust/Blur/Gaussian Blur
Radius: 1
OK
Repeat the above step with the rest of the water layers.
Copy Merge.

Open up AS
Edit/Paste/As New Animation

Back in PSP.
Click on the Undo button until all your rain layers are unblurred.
Moving the rain streams at the top and bottom, just move those away from the spout a little. The streams in between you can move in or out, up a little, down a little...however you like.
Copy Merge.

Carry into AS.
Edit/Paste/After Current Frame.

Back in PSP.
Click the undo button again until all the stream lines are unblurred.
Move them around again like you just did - again, only move the top and bottom rain streams closer to or away from the spout.
Copy Merge.

Carry into AS.
Edit/Paste/After Current Frame.

Repeat the above steps until you have 4 frames total in AS.

View your animation.
Animation/Resize Animation
Percentage of Original checked
Width & Height: 80
OK

Save your animation.

I do hope you stuck with this tutorial and was able to animate your tag. It’s some work - but I find this type of work relaxing, challenging, and fun…and I hope you found it to be the same as well.
Oooooor, I hope I didn’t confuse you too much! Yikes!!
If you have any questions just email me and I’ll do my best to help you out.

I’d love to see your results and show it off in my gallery.
Email me!
Hugs,
Bev
Somebunny Loves You

Clicking on the image will enlarge to full view.

r
Supplies
1 tube of choice - I’m using the wonderful artwork of Dominic Marco here
Font of Choice - I’m using Jester here
Weescotlass mask 249 here
Dezigns by Ali Template 115 here
Filters Unlimited 2.0 - Photo Aging - Optional
Xerox - Porcelain
“Hippity-Hop” is a PTU tagger size scrap kit created by Julie of Bits n Bobs and can be purchased at Exquisite Scraps. You can visit her blog here.

This tutorial was written assuming you have a working knowledge of PSP.

~♥~ Let’s get started ~♥~

Open up the template.
Shift + D.
Close out the original.
New Raster layer.
Send to bottom.
Flood fill white.
Delete the top 4 layers (credit layer and 3 staple layers)

I opened up Paper 8 and grabbed my colors from there that I used in this tutorial.

Highlight Raster 1 layer.
Use your Magic Wand and click on it.
New Raster layer.
Flood fill with a gradient of choice.
Deselect.
Delete the template layer.
Give it a texture of your choice.
I used Filters Unlmited 2.0 - Photo Aging Kit
Film Grain - Default Settings


Highlight Raster 3 layer.
Use your Magic Wand and click on it.
New Raster layer.
Invert your gradient and flood fill.
Give it the same texture.
DO NOT DESELECT YET.

Copy and paste your tube as a new layer.
Resize a bit larger if you have to and position over the circle.
Selections/Invert
Tap the delete key.
Deselect.
Apply Xerox - Porcelain
Default Settings

Highlight Raster 4 layer.
Use your Magic Wand and click on it.
New Raster layer.
Flood fill with a plain color.
Deselect.
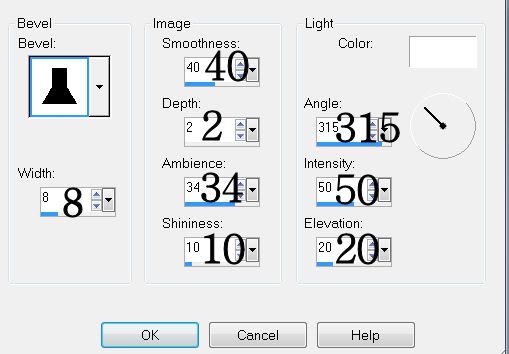
Give it a slight inner bevel:

Highlight Raster 2 layer.
Repeat the above step.

Highlight Merged Layer.
Using your Magic Wand click on the top rung.
New Raster layer.
Flood fill with a bright color.
Deselect.
Give it an inner bevel:


Repeat the above step with the remaining 2 rungs, using a different color on each one.
Once you have all 3 rungs done delete the template layer.

Copy and paste your tube as a new layer.

Add your embellishments. I used:
Stitching 2: Resize 40% It’s alright a tad hangs over - it can be hidden with the added embellishments.
Flower Spray 2: Resize 80%
Rabbit 1: Resize 40%
Dragonfly 1 and 2: Resize 25%
Butterfly 2 & 3: Resize 35% Free rotate 25 degrees

Highlight your white background.
New Raster layer.
Select All.
Copy and paste a paper of choice Into Selection.
Deselect.
Apply the Mask.
Resize 120%
Merge Group.
Duplicate.

Add your copyrights.

Add your name.
Give it the same inner bevel you used last.

Resize all layers 90%.

I hope you enjoyed this tutorial.
I’d love to see your results and show it off in my gallery.
Email me!
Hugs,
Bev
Sunday, March 7, 2010

First Kiss

Clicking on the image will enlarge to full view.

Supplies
1 tube of choice - I’m using the beautiful artwork of Zindy S.D. Nielsen here. This particular tube is a FREEBIE and be found here at the moment.
Font of Choice - I used Lavishly Yours - a pay font
Weescotlass Mask 138 here
Xerox - Porcelain
“Baby Blue” is a PTU tagger size scrap kit created by ZaZa of Scraps and Tubes and can be purchased from Butterfly Blush Designs.
Thank you ZaZa for such an eloquent and beautiful kit!

This tutorial was written assuming you have a working knowledge of PSP.

~♥~ Let’s get started ~♥~

Open up a 700 X 700 blank canvas.
Flood fill white.

Copy and paste Heart 21 as a new layer.
Use your Magic Wand and click inside the heart. Be sure to click inside the loops that are inside the heart.
New Raster layer below the frame.
Copy and paste a paper of choice Into Selection.
DO NOT DESELECT.

Copy and paste your tube as a new layer.
Resize as needed and position under the heart frame.
Selections/Modify/Feather
Number of Pixels:
43
OK
Selections/Invert
Tap the Delete key until you have a nice feathered effect.
Deselect.
Apply Xero - Porcelain:
Default Settings.

Add your embellishments. I used:
Flower 5: Mirror Duplicate/Resize 75%
Flower 8
Flower 7: Duplicate/resize 80%
Flower 1: Mirror/Resize 90%
Feather: Resize 70%
Swan: Resize 70%
Butterfly 1: Resize 25% and 85%

Highlight your white background.
New Raster layer.
Select All.
Copy and paste a paper of choice Into Selection.
Deselect.
Apply the Mask.
Resize 130%
Merge Group.
Duplicate

Add your copyrights.

Add your name.
Choose your colors but be sure the stroke is set to 1.
Convert to Raster layer.
Select All/Float/Defloat
Selections/Modify/Contract by 1
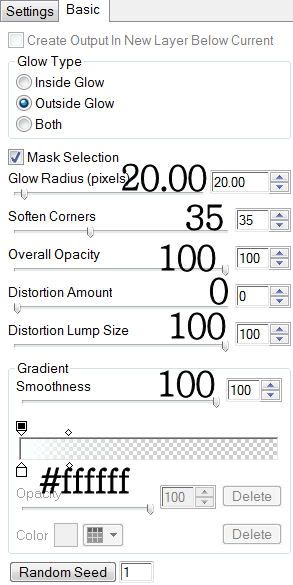
Give it an inner bevel:


Give it a hint of Noise.
Deselect.

Resize all layers 80%.

I hope you enjoyed this tutorial.
I’d love to see your results and show it off in my gallery.
Email me!
Hugs,
Bev