Friday, August 20, 2010

Sunshine n Lollipops


Clicking on the image will allow you to enlarge to bigger size.

Supplies

1 tube of your choice - I used the artwork of Denis Rino at MPT
Font of Choice - I used Nadall here
Weescotlass Mask 241 here
“Sunshine and Lollipops” is a PTU scrap kit created by
Julie of Bits N Bobs and can be purchased at Exquisite Scrap Store. You can visit her blog here.
Thank you Julie for a bright and cheerful kit!

~♥~ Let’s get started ~♥~

Open up a 700 X 700 blank canvas.
Flood fill white.

Copy and paste 57 as a new layer.
Click inside of it with your Magic Wand - even click inside the large gaps.
Selections/Modify/Expand by 1
New Raster layer below the frame.
Copy and paste a paper of choice Into Selection.
DO NOT DESELECT.

Copy and paste 51 as a new layer above the paper.
Move into position - see my tag for reference.
Selections/Invert
Tap the delete key.
DO NOT DESELECT.

Copy and paste your tube as a new layer just below the frame.
Tap the delete key.
Deselect.

Add your embellishments. I used:
64: Resize 70%
73: Resize 70%/Mirror
72: Resize 70%
7: Resize 40%
50: Resize 110%
28 & 30: Resize 25%/Free rotate 30 degrees

Highlight your white background.
Select All
New Raster layer.
Copy and paste a paper of choice Into Selection.
Deselect.
Apply the mask.
Merge Group.

Add your credits.

Add your name.

Resize all layers 80%.

I hope you enjoyed this tutorial.
I’d love to see your results and show it off in my gallery.
Email me!
Hugs,
Bev

Thursday, August 19, 2010

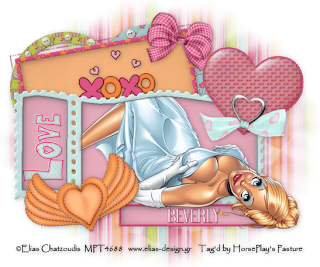
XOXO


Clicking on the image will allow you to enlarge for a bigger view.

Supplies

1 tube of your choice - I used the wonderful artwork of Elias Chatzoudis at MPT
Font of Choice - I used Dream Orphan here
Weescotlass Mask 138 here
Template 2 by Poppy made exclusive for Misfit Creations here - scroll to near the bottom
Eye Candy 5: Impact - Bevel
“XOXO” is a PTU scrap kit created by Brooke of Butterfly Blush Designs and can be purchased from her store Butterfly Blush Designs. You can visit her store blog here.
Thank you Brooke for such an adorable kit!

~♥~ Let’s get started ~♥~

Open up the template.
Shift + D.
Close out the Original.
Delete Raster 8, Copy of Raster 5, and Raster 7.

Highlight Raster 6.
Click on it with your Magic Wand.
New Raster layer.
Copy and paste a paper of choice Into Selection.
Selections/Modify/Contract by 3.
Tap the delete key.
Selections/Modify/Expand by 2.
New Raster layer below the new frame you just created.
Copy and paste a paper of choice Into Selection.
Deselect.
Deselect the template layer.
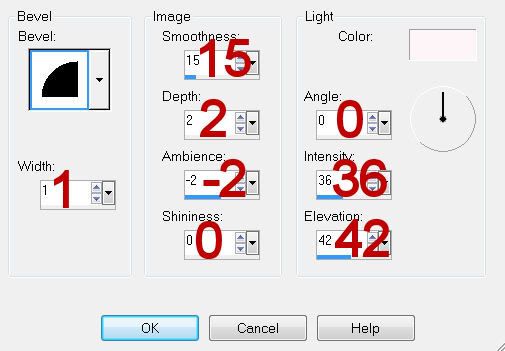
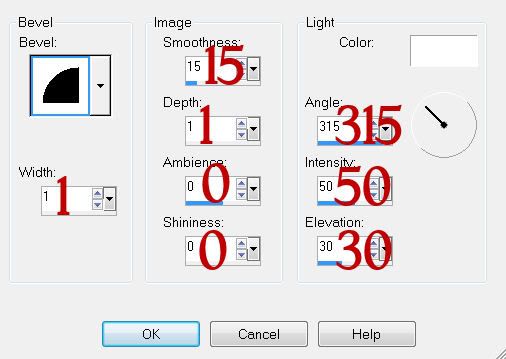
Give the frame a slight Inner Bevel:


Highlight Raster 4 layer.
Select All/Float/Defloat
New Raster layer.
Copy and paste a paper of choice Into Selection.
Deselect.
Delete the template layer.

Highlight Raster 3 layer.
Click on it with your Magic Wand.
New Raster layer.
Copy and paste a paper of choice Into Selection.
Selections/Modify/Contract by 10.
Tap the delete key.
Selections/Modify/Expand by 6.
New Raster layer below the new frame you just created.
Copy and paste a paper of choice Into Selection.
Deselect.
Delete the template layer.
Give the new frame the same slight inner bevel.

Close out Raster 5 for now.
Highlight Raster 1.
Click on it with your Magic Wand.
New Raster layer.
Copy and paste a paper of choice Into Selection.
Deselect.
Close this paper layer out for now.
Highlight Raster 5.
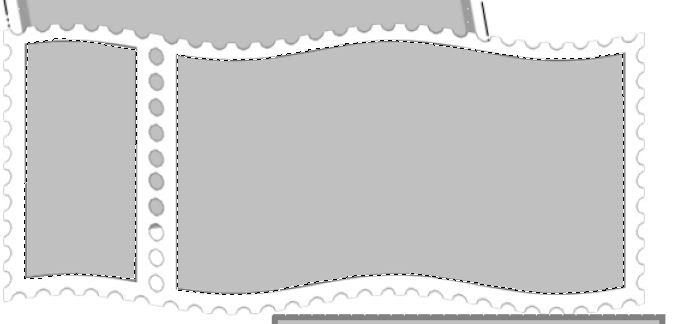
Use your Freehand Selection Tool and outline the inside area of the template:


Highlight the paper layer and open it up.
Tap the delete key.
Selections/Expand by 2.
New Raster layer above this new frame you just created.
Flood fill with a gray color.
Selections/Modify/Contract by 2.
Tap the delete key.
Selection/Modify/Expand by 6.
New Raster layer below the frame.
Copy and paste a paper of choice Into Selection.
Copy and paste your tube above the paper.
Selection/Invert
Tap the delete key.
Deselect.
Give the frame and the thin gray outline the same inner bevel.

Reopen Raster 5 layer.
Click on it with your Magic Wand.
New Raster layer.
Copy and paste a paper of choice Into Selection.
Selections/Modify/Contract by 3.
Tap the delete key.
Selections/Modify/Expand by 2.
New Raster layer below the new frame you just created.
Copy and paste a paper of choice Into Selection.
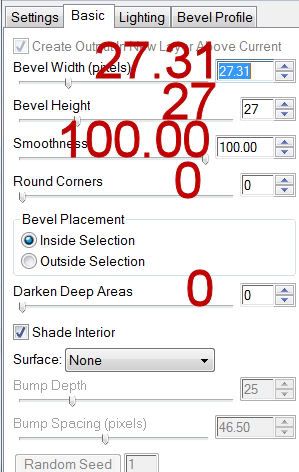
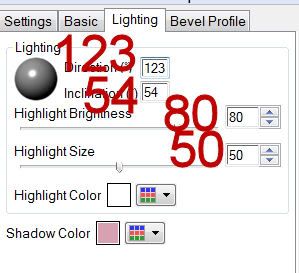
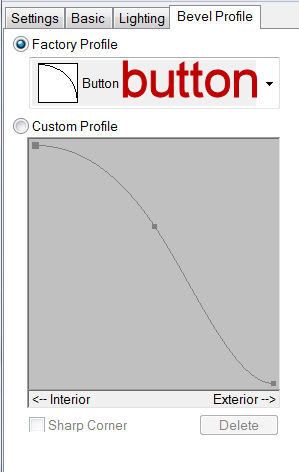
Apply Eyecandy 5: Impact - Bevel:
Basic Tab:


Lighting Tab:


Bevel Profile Tab:


Deselect.

Highlight the Heart frame you created and give it the same slight inner bevel.

Add your embellishments. I used:
Frame 2: Resize 40%
Frame 3: Resize 40%
Bow 1: Resize 50%/Free rotate right 20 degrees
XOXO Word Art: Resize 40%
Heart 4: Resize 40%/Free rotate left 20 degrees
Ribbon Heart 5
Love Word Art: Resize 50%/Free rotate left 90 degrees

Highlight your white background.
Select All
New Raster layer.
Copy and paste a paper of choice Into Selection.
Deselect.
Apply the mask.
Resize 130%
Merge Group.

Add your credits.

Add your name.
Give it the same slight inner bevel.

Resize all layers 80%.

I hope you enjoyed this tutorial.
I’d love to see your results and show it off in my gallery.
Email me!
Hugs,
Bev

Wednesday, August 18, 2010

Mayberry


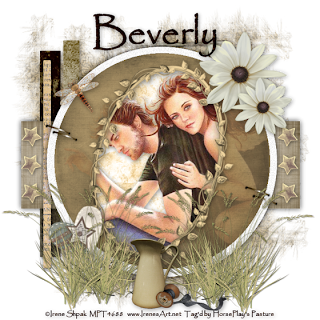
Clicking on the image will allow you to enlarge to bigger view.

Supplies

1 tube of your choice - I used the beautiful artwork of Irene Shpak at MPT
Font of Choice - I used Papyrus which came with my pc
Weescotlass Mask 297 here
Divine Intentionz Template 320 here
“Mayberry Gazette” is a PTU scrap kit created by
Brandie of Brandies Eye Candies and can be purchased at Scraps with Attitude. You can visit her blog here.
Thank you Brandie for such a truly wonderful kit. I fell in love with this!

~♥~ Let’s get started ~♥~

Open up the template.
Shift + D.
Close out the Original.
Image/Canvas Size
700 X 700
OK
Flood fill the background layer white.
Delete the top 7 layers.

Highlight Rectangle 1 layer.
Click on it with your Magic Wand.
Copy and paste Paper 4 as a new layer.
Resize 85%
Choose the darkest stripe and move into position over the template layer.
Selections/Invert
Tap the delete key.
Deselect.
Delete the template layer.

Highlight Rectangle 2 layer.
Repeat the above step using the same paper accept choose a lighter colored stripe.

Highlight Rectangle 3 layer.
Click on it with your Magic Wand.
Copy and paste Paper 1 as a new layer.
Resize 85%
Move into position over the template layer.
Selections/Invert
Tap the delete key.
Deselect.
Delete the template layer.

Highlight Raster 1 layer.
Click on it with your Magic Wand.
New Raster layer.
Copy and paste Paper 5 Into Selection.
Deselect.
Delete the template layer.

Highlight the Glittered layer.
Select All/Float/Defloat
New Raster layer.
Flood fill with the white color from Paper 4.
Adjust/Add Remove Noise/Add Noise:
Uniform and Monochrome checked
Noise: 25%
OK
Delete the template layer.

Highlight Circle layer.
Click on it with your Magic Wand.
New Raster layer.
Copy and paste Paper 8 Into Selection.
Deselect.
DO NOT DELETE THE TEMPLATE LAYER.

Copy and paste Frame 2 as a new layer.
Resize 60%
Free rotate right 15 degrees
Center the frame over the circle paper layer.
Copy and paste your tube as a new layer over the circle paper layer.
Move it into position so that the faces of the tube are within the frame.
Duplicate the tube layer and close it out for now.

Highlight the original tube layer.
Change the Properties to Multiply.
Lower the Opacity to about 34.
Highlight the Circle template layer.
Click on it with your Magic Wand.
Highlight the original tube layer.
Tap the delete key.
Deselect.
Delete the template layer.

Highlight the frame element layer.
Using your Freehand Selection Tool outline the frame.
New Raster layer below the close out duplicated tube layer.
Copy and paste Paper 7 Into Selection.
Highlight the duplicated tube layer and open it up.
Selections/Invert
Tap the delete key.
Deselect.

Add your embellishments. I used:
Star 1: Resize 25% and 50%/Duplicate 5 times for a total of 6
Flower 2: Resize 25%/Duplicate/Resize 70%
Staple: Resize 25% and 50%/Duplciate/Free rotate left 15 degrees
Dragonfly: Resize 25% and 70%
Grass: Resize 50%/Duplicate
Heart: Resize 25%/Free rotate left 30 degrees
Pitcher: Resize 25% and 80%
Spool: Resize 25% and 85%

Highlight your white background.
Select All
New Raster layer.
Copy and paste Paper 9 Into Selection.
Deselect.
Copy and paste Trellis as a new layer above the paper.
Merge down.
Apply the mask.
Merge Group.

Add your credits.

Add your name.

Resize all layers 80%.

I hope you enjoyed this tutorial.
I’d love to see your results and show it off in my gallery.
Email me!
Hugs,
Bev

Tuesday, August 17, 2010

Home


Clicking on the image will allow you to enlarge.
Supplies

Font of Choice - I used Arctic 2 here
Becky Mask 22 here
My Template 13 here
“House Warming” is a PTU scrap kit created by Katelynn’s Designs and can be purchased from Aussie Scrap Designs. You can visit her blog here.
Thank you Katelynn for such an adorable kit!

~♥~ Let’s get started ~♥~

Open up the template.
Shift + D.
Close out the original.
Delete the credit layer and Butterfly layer.

Highlight Large Rectangle 1 layer.
Click on it with your Magic Wand.
New Raster layer.
Copy and paste a paper of choice Into Selection.
Deselect.
Delete the template layer.
Give it a slight inner bevel:


Highlight Bottom Rectangle layer.
Merge Down.
Merge Down.
All 3 thin rectangles should be on one layer.
Use your Magic Wand and click on each one.
New Raster layer.
Copy and paste a paper of choice Into Selection.
Deselect.
Delete the template layer.
Give it the same slight inner bevel.


Highlight Flower layer.
Click on it with your Magic Wand.
New Raster layer.
Copy and paste a paper of choice Into Selection.
Deselect.
Delete the template layer.
Give it the same slight inner bevel.

Highlight Circle layer.
Click on it with your Magic Wand.
Copy and paste Paper 9 as a new layer
Deselect.
Adjust/Blur/Gaussian Blur:
Radius: 20
OK

Copy and paste Tree 1 as a new layer below the Circle Frame layer.
Resize 50%
Move into position - see my tag for reference.
Highlight the Circle Frame layer.
Click inside of it with your Magic Wand.
Selections/Modify/Expand by 6.
Selection/Invert
Highlight the tree layer.
Tap the delete key.
Deselect.

Add your embellishments. I used:
Round Bow 1: Resize 25% and 45%
Blossoms 4: Resize
Bird 1: Resize 30%
Pin 2: Resize 25%/Mirror
Gift 6: Resize 50%
Animals 1: Resize 50%/Mirror
Animals 2: Resize 50%/Mirror

Highlight your white background.
Select All
New Raster layer.
Copy and paste a paper of choice Into Selection.
Deselect.
Apply the mask.
Resize 105%
Merge Group.

Add your credits.

Add your name.

I hope you enjoyed this tutorial.
I’d love to see your results and show it off in my gallery.
Email me!
Hugs,
Bev


Sunday, August 15, 2010

Sprite


Clicking on the image will allow you to enlarge to bigger view.

Supplies

1 tube of choice - I used Jessica Dougherty at CILM
Font of Choice - I used Oh Lara a pay font
Weescotlass Mask 259 here
Scrapity Scrap and More Template 25 here
“Sprite” is a PTU scrap kit created by
Vicki of Gemini Creationz and can be purchased from TKO Scraps. You can visit her blog here.
Thank you Vicki for such a beautiful kit!

~♥~ Let’s get started ~♥~

Open up the template.
Shift + D.
Close out the original.
Resize all layers 120%
Delete the credit layer.
Image/Canvas Size
700 X 400
OK
Flood fill the background layer white.

Highlight Bottom Dotted Line layer.
Merge Down.
Select All/Float/Defloat
New Raster layer.
Flood fill with a color of choice.
Deselect.
Delete the template layer.
Give it a slight Inner Bevel:


Highlight Right Circle layer.
Click on it with your Magic Wand.
New Raster layer.
Copy and paste a paper of choice Into Selection.
Copy and paste your tube as a new layer - move into position over the paper layer.
Selections/Invert
Tap the delete key.
Deselect.
Delete the template layer.

Highlight Border Left Circle layer.
Select All/Float/Defloat
New Raster layer.
Flood fill with the same color you used on the dotted line layer.
Deselect.
Delete the template layer.
Give it the same slight inner bevel.

Repeat the above step with the following layers:
Border Right Circle layer.
Border Top Rect
Border Bottom Rect

Highlight Right Circle layer.
Click on it with your Magic Wand.
Copy and paste Brad as a new layer - move into position over the right circle layer.
Resize 80%
Selections/Invert
Tap the delete key.
Deselect.
Delete the template layer.

Highlight Top Rect layer.
Click on it with your Magic Wand.
New Raster layer.
Copy and paste a paper of choice Into Selection.
Deselect.
Delete the template layer.

Highlight Bottom Rect layer.
Repeat the above step.

Add your embellishments. I used:
Flower 1: Resize 90%
Ribbon 3: Resize 50%
Sequin
Greenery 3: Resize 60%
Drink: Resize 40%
Dragonfly: Resize 40%/Free rotate left 30 degrees
Lemon : Resize 30%
Lime: Resize 30%
Butterfly 1: Resize 30%
Floral Spray: Resize 70%

Highlight your white background.
Select All
New Raster layer.
Copy and paste a paper of choice Into Selection.
Deselect.
Apply the mask.
Resize 110%
Use your Pick Tool and pull the sides out slightly.
Merge Group.

Add your credits.

Add your name.
Give it a slight inner bevel:


Resize all layers 85%.

I hope you enjoyed this tutorial.
I’d love to see your results and show it off in my gallery.
Email me!
Hugs,
Bev

Beary Fine Day


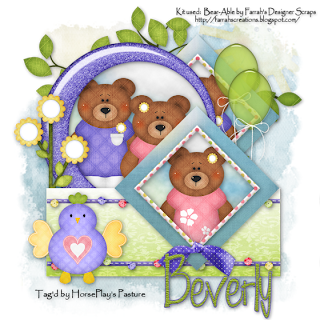
Clicking on the tag will allow you to enlarge to bigger view.

Supplies

Font of Choice - I used Fabulous 50’s here
Becky Mask 22 here
My Template 57 here
“Bear-Able” is a FTU scrap kit created by
Farrah’s Designer Scraps and can be downloaded from her blog here.
Please leave a thank you when downloading as it’s a small gesture for hard work given freely.

~♥~ Let’s get started ~♥~

Open up the template.
Shift + D.
Close out the original.
Delete the credit layer.
Image/Canvas Size
700 X 700
OK
Flood fill the background layer white.

Highlight Diamond Back 1 layer.
Click on it with your Magic Wand.
New Raster layer.
Copy and paste Paper 2 Into Selection.
Deselect.
Delete the template layer.

Highlight Diamond Back 2 layer.
Repeat the above step.

Highlight Diamond 1 layer.
Click on it with your Magic Wand.
New Raster layer.
Copy and paste Paper 1 Into Selection.
Copy and paste Bear 1 as a new layer - center it over the diamond.
Selections/Invert
Tap the delete key.
Deselect.
Delete the template layer.

Highlight Diamond 2 layer.
Repeat the above step accept copy and paste Bear 2.

Highlight Diamond Frame 1 layer.
Click on it with your Magic Wand.
New Raster layer.
Copy and paste Paper 5 Into Selection.
Deselect.
Delete the template layer.
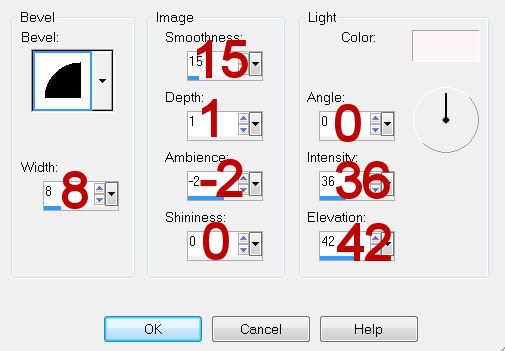
Give it a slight inner bevel:
INSERT PIC HERE

Highlight Diamond Frame 2 layer.
Repeat the above step.

Highlight Circle layer.
Click on it with your Magic Wand.
New Raster layer.
Copy and paste Frame 2 Into Selection.
Deselect.
Delete the template layer.
Click inside the frame with your Magic Wand.
Selections/Modify/Expand by 6.
New Raster layer below the frame.
Copy and paste Paper 1 Into Selection.
Deselect.
Copy and paste Bear 1 as a new layer below the frame.
Copy and paste Bear 2 as a new layer below the frame.

Highlight the Rectangle layer.
Click on it with your Magic Wand.
New Raster layer.
Copy and paste Paper 6 Into Selection.
Deselect.
Delete the template layer.

Highlight Bottom Line template layer.
Merge Down so that both lines are now on one layer.
Click on the top line.
Open up Paper 3/Free rotate left 90 degrees/Copy
Make your working canvas active.
Paste as a new layer.
Choose which stripe you want to have in the template layer - move into position.
Selections/Invert
Tap the delete key.
Deselect.

Highlight the template layer again.
Click on the bottom line.
Paste the paper again.
Choose the same colored stripe and position it over the template line.
Selections/Invert
Tap the delete key.
Deselect.
Delete the template layer.

Add your embellishments. I used:
Flower 1: Resize 50%
Bow 2: Resize 80%
Sequins
Bird
Balloon: Resize 50%
Tree: Resize 80%

Highlight your white background.
Select All
New Raster layer.
Copy and paste Paper 2 Into Selection.
Deselect.
Copy and paste Sun as a new layer - move into the top right corner.
Merge Down.
Apply the mask.
Merge Group.

Add your credits.

Add your name.
Give it a slight inner bevel:


Resize all layers 80%.

I hope you enjoyed this tutorial.
I’d love to see your results and show it off in my gallery.
Email me!
Hugs,
Bev