Thursday, July 26, 2012

Summer's End - Magical!

Supplies

1 tube of choice – I used the artwork of Karen Middleton which can be purchased from CDO.  You must have a license to use.

Font of choice – I used Centeria Script here

JWY Mask here

“Summer’s End – Magical!” is a tagger size scrap kit created by me, Bev of HorsePlay’s Pasture Designs and can be purchased from  either of your favorite stores – Lollipops n Gumdrops or Butterfly Blush Designs.   You can visit my designing blog here.

~~ Lets get started ~~

Open up a 700 x 700 blank canvas.
Flood fill white.

Copy and paste 36 as a new layer.
Resize 65%
Free rotate Left 10 degrees
Click inside all 4 areas of it with your Magic Wand.
Selections/Modify/Expand by 4.
New Raster layer below the frame.
Copy and paste Paper 9 Into Selection.
Deselect for now.

Add the following elements below the frame – see my tag for reference:
23
1:  Resize 70%/Mirror

Highlight the paper layer.
Click anywhere outside of it with your Magic Wand.
Highlight each element below the frame and tap the delete key.
Deselect.

Copy and paste your tube as a new layer.

Add your elements.  I used:
17:  Resize 50%/Flip/Duplicate/Mirror/Erase the end of the stem on each
13:  Resize 65%
8:  Resize 50%
8 again:  Resize 60% (position this one behind the frame)
2:  Resize 20%18:  Resize 65%

Highlight your white background.
New Raster layer.
Select All.
Copy and paste Paper 8 Into Selection.
Deselect.
Apply the mask.
Merge Group.

Close out your white background.
Merge Visible.
Resize 65%
Reopen your white background.

Copy and paste 48 as a new layer just above your white background.

Add the rest of the elements.  I used:
11 & 12:  Resize 50%
45:  Resize 45%
27:  Resize 20%/Free rotate Right 25 degrees/Duplicate/Mirror/Resize 70% and 50%

Highlight your white background.
New Raster layer.
Select All.
Copy and paste Paper 1 Into Selection.
Deselect.
Apply the mask.
Use your Pick Tool and pull the sides out slightly.
Merge Group.

Add your credits.

Add your name.
Foreground and Background: #260d0c
Type your name.
Give it a slight Inner Bevel:
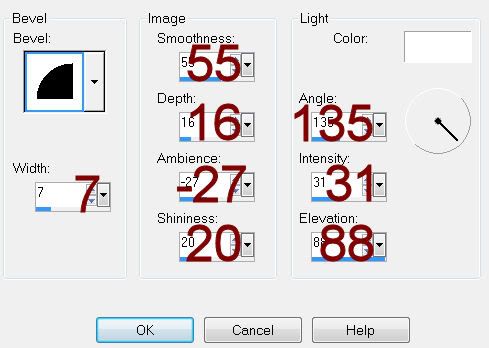
Use your Pick Tool and tilt it so that the name is angled evenly with the bottom of the scroll paper.

Resize all layers 80%.

I’d love to see your results.
Email me!
Hugs,
Bev

Tuesday, July 24, 2012

Hot Emo

Supplies

1 tube of choice – I used the awesome artwork of Zlata M which can be purchased from The PSP Project.  You must have a license to use.

Font of choice - I used Body Pierce & Chains here

Vix Mask 451 here

Plug Ins used:
Stylize – Glowing Edges
Eyecandy 3.1 – Glow

“Hot Emo” is a tagger size scrap kit created by Sanie of Creation by Sanie and can be purchased from HeartbeatzCreationz.   You can visit her blog here.
Thank you Sanie for a fantastic kit.
This tutorial was written assuming you have a working knowledge of PSP.

~~ Lets get started ~~

Open up a 700 x 700 blank canvas.
Flood fill white.

New Raster layer.
Make your Selection Tool active set on Ellipse.
Make an oval approximately 550 x 425 pixels – we’ll center it in a bit.
Copy and paste Paper 4 Into Selection.
Copy and paste your tube as a new layer over the paper – see my tag for reference.
Selections/Invert
Tap the delete key.
Change the Properties to Soft Light.
Merge Down.
Deselect.
Copy and paste Flame 2 as a new layer.
Resize 70%/Duplicate 4x’s.
Move flames into position – see my tag for reference.
Highlight the oval paper layer.
Click anywhere outside of it with your Magic Wand.
Highlight each flame layer and tap the delete key.
Deselect.
Close out your white background.
Merge Visible.
Reopen your white background.
Center it on your canvas.
Apply Eyecandy 3.1 – Glow
Width: 5
Opacity: 100%
Opacity Drop Off: Fat
Color: White
OK

New Raster layer.
Make your Selection Tool active set on Rectangle.
Make a rectangle approximately 600 x 100 pixels.
Copy and paste Paper 6 Into Selection.
Apply Stylize – Glowing Edge:
Use Default Settings.
OK
Deselect.
Apply Eyecandy 3.1 – Glow:
Use same settings.
Duplicate rectangle layer 2x’s and move them into position – see my tag for reference.

Copy and paste your tube as a new layer.
Position in front of the flames.

Add your elements.  I used:
Flower 1:  Resize 50%/Duplicate 3 x’s for a total of 4
Flying Heart 2:  Resize 50%
Bow 2:  Resize 30%/Duplicate/Mirror
Deco 1:  Resize 50%
Glitter 3:  Duplicate/Mirror/Flip
Bad Bug 1:  Resize 30%
Butterfly 2:  Resize 25%/Duplicate/Mirror/Resize 70%

Highlight your white background.
New Raster layer.
Select All.
Copy and paste Paper 3 Into Selection.
Apply the mask.
Merge Group.
Use your Pick Tool and pull the sides out slightly.

Add your credits.

Add your name.
Background: #000000
Type your name.
Convert to Raster layer.
Select All/Float/Defloat
Selections/Modify/Expand by 2.
New Raster layer below your name.
Flood fill with #ffffff
Deselect.
Highlight your name that’s in black.
Merge Down.

Resize all layers 80%.

I’d love to see your results.
Email me!
Hugs,
Bev

Sunday, July 22, 2012

Beach Party


Supplies

1 tube of choice – I used the beautiful artwork of Paul Butvila which can be purchased from Up Your Art.  You must have a license to use.

Font of choice - I used Fisher here

Becky Mask 22 here

Plug Ins used:
Mura’s Meister – Cloud

“By the Bay” is a tagger size scrap kit created by me, Bev of HorsePlay’s Pasture Designs and can be purchased from either of your favorite stores – Lollipops n Gumdrops or Butterfly Blush Designs.   You can visit my designing blog here.

This tutorial was written assuming you have a working knowledge of PSP.

~~ Lets get started ~~

Open up a 700 x 700 blank canvas.
Flood fill white.

Color Pallet:
Foreground: #a4c4d0
Background: #efefef

New Raster layer.
Apply Mura’s Meister – Cloud
OK

Color Pallet:
Foreground: #800000
Background: #1b1e2d
Stroke: 2

Type your name – large size so that it runs across the canvas.
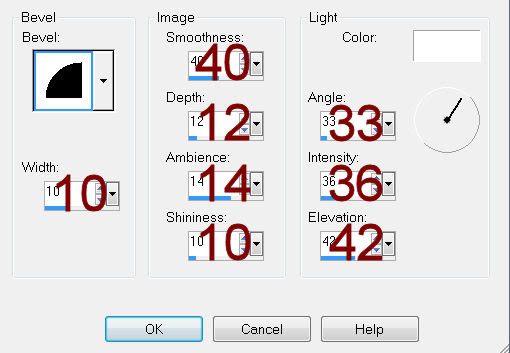
Give it a slight Inner Bevel:

Add the elements: See my tag for placement -
21:  Resize 60%/Duplicate
56:  Resize 50%/Duplicate as many times as you like
32:  Resize 70%/Mirror
50:  Resize 60%
52:  Resize 60%/Mirror
61:  Resize 25%
40:  Resize 30%
49:  Resize 30%/Duplicate
70:  Resize 80%

Copy and paste your tube as a new layer.

Crop you image if needed.
Copy Merge.

Create a new 700 x 700 blank canvas.
Flood fill white.
Paste as new layer.
Apply the mask.
Merge Group.

Duplicate
Merge Down.

Repeat the above step 3 more times.

Add your credits.

I’d love to see your results.
Email me!
Hugs,
Bev