Wednesday, November 24, 2010

Autumn Horizon


Clicking on the image will allow you to enlarge for bigger view.

Supplies

2 tubes of choice - I used the artwork of Anna Marine at CILM
Font of Choice - I used Rat Infested Mailbox here
Vix Mask 452 here - you’ll find it under March 15, 2010
Mura Meister - Copies
Greg’s Factory Output Vol. II - Pool Shadow
Creative by Nature Template 72 here
“Fall About” is a PTU tagger size scrap kit created by Julie of Bits N Bobs and can be purchased from Exquisite Scraps. You can visit her blog here.
Thank you Julie for this amazing kit!

This tutorial was written assuming you have a working knowledge of PSP.

~♥~ Let’s get started ~♥~

Open up the template.
Shift + D.
Close out the original.
Delete the top 3 layers.
Image/Canvas Size
700 x 600
New Raster layer.
Send to bottom.
Flood fill white.

Highlight Raster 5 layer.
Click on it with your Magic Wand.
New Raster layer.
Copy and paste Paper 9 Into Selection.
Deselect.
Delete the template layer.

Highlight Raster 6 layer.
Select All/Float/Defloat
New Raster layer.
Flood fill with #470000
Deselect.
Delete the template layer.

Highlight Raster 3 layer.
Click on it with your Magic Wand.
New Raster layer.
Copy and paste Paper 6 Into Selection.
Copy and paste your tube as a new layer.
Position it over the paper circle.
Selections/Invert
Tap the delete key
Deselect.
Delete the template layer.
Change the Properties to Overlay.

Highlight Raster 2 layer.
Click on it with your Magic Wand.
New Raster layer.
Copy and paste Paper 5 Into Selection.
Deselect.
Delete the template layer.
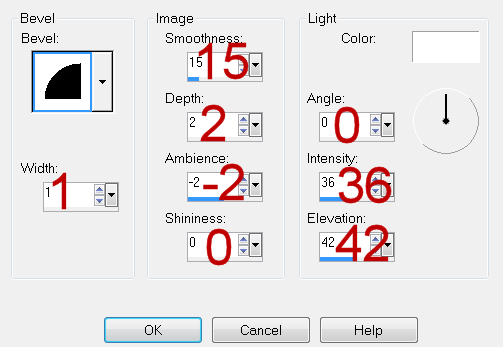
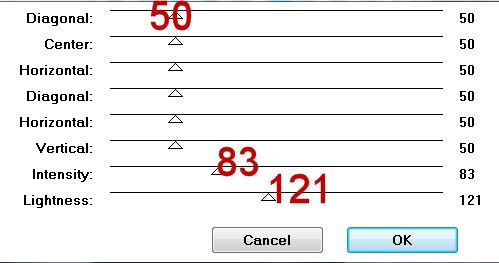
Apply Greg’s Factory Output Vol. II - Pool Shadow:


Copy and paste Element 59 as a new layer.
Resize 25% and 40%
Apply Mura Meister - Copies
Wallpaper (Perspective)
Default Settings accept change Number to 15.
OK
Position just over the rectangle paper.
Highlight the paper layer.
Click anywhere outside of it with your Magic Wand.
Highlight the leaves layer.
Tap the delete key.
Deselect.

Highlight Raster 7 layer.
Copy and paste Element 9 as a new layer.
Resize 70%
Position over the template layer.
Use your Pick Tool and bring the top and bottom in on the ribbon to match the length of the template layer.
Delete the template layer.

Highlight Raster 4 layer.
Click on it with your Magic Wand.
New Raster layer.
Copy and paste your tube as a new layer.
Resize as needed and position over the paper - see my tag for reference.
Duplicate/Move to the left a little/In your layers pallet move below the original.
Change the Properties to Soft Light.
Selections/Invert
Tap the delete key.
Deselect.

Add your embellishments. I used:
66: Resize 70%
52: Resize 70%
27: Resize 40%/Duplicate/Flip/Merge Down/Duplicate/Mirror
33: Resize 40%
6: Resize 70%

Crop your image.

Highlight your white background.
Select All.
New Raster layer.
Copy and paste Paper 8 Into Selection.
Deselect.
Apply the mask.
Merge Group.
Move the mask down and to the left just a tad.

Add your credits.

Add your name.

Resize all layers 80%.

I hope you enjoyed this tutorial.
I’d love to see your results and show it off in my gallery.
Email me!
Hugs,
Bev

The Holly Days


Clicking on the image will allow you to enlarge for bigger view.

Supplies

1 tube of choice - I used the beautiful artwork of Bits N Bob at Mistaken Art. You must check out all of her awesome tubes!!
Font of Choice - I used Clive Barker here
Gem Mask 161 here
Creative by Nature Template 42 here
“The Holly Days” is a PTU tagger size scrap kit created by Emjay Scraps and can be purchased from Butterfly Blush Designs. You can visit her blog here.
Thank you Em for a very festive kit!

This tutorial was written assuming you have a working knowledge of PSP.

~♥~ Let’s get started ~♥~

Open up the template.
Shift + D.
Close out the original.
Image/Canvas Size
700 x 500
Open up Raster 1 layer and flood fill white.
Delete the top 4 layers, Raster 4 layer, and Copy of Raster 4 layer.

Highlight Rectangle 2 layer.
Click anywhere on the black part with your Magic Wand.
New Raster layer.
Copy and paste Paper 16 Into Selection.
Deselect.
Delete the template layer.

Highlight Copy of Vector 1 layer.
Click on it with your Magic Wand.
New Raster layer.
Copy and paste Paper 15 Into Selection.
Copy and paste Element 10 as a new layer.
Resize 55%/Move into Position - see my tag for reference.
Selections/Invert
Tap the delete key.
Deselect.
DO NOT DELETE THE TEMPLATE LAYER.

Make your Lighten/Darken Tool active
Use Default Settings accept change the size to about 20.
Darken each end of the ribbon at the edge of the circle.

Copy and pate your tube as a new layer.

Add your embellishments. I used:
18: Resize 98%/Duplciate/Flip
48: Resize 70%
13: Resize 50%
11: Resize 50%/Free rotate right 10 degrees/Duplicate/Mirror
47: Resize 50%

Highlight your white background.
Select All.
New Raster layer.
Copy and paste Paper2 Into Selection.
Deselect.
Apply the mask.
Merge Group.

Add your credits.

Add your name.

Resize all layers 80%.

I hope you enjoyed this tutorial.
I’d love to see your results and show it off in my gallery.
Email me!
Hugs,
Bev

Tuesday, November 23, 2010

Another Kind of Christmas


Supplies

3 tubes of choice - I used the artwork of Zindy S. D. Nielsen here
Font of Choice - I used Oh Lara - a pay font
Gem Mask 204 here
My Template 114 here
Eyecandy 5: Nature - Fire
Eyecandy 5: Impact - Bevel
Eyecandy 4000 - Gradient Glow
Animation Shop
“Christmas Like No Other” is a PTU tagger size scrap kit created by Jen’s Sweet Temptations and can be purchased from Twilight Scraps. You can visit her blog here.
Thank you Jen for a truly beautiful kit!

This tutorial was written assuming you have a working knowledge of PSP.

~♥~ Let’s get started ~♥~

Open up the template.
Shift + D.
Close out the original.
Image/Canvas Size
700 x 600
Flood fill the background layer white.
Delete the credit layer.

Highlight Top Heart layer.
Click on it with your Magic Wand.
New Raster layer.
Copy and paste Paper 2 Into Selection.
Deselect.
Delete the template layer.
Apply Eyecandy 5: Impact - Bevel:

Basic Tab:


Lighting Tab:


Bevel Profile Tab:
Choose “button”

OK

Highlight Bottom Heart Layer.
Repeat the above step.

Highlight Right Glitter Back layer.
Select All/Float/Defloat
New Raster layer.
Copy and paste Paper 8 Into Selection.
Adjust/Add Remove Noise/Add Noise:
Gaussian and Monochrome checked
Noise: 33%
OK
Deselect.
Delete the template layer.

Highlight Top Glitter Back layer.
Repeat the above step.

Highlight Middle Glitter Back layer.
Select All/Float/Defloat
New Raster layer.
Make Paper 8 active/Flip/Copy
Make your working canvas active.
Paste Into Selection.
Apply the same noise effect.
Deselect.
Delete the template layer.

Highlight Top Rectangle layer.
Click on it with your Magic Wand.
New Raster layer.
Copy and paste Paper 1 Into Selection.
Copy and paste your tube as a new layer over the paper.
Resize as needed.
Move into position.
Selections/Invert
Tap the delete key.
Deselect.
Delete the template layer.

Highlight Middle Rectangle layer.
Click on it with your Magic Wand.
Copy and paste Paper 1 Into Selection.
Deselect.
Copy and paste your tube as a new layer.
Free rotate right 10 degrees.
Resize as needed/Move into position over the paper.
Highlight the paper layer.
Click anywhere outside of it with your Magic Wand.
Highlight the tube layer.
Selections/Invert
Tap the delete key.
Deselect.
Delete the template layer.

Highlight Right Rectangle layer.
Repeat the above step accept free rotate your tube 20 degrees to the right.

Add your embellishments. I used:
Champagne 1: Resize 70%/Duplicate
Rings: Resize 25%
Candle 1: Copy the left candle/Paste/Duplicate
Décor 2: Resize 80%/Free rotate right 20 degrees
Décor 2 again: Position behind the hearts/Free rotate left 50 degrees
Doves
Flower 2: Resize 30%/Duplicate/Resize 80%
Décor 4
Ornament 4: Resize 70%
Ribbon 1
Snowflake 4: Duplicate/Merge Down/Duplicate


Highlight your white background.
Select All.
New Raster layer.
Copy and paste a paper of choice Into Selection.
Deselect.
Apply the mask.
Merge Group.
Duplicate

Move the candle into exact position where you want them.
Merge Visible both candles.
Duplicate twice for a total of 3 layers.
Rename them Candle 1, 2, and 3.
Highlight Candle 1 layer.
Use your Freehand Selection Tool and make the shape of a flame at the top of each wick.
Apply Eyecandy 5: Nature - Fire

Settings Tab:
Small, Candle

Basic Tab:


Colors Tab:
Move the little boxes to match mine as closely as you can.
It doesn’t have to be perfect.

OK

Highlight Candle 2 layer.
Apply the same fire effect accept hit the random seed button once.

Highlight Candle 2 layer.
Apply the same fire effect accept hit the random seed button once.

Close out Candle 2 and 3 layers.

Add your credits.

Add your name.
Apply Eyecandy 4000 - Gradient Glow:

Basic Tab:


Color Tab:
White

Resize all layers 80%.

Copy Merge

~Time to Animate~

Open up Animation Shop.
Edit/Paste/As New Animation.

Back in PSP.
Close out Candle 1 layer.
Open up Candle 2 layer.
Copy Merge

Carry into AS.
Edit/Paste/After Current Frame.

Back in PSP.
Close out Candle 2 layer.
Open up Candle 3 layer.
Copy Merge

Carry into AS.
Edit/Paste/After Current Frame.

Ctrl + A to highlight all frames.
Animation/Frame Properties:
Change the number to 25
OK

View your animation.
If you’re happy then save.

I hope you enjoyed this tutorial.
I’d love to see your results and show it off in my gallery.
Email me!
Hugs,
Bev

Monday, November 22, 2010

Autumn's Song


Clicking on the image will allow you to enlarge for bigger view.

Supplies

1 tube of choice - I used the artwork of Michael Calandra at MPT
Font of Choice - I used Aquarelle here
Vix Mask 451 here
Artmama Made Template 23 here
“Autumn‘s Song” is a PTU tagger size scrap kit created by Stina of Designed by Stina and can be purchased from Aussie Scrap Designs. You can visit her blog here.
Thank you Stina for such an amazing seasonal kit!

This tutorial was written assuming you have a working knowledge of PSP.

~♥~ Let’s get started ~♥~

Open up the template.
Shift + D.
Close out the original.
Image/Canvas Size
700 x 700
Flood fill the background layer white.
Delete the top 6 layers.

Highlight Left Rectangle layer.
Click on it with your Magic Wand.
New Raster layer.
Copy and paste Paper 8 Into Selection.
Deselect.
Delete the template layer.
Give it a slight Inner bevel:


Highlight Dots. Layer.
Select All/Float/Defloat
New Raster layer.
Flood fill with #ebe295
Adjust/Add Remove Noise/Add Noise:
Gaussian and Monochrome checked
Noise: 60%
OK
Deselect.
Delete the template layer.

Highlight Right Rectangle layer.
Click on it with your Magic Wand.
New Raster layer.
Copy and paste Paper 9 Into Selection.
Deselect.
Delete the template layer.
Give it the same slight inner bevel.

Highlight Left Circle layer.
Click on it with your Magic Wand.
New Raster layer.
Copy and paste Paper 11 Into Selection.
Copy and paste Fox as a new layer over the circle paper.
Resize 80%
Move into position - see my tag for reference.
Duplicate/Move to the right a little/Move below the original in your layers pallet.
Selections/Invert
Highlight each fox layer and tap the delete key.
Change the Properties of the duplicate layer to Soft Light.
Deselect.
Delete the template layer.

Highlight Right Circle layer.
Click on it with your Magic Wand.
New Raster layer.
Copy and paste Paper 11 Into Selection.
Copy and paste Owl as a new layer over the circle paper.
Resize 40%
Move into position - see my tag for reference.
Duplicate/Move to the left a little/Move below the original in your layers pallet.
Selections/Invert
Highlight each owl layer and tap the delete key.
Change the Properties of the duplicate owl to Soft Light.
Deselect.
Delete the template layer.

Highlight Center Circle layer.
Click on it with your Magic Wand.
New Raster layer.
Copy and paste Paper 11 Into Selection.
Copy and paste your tube as a new layer over the circle paper.
Resize as needed.
Move into position - see my tag for reference.
Duplicate/Move to the left a little/Move below the original in your layers pallet.
Selections/Invert
Highlight each tube layer and tap the delete key.
Change the Properties of the duplicate tube to Soft Light.
Deselect.
Delete the template layer.

Copy and paste Clocks as a new layer.
Use your Eraser Tool and erase the clocks and strings.
Resize 80%/Position over the bottom rectangle.
Duplicate/Resize 80%/Flip/Position over the top circle.

Add your embellishments. I used:
Lamp: Resize 50%
Mushroom Basket: Resize 50%
Pine Cones: Resize 25% and 60%
Music Notes 3: Your choice - Resize 25% and 60%
Squirrel: Resize 25%
Leaf Scatter

Highlight your white background.
Select All.
New Raster layer.
Copy and paste Paper 3 Into Selection.
Deselect.
Apply the mask.
Resize 115%
Merge Group.

Add your credits.

Add your name.

Resize all layers 80%.

I hope you enjoyed this tutorial.
I’d love to see your results and show it off in my gallery.
Email me!
Hugs,
Bev

Sunday, November 21, 2010

University Xmas


Supplies

2 tubes of choice - I used the artwork of Keith Garvey at MPT
Font of Choice - I used Al Sandra here
Gem Mask 204 here
My Template 94 here
Animation Shop
“University Xmas” is a PTU tagger size scrap kit created by Missy of Scraps with Attitude and can be purchased from her store Scraps with Attitude. You can visit her blog here.
Thank you Missy for a fun and energetic holiday kit!

This tutorial was written assuming you have a working knowledge of PSP.

~♥~ Let’s get started ~♥~

Open up the template.
Shift + D.
Close out the original.
Image/Canvas Size
700 x 600
Flood fill the background layer white.
Delete the top 3 layers and Stitches Layer.

Highlight Large Rec Back layer.
Click on it with your Magic Wand.
New Raster layer.
Flood fill with #45a6b6.
Adjust/Add Remove Noise/Add Noise:
Gaussian and Monochrome checked
Noise: 60%
OK
Deselect.

Highlight Large Rect layer.
Select All/Float/Defloat
New Raster layer.
Flood fill with a gradient of choice.
Copy and paste 44 as a new layer.
Resize 40%
Adjust/Sharpness/Sharpen More
Move into position in the upper right corner of your gradient layer.
Duplicate/Move to fit in the opposite corner.
Merge Down.
Selections/Invert
Tap the delete key.
DO NOT DESELECT.

Copy and paste 41 as a new layer.
Resize 40%
Move into position at the bottom right corner of the gradient layer so that the bulbs that stick up are sitting along the bottom edge of the gradient layer - be sure the bulb doesn’t go over the side edge.
Duplicate/move to the left side - again be sure the bulb doesn’t go over the edge.
Erase any of the overlap that you see.
Merge Down.
Tap the delete key.
Deselect.
Delete the template layer.
Duplicate the merged bulb layer.
Rename them Bulb 1 and Bulb 2

Highlight Bulb 1 layer.
Make your Lighten/Darken Tool active and lighten all the pink bulbs.
Close the layer out.

Highlight Blub 2 layer.
Lighten all the blue bulbs.
Close this layer out.
Reopen Bulb 1 layer.

Highlight Vertical Rectangle layer.
Select All/Float/Defloat
New Raster layer.
Flood fill this layer using the same gradient colors just change the angle so that it’s different.
Copy and pasteyour tube as a new layer over the gradient layer.
Selections/Invert
Tap the delete key.
Deselect.
Delete the template layer.
Change the Properties of the tube layer to Soft Light.

Highlight Vertical Rec Frame layer.
Click on it with your Magic Wand.
New Raster layer.
Flood fill with #45a6b6.
Add the same noise.
Deselect.
Delete the template layer.

Copy and paste your tube as a new layer.

Add your embellishments. I used:
19: Resize 50%
21: Resize 40%/Free rotate Left 20 degrees
56: Resize 80%
49: Resize 30%/Duplicate/Mirror
9: Resize 35%
10: Resize 25%/Mirror/Free rotate Left 30 degrees
30: Resize 25% and 80%/Free rotate Left 20 Degrees/Duplicate/Mirror
67: Resize 25% and 59%/Free rotate Left 20 degrees

Highlight your white background.
Select All.
New Raster layer.
Copy and paste a paper of choice Into Selection.
Deselect.
Apply the mask.
Merge Group.

Add your credits.

Add your name.

Resize all layers 80%.

Copy Merge

~Time to Animate~

Open up Animation Shop.
Edit/Paste/As New Animation

Back into PSP.
Copy Merge.

Carry into AS.
Edit/Paste/After Current Frame

Ctrl + A to highlight both frames.
Animation/Frame Properties:
Change the number to 20
OK

View your animation.
If you’re happy then save.

I hope you enjoyed this tutorial.
I’d love to see your results and show it off in my gallery.
Email me!
Hugs,
Bev