Saturday, November 14, 2009

A Precious Gift


Clikcing on the image will enlarge and also show the animation.
Supplies
1 or 2 tubes of choice - I used the wonderful artwork of Irene Shpak here
Font of choice - I used Scriptina here
My Template 31 here
Weescotlass Mask 81 here
Eyecandy 5: Nature - Fire
Animation Shop
“Blue Ice” is a PTU full size scrap kit created by JozDzigns and can be purchased at TKO Scraps. You can visit their blog here.
Thank you, Brenda and Glenda for such a beautiful kit!
The name is very fitting!

This tutorial was written assuming you have a working knowledge of PSP.

~♥~ Let’s get started ~♥~
Open up the template.
Shift + D.
Close out the original.
Delete my credit, bow, and stitches layers.
Highlight Large Rectangle layer.
Select All/Float/Defloat
New Raster layer.
Copy and paste a paper of choice Into Selection.
Deselect.
Delete the template layer.
Highlight Small Rectangle layer.
Select All/Float/Defloat
New Raster layer.
Copy and paste a paper of choice Into Selection.
Deselect.
Delete the template layer.
Highlight Oval 1 layer.
Select All/Float/Defloat
New Raster layer
Copy and paste a paper of choice Into Selection.
Deselect.
Delete the template layer.
Repeat with Oval 2 layer.
Copy and paste Frame 4 as a new layer.
Resize 20% and 90%
Make your Pick Tool active and move the tiny boxes inward to get the frame to fit nicely around the oval shape. Once you’ve managed that, duplicate and move it over the other oval.

Highlight an oval layer.
Select All/Float/Defloat
Copy and paste a tube over the oval paper layer.
Selections/Invert
Tap the delete key.
Deselect.
Repeat the above step with the other oval layer.

Add your embellishments. I used:
Bow 1: Resize 20% and 70%
Snowflake Spray: Resize 35%
Snowflake Spray again: Resize 25%
Floral Décor 1: Resize 20% and 80%
Icicle Swag: Resize 20% and 60%
Candle 1: Resize 20% and 80%
Candle 3: Resize 20% and 60%
Highlight your white background.
New Raster layer.
Select All.
Copy and paste a paper of choice Into Selection.
Deselect.
Apply the mask.
Merge Group.
Merge Visible both of the candle layers.
Using your Freehand Selection Tool outline the flames of the candles.
Duplicate twice of a total of 3 candle layers.
Rename them Candle 1, 2, and 3
Highlight Candle 1
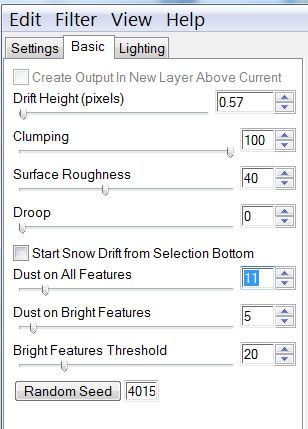
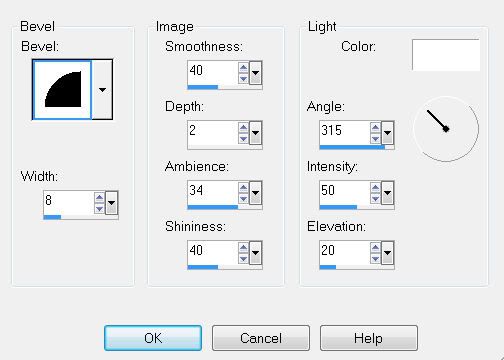
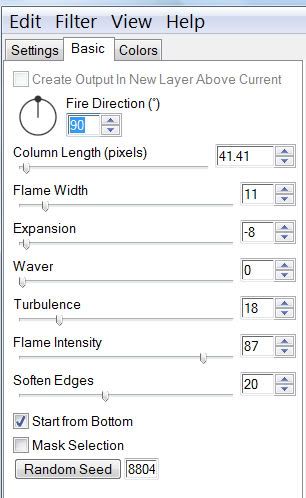
Apply Eyecandy 5: Nature - Fire


Close out Candle 1.
Open up Candle 2.
Apply Eyecandy again accept hit the randon seed button once.
OK
Close out Candle 1.
Open up Candle 3.
Apply Eyecandy again accept hit the randon seed button once.
OK
Deselect.
Close out Candle 3.
Reopen Candle 1

Add your copyrights.

Add your name.
Time to Animate:
Copy Merge

Carry Into Animation Shop.
Edit/Paste as New Animation

Back into PSP.
Close out Candle 1.
Open Candle 2.
Copy Merge.

Carry into AS.
Edit/Paste After Current Frame.
Back into PSP.
Close out Candle 2.
Open Candle 3.
Copy Merge.
Carry into AS.
Edit/Paste After Current Frame.

Animation/Frame Properties
Change Display Time number to 21.
OK

Watch your animation.
If you’re happy then save.
I hope you enjoyed this tutorial.
I’d love to see your results.
Email me!
Hugs,
Bev

Festive Holiday


Clicking on the image will enlarge to full view.

Supplies
1 tube of choice - I used the wonderful artwork of PinUpToons here
Font of choice - I used Curly Cue here
My Template 53 here
Weescotlass Mask 167 here
“Winter Love” is a PTU tagger size scrap kit created by Bea of Bea Creations and can be purchased at Twilight Scraps. You can visit her blog here.
Thank you, Bea for such a festive kit!

This tutorial was written assuming you have a working knowledge of PSP.

~♥~ Let’s get started ~♥~
Open up the template.
Shift + D.
Close out the original.
Delete my credit layer.
Highlight Square Back layer.
Select All/Float/Defloat
New Raster layer.
Copy and paste a paper of choice Into Selection.
Deselect.
Delete the template layer.

Highlight Square Frame layer.
Select All/Float/Defloat
New Raster layer.
Copy and paste a paper of choice Into Selection.
Deselect.
Delete the template layer.
Give it a slight inner bevel:

Highlight Bottom Circle Back.
Select All/Float/Defloat
Copy and paste a paper of choice as a new layer.
Selections/Invert
Tap the delete key.
Deselect.
Delete the template layer.

Repeat the above step with Top Frame Back.

Highlight Bottom Circle Frame layer.
Select All/Float/Defloat
New Raster layer.
Copy and paste a paper of choice Into Selection.
Deselect.
Delete the template layer.
Give it the same inner bevel.

Repeat the above step with Top Frame layer.

Highlight Dotted Lines layer.
Select All/Float/Defloat
Copy and paste a paper of choice as a new layer.
Selections/Invert
Tap the delete key.
Deselect.
Delete the template layer.

Add your embellishments. I used:
Tree 05: Resize 80%
Bells 01: Resize 70%
Branch 01: Resize 70% Free rotate 40 degrees
Tree 04: Resize 70%
Box 01 & 02: Resize 35%
Snowflake 01 & 02: Resize 20% and smaller
Copy and paste your tube as a new layer.

Highlight your white background.
New Raster layer.
Select All.
Copy and paste a paper of choice Into Selection.
Deselect.
Apply the mask.
Merge Group.
Duplicate/mirror/flip

Add your copyrights.
Add your name.
I hope you enjoyed this tutorial.
I’d love to see your results.
Email me!
Hugs,
Bev


Wednesday, November 11, 2009

Home for the Holidays

Clicking on the image will enlarge to full view.

Supplies
3 tubes of choice - I used the beautiful artwork of Jennifer Janesko here
Font of choice - I used Aquarelle here
Chica’s Designz Template 9 here
Xenofex 1: Shatter
“14K Christmas” is a PTU tagger size scrap kit created by Kesha of KnC Scrapz and can be purchased at Lollipops 'n Gumdrops. You can visit her blog here.
Thank you, Kesha for such a ritzy rich kit!

This tutorial was written assuming you have a working knowledge of PSP.

~♥~ Let’s get started ~♥~
Open up the template.
Shift + D.
Close out the original.
Delete the watermark layer, Word Art layers 1 & 2, and Doddle layers 1 & 2.
New Raster layer.
Flood fill white and send to bottom.
Highlight Frame 1 layer.
Select All/Float/Defloat
New Raster layer.
Copy and paste Paper 8 as a new layer.
Resize 70% and 90%
Selections/Invert
Tap the delete key.
Deselect.
Delete the template layer.
Highlight Frame Back 1 layer.
Select All/Float/Defloat
New Raster layer.
Copy and paste Paper 7 Into Selection.
Deselect.
Delete the template layer.

Make Paper 8 from the kit active.
Using your Selection Tool, section off a small portion of it.
Set your color pallet to Pattern and find the portion of the paper.
Highlight Circle Frame 1 layer.
Select All/Float/Defloat
New Raster layer.
Flood fill with your pattern.
Deselect.
Delete the template layer.
Repeat the above step with Frame 2 & Frame 3 layers.
Highlight Circle Back layer.
Select All/Float/Defloat
New Raster layer.
Copy and paste Paper 6 Into Selection.
Copy and paste a tube as a new layer.
Resize as needed.
Selections/Invert
Tap the delete key.
Deselect.
Delete the template layer.
Repeat the above step with Frame Back 2 & 3 layers.

Open up the Gold Apple element.
Using your Selection Tool, choose a portion of it.
Set the color pallet to pattern with the portion you chose.
Highlight Ribbon 1 layer.
Select All/Float/Defloat
New Raster layer.
Flood fill with the gold pattern.
Deselect.
Delete the template layer.

Repeat the above step with Ribbon 2 layer.
Add your embellishments. I used:
Bow: Resize 25% and 70% Free rotate right 10 degrees
Tree 1: Resize 60%
Feather: Resize 25% and 70%
Star String: Resize 40%
Close out your white background.
Merge Visible.
Resize 85%
Duplicate

Highlight the Merged layer.
Adjust/Blur/Gaussian Blur
Radius: 20
Apply Xenofex 1: Shatter


Crop your image.

Add your copyrights.

Add your name.
Give it an inner bevel:


I hope you enjoyed this tutorial.
I’d love to see your results.
Email me!
Hugs,
Bev

'Tis the Season


Supplies
1 tube of choice - I used the amazing artwork of KatNKDA here
Font of choice - I used Pendulum here
Weescotlass Mask 286 here
Dezings by Ali Template 121 here
Snow which I’ve supplied on Box or 4Shared
Alien Skin Eyecandy 5: Nature - Snow Drift
Animation Shop
“Heartland Holidays” is a PTU full size scrap kit created by Kat of KatNKDA and can be purchased at her store NK Art Shop. You can visit her blog here.
Thank you, Kat for another beautiful kit.
This one is sure to put anyone in the holiday spirit!

This tutorial was written assuming you have a working knowledge of PSP.

~♥~ Let’s get started ~♥~

Open up the template.
Shift + D.
Close out the original.
Delete the credit layer and Raster 7 & 10 layer.
New Raster layer.
Image/Canvas Size
725 X 700
Flood fill white and send to bottom.

Highlight Raster 1 layer.
Select All/Float/Defloat
New Raster layer.
Copy and paste a paper of choice Into Selection.
Deselect.
Delete the template layer.

Highlight Raster 3 layer.
Select All/Float/Defloat
New Raster layer.
Flood fill with a color or gradient of your choice.
Deselect.
Delete the template layer.
Give it a slight inner bevel:


Repeat the above step the Copy of Raster 3 layer.

Highlight Raster 2 layer.
Select All/Float/Defloat
New Raster layer.
Copy and paste Paper 12 as a new layer.
Resize 25% and 25%.
Move into position below the frame.
Selections/Invert
Tap the delete key.
Deselect.
Delete the template layer.

Repeat the above step with Copy of Raster 2 layer.

Copy and paste your tube as a new layer.
If you’re using the same tube as me, I resized it 25% and 80%.

Copy and paste your tube as a new layer again -
this layer we’re going to place inside the lower square.
Move your tube below the frame.
Resize to your liking.
Highlight the paper to this square.
Select All/Float/Defloat
Selections/Invert
Highlight your tube layer.
Tap the delete key.
Change the Opacity to Soft Light.
If it’s too faint for your liking, duplicate.
Merge Down.

Add your embellishments. I used:
Element 1: Resize 25% and 90%
Element 32: Resize 25% and 25%
(I used the Target Tool and changed the color to better match the tube)
Element 4: Resize 25% and 25%
Element 39: Resize 25% and 50% Free rotate Left 10 degrees
Element 40: Resize 25% and 50% Free rotate Right 30 degrees

Highlight your white background.
New Raster layer.
Select All.
Copy and paste a paper of choice Into Selection.
Deselect.
Apply the mask.
Merge Group.
Use your Pick tool to pull or push the sides of the mask to your liking.

Add your copyrights.

Add your name.
Give it the same inner bevel.

You can apply Eyecandy 5: Snow Drift to whichever layers your choose.
Use these settings:


Now we’re going to apply the snowflakes so that the tag can be animated.

Highlight the Circle Paper layer.
Select All/Float/Defloat
Selections/Invert

Open up the snow that I’ve supplied.
Highlight Frame 1
Copy

Make your working canvas active and paste the snow layer just above the Circle Paper layer.
(The snow will overhang. It’s OK. We’ll take care of that later.)
Rename Snow 1.

Make the snow layers active again.
Highlight Frame 2
Copy
Highlight your working canvas.
Paste as a new layer just above Snow 1
Rename this new layer Snow 2.

Repeat the above steps with the remaining snow layers.
Take your time and concentrate so you don’t lose track of which layers you’re copying and pasting….I’m advising from experience:S lolOnce you’ve copied and pasted all the snow layers onto your working image…

Highlight each snow layer and tap the delete key.
Deselect.

Resize all layers 8o%.

Now it’s time to animate.

***********
Close out all snow layers accept for Snow 1.
Copy Merge
Carry into Animation Shop.
Edit/Paste/As New Animation.

Back into PSP.
Close out Snow 1 and open up Snow 2.
Copy Merge.
Carry into AS.
Edit/Paste/After Current Frame.

Back into PSP.
Close out Snow 2 and open up Snow 3.
Copy Merge.Carry into AS.
Edit/Paste/After Current Frame.

Back into PSP.
Close out Snow 3 and open up Snow 4.
Copy Merge.Carry into AS.
Edit/Paste/After Current Frame.

Back into PSP.
Close out Snow 4 and open up Snow 5.
Copy Merge.Carry into AS.
Edit/Paste/After Current Frame.

Back into PSP.Close out Snow 5 and open up Snow 6.
Copy Merge.
Carry into AS.
Edit/Paste/After Current Frame.

Back into PSP.
Close out Snow 6 and open up Snow 7.
Copy Merge.Carry into AS.
Edit/Paste/After Current Frame.

Back into PSP.
Close out Snow 7 and open up Snow 8.
Copy Merge.Carry into AS.
Edit/Paste/After Current Frame.
Back into PSP.
Close out Snow 8 and open up Snow 9.
Copy Merge.Carry into AS.
Edit/Paste/After Current Frame.

Back into PSP.
Close out Snow 9 and open up Snow 10.
Copy Merge.
Carry into AS.
Edit/Paste/After Current Frame.

View your animation.
Admire the snow!
If you’re happy then save.

I hope you enjoyed this tutorial.
I’d love to see your results.
Email me!
Hugs,
Bev

Holiday Cheer

Clicking on the image will enlarge to full view.

Supplies
1 tube of choice - I used the wonderful artwork of Elias Chatzoudis here
Font of choice - I used TS Curly here
Monti Mask here - Thank you Monti!
Dezigns by Ali Template 107 here
“Noel” is a FTU tagger size scrap kit created by me, Horsing’ ’Round with Scraps and can be downloaded here.
Leaving a small thank you would mean a lot!

This tutorial was written assuming you have a working knowledge of PSP.

~♥~ Let’s get started ~♥~

Open up the template.
Shift + D.
Close out the original.
Delete the credit layer.
Image/Canvas Size
700 x 700
New Raster layer.
Flood fill white.
Send to bottom.

Highlight Shape 1 layer.
Select All/Float/Defloat
New Raster Layer.
Copy and paste a paper of choice Into Selection.
Deselect.
Delete the template layer.
Highlight Layer 1.
Select All/Float/Defloat
New Raster Layer.
Copy and paste a paper of choice Into Selection.
Deselect.
Delete the template layer.
 
Highlight Shape 2 Copy layer.
Select All/Float/Defloat
New Raster Layer.
Copy and paste a paper of choice Into Selection.
Deselect.
Delete the template layer.
Give it a slight inner bevel:


Repeat with Shape 2 layer.

Highlight Layer 3.
Select All/Float/Defloat
Copy and paste a paper of choice as a new layer.
Selections/Invert
Tap the delete key.
Copy and paste a one of your tubes below the frame.
Tap the delete key.
Deselect.
Delete the template layer.

Repeat the above step with Layer 2.

Highlight Shape 3 Copy layer.
Merge Down.
Both Shape templates should be on one layer now.
Select All/Float/Defloat
Copy and paste a paper of choice as a new layer.
Selections/Invert
Tap the delete key.
Deselect.
Delete the template layer.

Add your embellishments. I used:
Button 1a glass - 4a glass: Resize 30%
Bow 1: Resize 70% Duplicate/Merge Down. Duplciate/Merge Down again
String Lights: Resize 45% Free rotate Left 5 degrees. Duplicate/Mirror
Icicles 2: Resize 70%
Ribbon 8
Ball 1: Resize 20% Free rotate left 15 degrees
Ball 2: Resize 20% Free rotate right 70%
Christmas Tree: Resize 80%
Christmas Tree again: Resize 70%

Crop your image but be generous and leave room around your tag.
Highlight your white canvas.
New Raster layer.
Select All.
Copy and pate a paper of choice Into Selection.
Deselect.
Apply the mask.
Merge Group.

Add your copyrights.

Add your name.
Give it the same inner bevel.

Resize all layers 80%

I hope you enjoyed this tutorial.
I’d love to see your results.
Email me!
Hugs,
Bev


Nighty Night

Clicking on the image will enlarge to full view.

Supplies
1 tube of choice - I used the wonderful artwork of PinUpToons here
Font of choice - I used O’Connor here
Becky Mask 22 here
My Template 13 here
“Midnight Whispers” is a PTU tagger size scrap kit created by Missy of Scraps with Attitude and can be purchased at her store Scraps with Attitude.
Thank you Missy for a fabulous kit!

This tutorial was written assuming you have a working knowledge of PSP.

~♥~ Let’s get started ~♥~

Open up my template.
Shift + D.
Close out the original.
Delete the credit and butterfly layer.

Highlight Large Rectangle.
Select All/Float/Defloat
Copy and paste a paper of choice as a new layer.
Resize 60%
Selections/Invert
Tap the delete key.
Deselect.
Delete the template layer.
Highlight Bottom Rectangle layer.
Merge Down.
Merge Down again.
All your rectangle templates should be on one layer now.
Select All/Float/Defloat
Copy and paste a paper of choice as a new layer.
Resize 60%
Selections/Invert
Tap the delete key.
Deselect.
Delete the template layer.

Highlight Flower Layer.
Select All/Float/Defloat
New Raster layer.
Copy and paste a paper of choice Into Selection.
Deselect.
Delete the template layer.
Give it a slight inner bevel:


Highlight the Circle layer.
Select All/Float/Defloat
Copy and paste a paper of choice
Selections/Invert
Tap the delete key.
Deselect.
Delete the template layer.

Copy and paste Curtain 2 as a new layer.
Resize 40%
Move into position - see my tag for reference.
Highlight the Circle Frame.
Select All/Float/Defloat
Highlight the curtain layer.
Use your Eraser Tool to erase the part of the curtain that overlaps the frame.
Selection/Invert
Now carefully erase the part of the curtain that is outside the frame.
Deselect.
Duplicate
Move the curtain into place.

Highlight your white canvas.
New Raster Layer.
Select All.
Copy and paste a paper of choice Into Selection.
Deselect.
Copy and paste Balloon Basket as a new layer.
Mirror/Resize 50%
Move toward the upper right corner.
Copy and paste the Bed as a new layer.
Resize 40% and move into the lower left corner.
Merge Visible the paper, balloon, and bed.
Apply the mask.
Merge Group.

Add your embellishments. I used:
Cute Moon 1: Resize 25% and 80%
Dangling Star 3: Resize 30%
Clock: Resize 25% and 80%
Butterfly 2: Resize 25% and 70% - Duplicate and resize as many times as you like.
Star Brad 3: Resize 10% and 90% - Duplicate and size as many times as you like.

Add your copyrights.

Add your name.
Give it the same inner bevel:
Crop your image.
Resize all layers 90%

I hope you enjoyed this tutorial.
I’d love to see your results.
Email me!
Hugs,
Bev