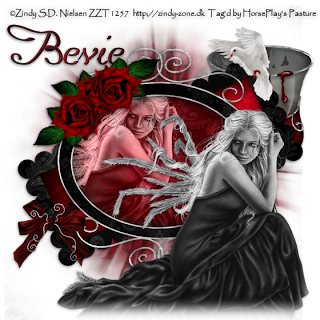
Saturday, January 15, 2011

Immortal Love

Clicking on the image will allow you to enlarge for bigger view.

Supplies

1 tube of choice - I used the artwork of Zindy S.D. Nielsen here
Font of Choice - I used Promocyja here
Gem Mask 71 here
Greg’s Factory Output Vol. II - Pool Shadow
“Immortal Love” is a PTU tagger size scrap kit created by Designs by Stina and can be purchased from Aussie Scrap Designs. You can visit her blog here.
Thank you Julie for a very beautiful scrap kit!

This tutorial was written assuming you have a working knowledge of PSP.

~♥~ Let’s get started ~♥~

Open up a 700 x 700 blank canvas.
Flood fill white.

Copy and paste Frame 7 as a new layer.
Resize 90%
Free rotate left 25 degrees.
Click inside of it with your Magic Wand.
Selections/Modify/Expand by 6.
New Raster layer below the frame.
Copy and paste Paper 13 Into Selection.
Deselect.
Apply Greg’s Factory Output Vol. II - Pool Shadow:
Default settings.

Close out your white background.
Merge Visible.
Reopen your white background.

Copy and paste Frame 2 as a new layer.
Resize 80%
Click inside of it with your Magic Wand.
New Raster layer below the frame.
Copy and paste Paper 1 Into Selection.
Copy and paste your tube as a new layer below the frame.
Move into position more toward the left side - see my tag for reference.
Selections/Invert
Tap the delete key.
Deselect.
Change the Properties to Luminance (Legacy)

Close out the merged layer and your white background.
Merge Visible.
Reopen all layers.
Move both merged layers into position.

Copy and paste your tube as a new layer.

Add your embellishments. I used:
Chalice: Resize 80%
Dove: Resize 25%
Bow 7: Resize 30%
Rose 7: Resize 25%/Duplciate/Mirror/Flip
Rose 7 again: Resize 25% and 90%/Free rotate right 45 degrees.

Highlight your white background.
New Raster layer.
Select All.
Copy and paste Paper 19 Into Selection.
Deselect.
Apply the mask.
Merge Group.

Add your credits.

Add your name.
Color pallet:
Foreground: Black
Background: Shade Red of your choice
Stroke: 1
Type your name.
Convert to Raster layer.
Select All/Float/Defloat
Selections/Modify/Contract by 1
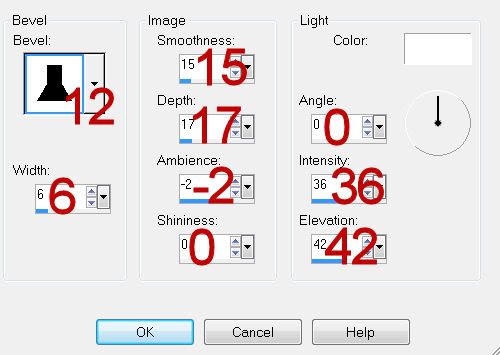
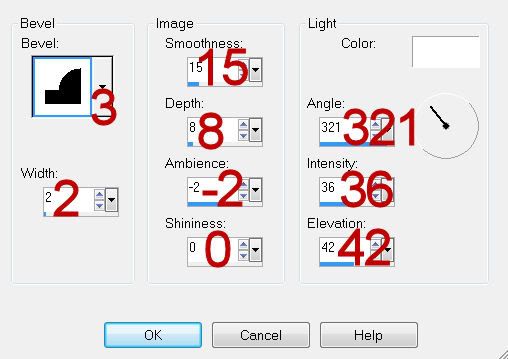
Give it a slight inner bevel:
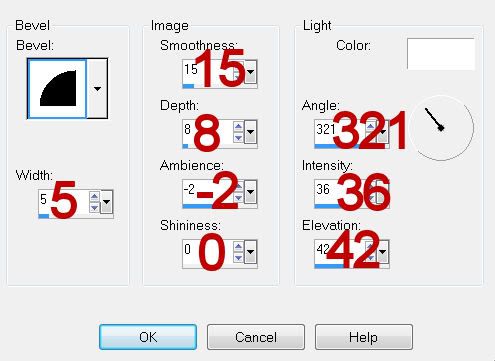

Apply Pool Shadow Effect.
Deselect.

Resize all layers 80%.

I hope you enjoyed this tutorial.
I’d love to see your results and show it off in my gallery.
Email me!
Hugs,
Bev

Cheerful Valentine


Clicking on the image will allow you to enlarge for bigger view.

Supplies

1 tube of choice - I used the artwork of Elias Chatzoudis at MPT
Font of Choice - I used BlackJack Regular here
Gem Mask 128 here
“All For Love” is a PTU tagger size scrap kit created by Julie of Bits N Bobs and can be purchased from Exquisite Scraps. You can visit her blog here.
Thank you Julie for a very beautiful scrap kit!

This tutorial was written assuming you have a working knowledge of PSP.

~♥~ Let’s get started ~♥~

Open up a 700 x 700 blank canvas.
Flood fill white.

Open up the mask.
You’ll be using it through this tutorial.
Please refer to my tag for element placement throughout this tutorial.

Copy and paste 25 as a new layer.
Click inside each of it with your Magic Wand.
Selections/Modify/Expand by 10.
New Raster layer below the frame.
Copy and paste Paper 10 Into Selection.
Deselect.

Close out your white background.
Merge Visible.
Reopen your white background.

Copy and paste your tube as a new layer.
Move your tube and frame into position.

Highlight your white background.
New Raster layer.
Select All.
Copy and paste Paper 8 Into Selection.
Deselect.
Apply the mask.
Merge Group.

Copy and paste 60 as a new layer.
Resize 50%
Position to the left side of your canvas.
Duplicate/Mirror
In your layers pallet move it just above the mask layer.
Apply the mask.
Merge Group.

Copy and paste 46 as a new layer just above the mask layer.
Move into position.
Apply the mask.
Merge Group.

Add your embellishments. I used:
43: Resize 40%/Free rotate left 15 degrees
16: Resize 50%
21: Erase the butterflies you don’t want.

Add your credits.

Add your name.
Give it a slight inner bevel:


Resize all layers 80%.

I hope you enjoyed this tutorial.
I’d love to see your results and show it off in my gallery.
Email me!
Hugs,
Bev
Friday, January 14, 2011

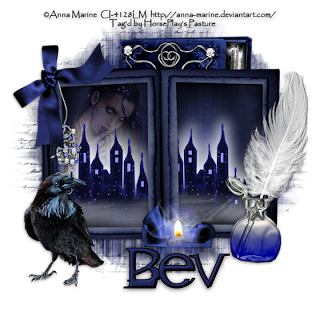
Goth in the City


Clicking on the image will allow you to enlarge for bigger view.

Supplies

1 tube of choice - I used the artwork of Anna Marine that can now be found at CDO
Font of Choice - I used Toril here
Weescotlass Mask 138 here
Greg’s Factory Output Vol. II - Pool Shadow
“Blue Moon Magic” is a PTU scrap kit created by KatNKDA and can be purchased from her store NK Art Shop. You can visit her blog here.
Thank you Kat for another beautiful kit!

This tutorial was written assuming you have a working knowledge of PSP.

~♥~ Let’s get started ~♥~

Open up a 700 x 700 blank canvas.
Flood fill white.

Copy and paste Element 7 as a new layer.
Resize 50%
Click inside each side with your Magic Wand.
Selections/Modify/Expand by 6.
New Raster layer below the frame.
Copy and paste Paper 9 Into Selection.

Copy and paste Element 22 as a new layer below the frame.
Resize 50%
Move into position - see my tag for reference.
Selections/Invert
Tap the delete key.

Copy and paste your tube as a new layer just above the paper.
Resize as needed.
Change the Properties to Soft Light.
Tap the delete key.
Deselect.
Use your Eraser Tool and erase any part of the tube you can see below the city element.

Highlight the Paper layer.
Apply Greg’s Factory Output Vol. II - Pool Shadow:
Use Default Settings

Add you embellishments. I used:
Element 4: Resize 25% and 50%/Mirror
Element 29: Resize 40%
Element 10: Resize 50%
Element 2: Resize 50%
Element 9: Resize 50%
Element 14

Highlight your white background.
Select All.
New Raster layer.
Copy and paste Paper 13 Into Selection.
Deselect.
Apply the mask.
Move it up slightly and use your Pick Tool to pull the sides out slightly.
Merge Group.

Add your credits.

Add your name.
Give it a slight inner bevel:


Apply the Pool Shadow Effect - same settings

Resize all layers 80%

I hope you enjoyed this tutorial.
I’d love to see your results and show it off in my gallery.
Email me!
Hugs,
Bev
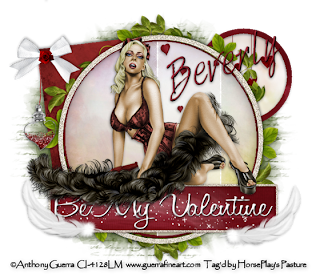
My Valentine Beauty


Clicking on the image will allow you to enlarge for bigger view.

Supplies

1 tube of choice - I used the artwork of Anthony Guerra. His work can now be found at CDO
Font of Choice - I used Honey Script here and HarabaraHand here
Artmama’s Template 25 here
“Be My Valentine” is a PTU tagger size scrap kit created by Kesha of KnC Scrapz and can be purchased from her store Lollipops n Gumdrops. You can visit her blog here.
Thank you Kesha for a beautiful Valentine’s Day kit!

This tutorial was written assuming you have a working knowledge of PSP.

~♥~ Let’s get started ~♥~

Open up the template.
Shift + D.
Close out the original.
Delete the top 5 layers and Tiny Words layer.
Highlight the background layer.
Image/Canvas Size
700 x 600
OK
Flood fill white.

Highlight Small Circle layer.
Click on it with your Magic Wand.
Copy and paste Paper 3 as a new layer.
Resize 25%
Move into position over the circle template layer.
Selections/Invert
Tap the delete key.
Copy and paste Hanging Hearts as a new layer.
Resize 25% and 80%
Move into position over the paper.
Tap the delete key.
Deselect.
Delete the template layer.

Highlight Small Circle Frame layer.
Click on it with your Magic Wand.
New Raster layer.
Copy and paste Paper 8 Into Selection.
Deselect.
Delete the template layer.

Repeat the above step with Lg Circle Back layer and Horizontal Rectangle layer.

Highlight Lg Rectangle layer.
Click on it with your Magic Wand.
New Raster layer.
Copy and paste Paper 1 Into Selection.
Deselect.
Delete the template layer.

Highlight Lg Circle layer.
Click on it with your Magic Wand.
New Raster layer.
Copy and paste Paper 2 Into Selection.
Deselect.
Delete the template layer.

In your Color Pallet:
Foreground and Background both set to white.
Using the Honey Script font type out the words “Be My Valentine”
(or other words if you choose!)
Position and center them over the rectangle.
Note: I needed to use the Pick Tool to push the bottom up a bit because the “y” hung over the frame and to also stretch the words out just a tad. If you need to do this just be sure you don’t disfigure the words too much.
Give the words a slight Inner Bevel:


Copy and paste your tube as a new layer.

Copy and paste Branch 3 as a new layer.
Resize 90%
Position behind the large Glitter Circle.
Get the left side so it looks nicely positioned. As you can see the right side doesn’t look so great.
Use your Freehand Selection tool to section the entire right side of the element.
Tap the delete key.
Duplicate/Mirror/Flip
You should now have what appears to be a full leaf circle.

Add your embellishments. I used:
Hearts: Resize 40%
Glitter Heart String: Resize 70%
Bow 3: Resize 50%
Stars: Resize 50%
Feather: Resize 25%/Free rotate Right 45 degrees/Duplicate/Free rotate Right 30 degrees - duplicate and mirror both feathers.

Highlight your white background.
New Raster layer.
Select All.
Copy and paste Paper 7 Into Selection.
Deselect.
Apply the maks.
Use your Pick tool to pull the sides out slightly.
Merge Group.

Add your credits.

Add your name.
Give it the same Inner Bevel.
Free rotate left 20 degrees

Resize all layers 80%

I hope you enjoyed this tutorial.
I’d love to see your results and show it off in my gallery.
Email me!
Hugs,
Bev
Thursday, January 13, 2011

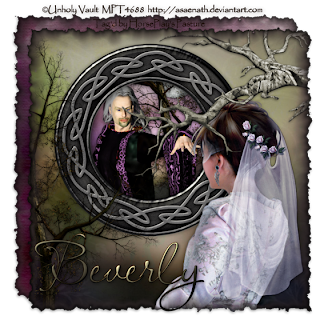
Wed in the Shadows


Clicking on the image will all you to enlarge for bigger view.

Supplies

1 tube of choice - I used the artwork of Unholy Vault at MPT
Font of Choice - I used LavishlyYoursRob (pay font) but Aquarelle is nearly identical and can be downloaded from here
Greg’s Factory Output Vol. II - Pool Shadow
Xenofex 2: Burnt Edges
“Destiny” is a PTU tagger size scrap kit created by Jessica of Gothic Inspirations and can be purchased from her store Gothic Inspirations. You can visit her blog here.
Jessica, I just had to create another tut with this absolutely stunning kit! Thank you again.

This tutorial was written assuming you have a working knowledge of PSP.

~♥~ Let’s get started ~♥~

Open up a 700 x 700 blank canvas.
Flood fill white.

Copy and paste Frame 2 as a new layer.
Resize 75%
Click inside with your Magic Wand.
Selections/Modify/Expand by 6.
New Raster layer below the frame.
Copy and paste Paper 5 Into Selection.
Deselect.

Copy and paste below the frame the following embellishments and move them into position (see my tag for reference) - don’t worry about anything that sticks out from the frame sides. We’ll clean that up in just a bit.
Wizard
Tree
Moon: Resize 25% and 25%

Highlight the paper layer.
Click anywhere outside of it with your Magic Wand.
Highlight each element layer and tap the delete key.
Deselect.

Close out your white background.
Merge Visible.
Reopen your white background.

Copy and paste your tube as a new layer.
Move the tube and frame into position - see my tag for reference.

Copy and paste Tree as a new layer.
Position it near the bottom left corner.

Copy and paste Tree Limb as a new layer.
Resize 70%
Mirror
Move into position at the top right corner.
Be sure the tree limb is at the top in your layers pallet.

Highlight your white background.
New Raster layer.
Select All.
Copy and paste Paper 15 Into Selection.
Deselect.

Close out your white background.
Merge Visible.
Reopen your white background.

Highlight the merged layer.
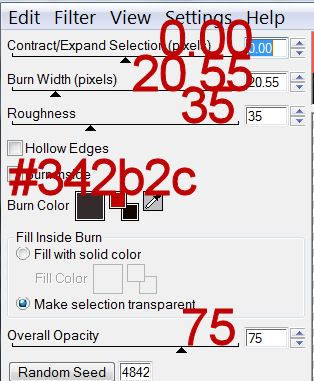
Apply Xenofex: Burnt Edges:


Resize the merged layer 90%

Highlight your white background.
New Raster layer.
Copy and paste Paper 2 Into Selection.
Deselect.
Apply the same Burnt Edges effect.
Resize 90%
Move this layer up toward the upper left corner just a little.
Move the other layer toward the bottom right corner.
See my tag for reference.

Add your credits.

Add your name.
Foreground: #140900
Background: Section out an area of Paper 15/set the background in your color pallet to pattern and find it.
Stroke: 1
Type your name.
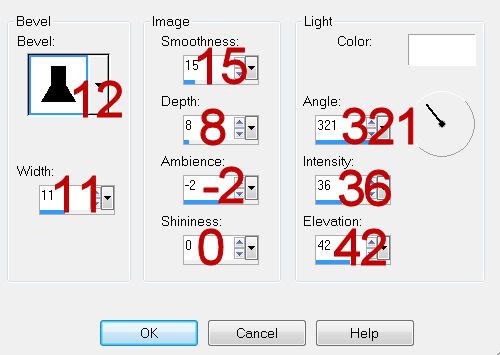
Give it a slight Inner Bevel:


Apply Greg’s Factory Output Vol. II - Pool Shadow twice:
Use Default Settings accept change the Intensity to 182.

Resize all layers 80%

I hope you enjoyed this tutorial.
I’d love to see your results and show it off in my gallery.
Email me!
Hugs,
Bev
Promised Evening


Clicking on the image will allow you to enlarge for bigger view.
Supplies

1 tube of choice and 1 close up image - I’m using the artwork of Keith Garvey at MPT
Font of Choice - I used Al Sandra here
Monti Circular mask here
Greg’s Factory Output Vol. II - Pool Shadow
“Amore Mio” is a PTU tagger size scrap kit created by Missy of Scraps with Attitude and can be purchased from her store Scraps with Attitude. You can visit her blog here.
Thank you Missy for such a terrific Valentine’s kit!

This tutorial was written assuming you have a working knowledge of PSP.

~♥~ Let’s get started ~♥~

Open up a 700 x 700 blank canvas.
Flood fill white.

Copy and paste 4 as a new layer.
Resize 60%
Click inside with your Magic Wand.
Selections/Modify/Expand by 2.
New Raster layer below the frame.
Flood fill with a gradient of choice.
Apply Greg’s Factory Output Vol. II - Pool Shadow -
Default Settings.
Copy and paste your close up image as a new layer below the frame.
Move into position.
Selections/Invert
Tap the delete key.
Deselect.

Add your embellishments. I used:
44: Resize 95%
36 - Erase the lower portion of the lamp
5: Resize 50%
14: Resize 25%/Duplicate/Free rotate Right 25 degrees/Mirror/Resize 70%
42: Resize 25% and 50%
34: Resize 70%

Highlight your white background.
Select All.
Copy and paste Paper 7 Into Selection.
Deselect.
Apply the mask.
Resize 95%
Merge Group.

Add your credits.

Add your name.
Foreground: Black
Background: A red shade of your choice.
Stroke: 2
Give it a slight Inner Bevel:


Resize all layers 80%

I hope you enjoyed this tutorial.
I’d love to see your results and show it off in my gallery.
Email me!
Hugs,
Bev
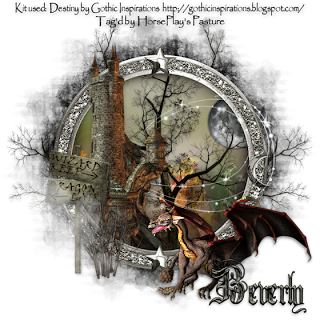
Destiny


Clicking on the image will allow you to enlarge for bigger view.

Supplies

Font of Choice - I used Anglo Text here
Weecotlass mask 161 here
Greg’s Factory Output Vol. II - Pool Shadow
“Destiny” is a PTU tagger size scrap kit created by Jessica of Gothic Inspirations and can be purchased from her store Gothic Inspirations. You can visit her blog here.
Jessica, thank you for yet another brilliant kit! I sooo love this one!!

This tutorial was written assuming you have a working knowledge of PSP.

~♥~ Let’s get started ~♥~

Open up a 700 x 700 blank canvas.
Flood fill white.

Copy and paste Frame 4 as a new layer.
Resize 85%
Click inside with your Magic Wand.
Selections/Modify/Expand by 6.
New Raster layer below the frame.
Copy and paste Paper 15 Into Selection.
Deselect.

We’re going to add the embellishments you see within the frame.
See my tag for reference for the placement:
Castle 2: Resize 90% (If you want the top of the castle to stick out from the top of the frame then duplicate and move this layer above the frame. Close it out for now.)
Tree: Resize 75%
Moon: Resize 25%
Fire 2: Resize 50%/Duplicate/Mirror - change the Properties of both fire layers to Multiply.

Highlight the paper layer.
Click anywhere outside of it with your Magic Wand.
Highlight each element that you have below the frame and tap the delete key.
Deselect.
Reopen the castle layer that’s above the frame and erase the bottom area.

Add the rest of your embellishments. I used:
Dragon 1: Resize 50% - Apply Greg’s Factory Output Vol. II - Pool Shadow - Default Settings.
Bush 1: Resize 30%
Sign: Resize 40%
Fog 21: Resize 80%
Dust Sphere: Resize 80%
Tree (behind the frame): Resize 80%/Duplicate/Mirror

Highlight your white background.
Select All.
Copy and paste Paper 20 Into Selection.
Deselect.
Apply the mask.
Resize 120%
Merge Group.

Add your credits.

Add your name.
Foreground: Black
Background: #7e7d70
Stroke: 1
Give it a slight Inner Bevel:


Resize all layers 80%

I hope you enjoyed this tutorial.
I’d love to see your results and show it off in my gallery.
Email me!
Hugs,
Bev

Wednesday, January 12, 2011

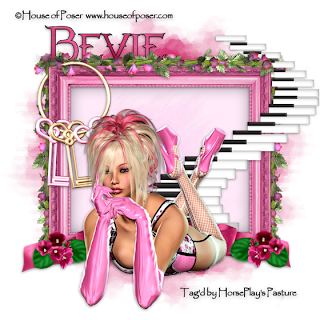
Pink Gothic Love


Clicking on the image will allow you to enlarge for bigger view.

Supplies

Font of Choice - I used Narnia here
Weescotlass Mask 161 here
“Pink Gothic Love” is a PTU tagger size scrap kit created by Cindy of Puddicat Creations and can be purchased from Butterfly Blush Designs. You can visit her blog here.
Thank you Cindy for a sweet gothic kit!

This tutorial was written assuming you have a working knowledge of PSP.

~♥~ Let’s get started ~♥~

Open up a 700 x 700 blank canvas.
Flood fill white.

Copy and paste Frame 2 as a new layer.
Resize 75%
Free rotate Left 90 degrees.
Click inside of it with your Magic Wand.
Selections/Modify/Expand by 4.
New Raster layer below the frame.
Copy and paste Paper 14 Into Selection.

Copy and paste Swing 1 as a new layer.
Free rotate Left 90 degrees.
Move into position so the flower line is parallel with the top of the frame.
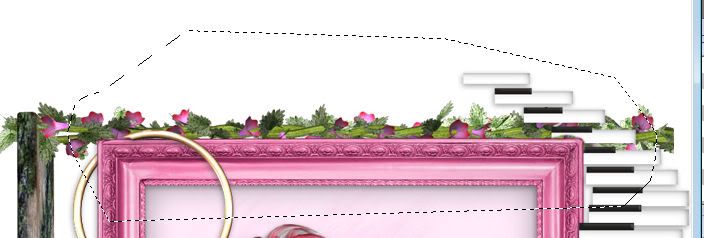
Use your Freehand Selection Tool to section out the area that’s the length of the frame.


Selections/Invert
Tap the delete key.
Deselect.
Duplicate/Free rotate Left 90 degrees
Position at the left side of the frame.
Duplicate/Mirror
Use your Eraser Tool to erase any part that overlaps on the ends.

Add your embellishments. I used:
Piano Stairs: Resize 80%
Ribbon 1: Resize 60%/Duplicate/Mirror
Keys 1: Resize 80%
Flowers 1: Resize 25%/Flip/Duplicate/Mirror
Pink Skulls 5 (the poser): Resize 75%

Highlight your white background.
New Raster layer.
Select All
Copy and pate Paper 12 Into Selection.
Deselect.
Apply the mask.
Resize 120%
Merge Group.

Add your credits.
Credit for the poser are in a folder of their own.

Add your name.

Resize all layers 80%.

I hope you enjoyed this tutorial.
I’d love to see your results and show it off in my gallery.
Email me!
Hugs,
Bev
Tuesday, January 11, 2011

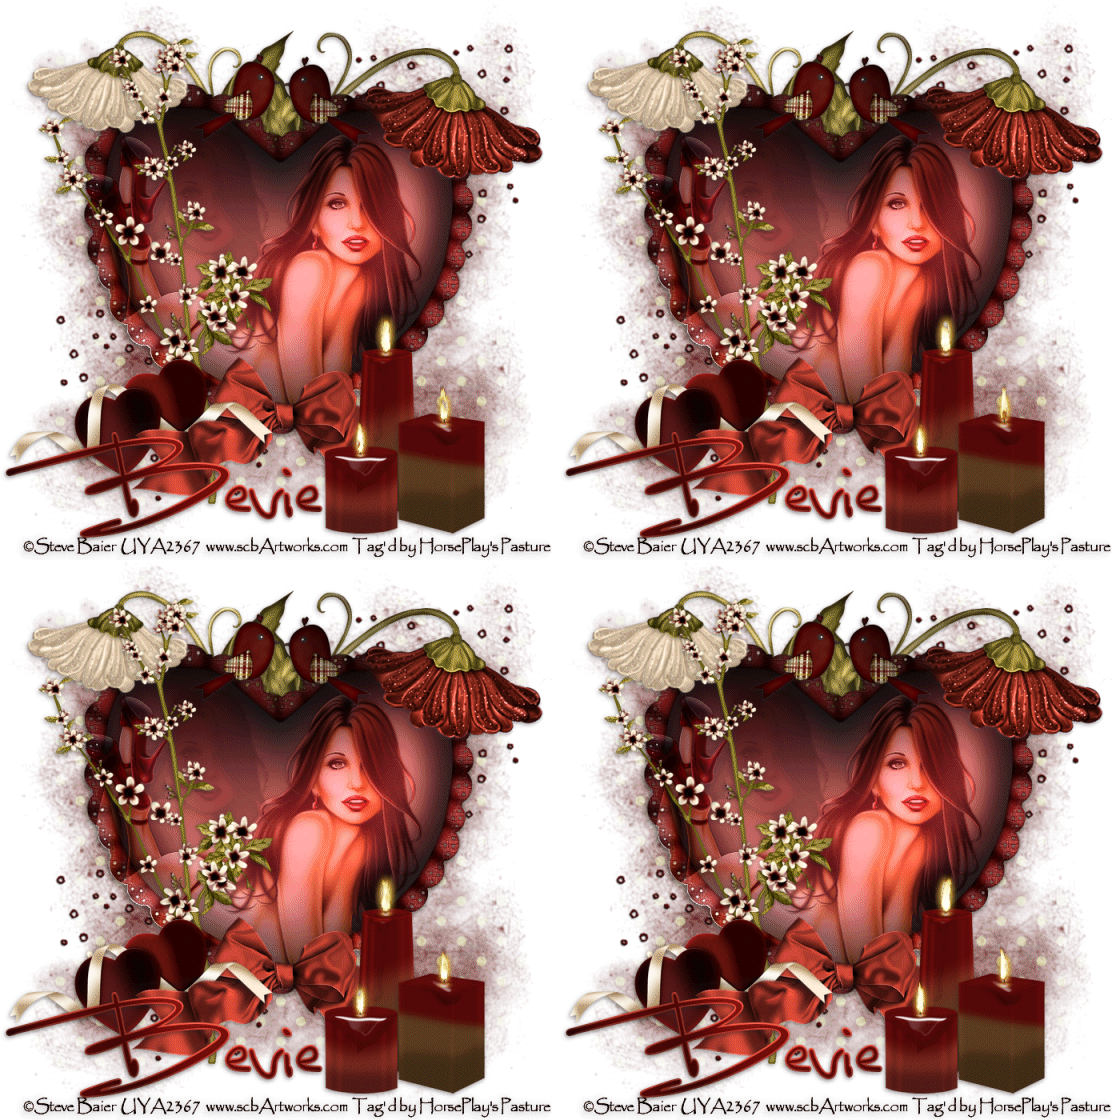
Winter Valentine


Supplies

1 tube of choice - I used the artwork of Steve Baier at Up Your Art
Font of Choice - I used Luna Bar here
Gem Mask 161 here
Greg’s Factory Output Vol. II - Pool Shadow
Eyecandy 5: Nature - Fire
Animation Shop
“Winter Valentine” is a PTU scrap kit created by Jane of JT’s Designs and can be purchased from Lollipops n Gumdrops. You can visit her blog here.
Thank you Jane for a kit that I absolutely adored the second I opened it up!

This tutorial was written assuming you have a working knowledge of PSP.

~♥~ Let’s get started ~♥~

Open up a 700 x 700 blank canvas.
Flood fill white.

Copy and paste Heart 4 as a new layer.
Copy and paste your tube as a new layer over the heart.
Move to the right side/Change the Properties to Soft Light.
Duplicate
Move to the left side/Change the Properties to Multiply and Lower the Opacity to about 22. In your layer’s pallet move below the original tube.
Highlight the original tube.
Click anywhere outside of it with your Magic Wand.
Selections/Invert
Highlight the duplicate tube.
Use your Eraser Tool and erase over the original tube.
Deselect.

Highlight the Heart layer.
Click anywhere outside of it with your Magic Wand.
Highlight each of the tube layers and tap the delete key.
Deselect.

Close out your white background layer.
Merge Visible.
Reopen your background layer.

Highlight the merged layer.
Apply Greg’s Factory Output Vol II - Pool Shadow:
Default Settings

Add your embellishments. I used:
Flower 8: Resize 60%/Mirror/Free rotate Right 20 degrees
Flower 7: Resize 70% - Apply Greg’s Factory Output Vol. II - Pool Shadow - Default Settings
Blossom 2: Resize 35%
Birds 1: Resize 25%/Apply Pool Shadow - default settings
Heart 1: Resize 50%
Bow 7: Resize 50%
Candle 1: Resize 50%
Candle 2: Resize 40%
Candle 3: Resize 40%
Spray 2: Resize 80%/Mirror

Merge Visible the 3 candle layers.
Duplicate 3 times for a total of 4 candle layers.
Rename them Candle 1, 2, 3, and 4.

Highlight Candle 1 layer.
Use your Freehand Selection Tool and outline the flame on each candle.
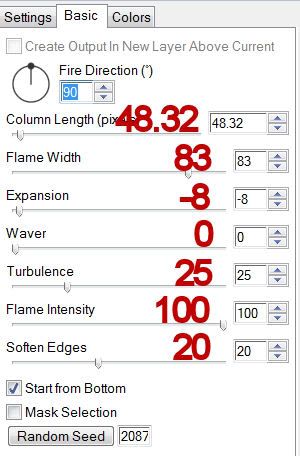
Apply Eyecandy 5: Nature - Fire:

Settings Tab:
Small, Candle

Basic Tab:


OK

Highlight Candle 2 layer.
Apply the same effect accept hit the random seed button once.

Highlight Candle 3 layer.
Repeat the above step.

Highlight Candle 4 layer.
Repeat the above step.

Deselect.
Close out Candle layers 2, 3, and 4.
Only Candle 1 layer should be open.

Highlight your white background.
New Raster layer.
Select All.
Copy and paste Paper 24 Into Selection.
Deselect.
Apply the mask.
Merge Group.

Add your credits.

Add your name.
Apply the Pool Shadow effect.
Same settings.

Resize all layers 80%.

Copy Merge

~Time to Animate~

Open up Animation Shop.
Edit/Paste/As New Animation

Back in PSP.
Close out Candle 1 layer.
Open Candle 2 layer.
Copy Merge.

Carry into AS.
Edit/Paste After Current Frame.

Back in PSP.
Close out Candle 2 layer.
Open Candle 3 layer.
Copy Merge.

Carry into AS
Edit/Paste/After Current Frame.

Back in PSP.
Close out Candle 3 layer.
Open Candle 4 layer.
Copy Merge.

Carry into AS
Edit/Paste/After Current Frame

Ctrl + A to highlight all frame.
Animation/Frame Properties
Change the display time to 25
OK

View your animation.
If you’re happy with it then save.

I hope you enjoyed this tutorial.
I’d love to see your results and show it off in my gallery.
Email me!
Hugs,
Bev