Supplies
1 tube of choice – I used the wonderful artwork of Karen Middleton
which can be purchased from CDO. You must have
a license to use.
Font of choice - I used Rockwell Extra Bold (came with my program)
Vickie’s template 13 here
“Happy Halloween” is a tagger scrap kit created by Wilma of Wilma4Ever
and be purchased from her store here. You can visit her blog here.
This tutorial was written assuming you have a working knowledge of PSP.
~♥~ Let’s get started ~♥~
Open up the template.
Shift + D
Close out the original.
Delete the credit layer.
Image/Canvas Size
700 x 575
OK
Open up the white background layer.
Flood fill white.
Color Pallet:
Foreground: #000000
Background: #250e08
Highlight Black Rectangle layer.
Make your Color Replacer Tool active.
Hold your mouse over the rectangle and double right click.
Adjust/Add Remove Noise/Add Noise:
Uniform and Monochrome checked
Noise: 35%
OK
Repeat the above step with the following layers:
Horizontal Black
Black Strip
Black Circle
Black Rectangle 2
Highlight Gray Rectangle layer.
Click on it with your Magic Wand.
New Raster layer.
Copy and paste Paper 3 Into Selection.
Deselect.
Delete the template layer.
Highlight Horizontal Gray layer.
Click on it with your Magic Wand.
New Raster layer.
Copy and paste Paper 5 Into Selection.
Deselect.
Delete the template layer.
Highlight Gray Strip
Repeat the above step.
Highlight Gray Circle layer.
Click on it with your Magic Wand.
New Raster layer.
Copy and paste Paper 2 Into Selection.
Deselect.
Delete the template layer.
Highlight Gray Rectangle 2 layer.
Click on it with your Magic Wand.
New Raster layer.
Copy and paste Paper 7 Into Selection.
Copy and paste EL35 as a new layer.
Resize 50%
Move into position – see my tag for reference.
Selections/Invert
Tap the delete key.
Deselect.
Delete the template layer.
Copy and paste your tube as a new layer.
Add your elements. I used:
33: Resize 40%
26: Resize 30%/Duplicate/Resize
70%
63: Resize 40%
17: Resize 40%
16: Resize 25%/Duplicate 2x’s/Resize
one of them 70%
27: Resize 40%/Mirror
24: Resize 40%
34: Resize 40%
28: Resize
60%/Duplicate/Mirror/Duplicate and erase the flowers you don’t want
Highlight your white background.
New Raster layer.
Select All.
Copy and paste Paper 9 Into Selection.
Deselect.
Apply the Mask.
Position behind the brown glitter circle layer.
Use your Pick Tool to pull the bottom part down just a little.
Use your Pick Tool and pull the sides out.
Merge Group.
Add your credits.
Add your name.
Color Pallet:
Foreground: #250e08
Background: Pattern/Paper 3
Stroke: 2.0
Type your name.
Free rotate Left 90 degrees
Move into position over the vertical strip – see my tag for reference.
Use the boxes around your name to fit it nicely into the strip.
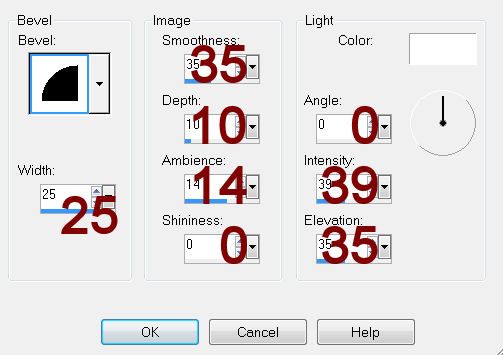
Give it a slight Inner Bevel:

Resize all layers 80%.


