Wednesday, July 1, 2015

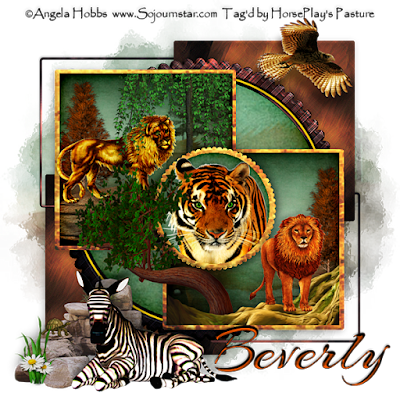
Lion King


Supplies Needed

Font of choice – I used Arizonia a pay font but Birds of Paradise should work just as nice here

Vix Big Mask 001 here

My template 206 here

Plug Ins used:
Brush Strokes - Crosshatch

For this tutorial I used Angela Hobb’s “Lion King Designer Resale Package” which can be purchased from her resale store here.  Angela, the elements in this package are stunning!  Thank you!    
  
This tutorial was written assuming you have a working knowledge of PSP. 

~~ Let’s get started ~~

Open up the template.
Shift + D.
Close out the original.
Delete Layer 11 and Layer 14
Image/Canvas Size:
700 x 700 Pixels
OK
Highlight the background layer.
Flood fill with #ffffff

Highlight LAYER 2.
Click on it with your Magic Wand.
New Raster layer.
Copy and paste BG1 Paper Into Selection.
Deselect.
Delete the template layer.
Give it a slight Inner Bevel:

Highlight Layer 3.
Repeat the above step.

Highlight Layer 4.
Click on it with your Magic Wand.
New Raster layer.
Copy and paste BG1 Paper Into Selection.
DO NOT DESELECT
Click your mouse on the Lock Icon at the top of your layers pallet to lock the layer.
Adjust/Blur/Motion Blur:
Angle: 24
Strength: 62%
OK
Apply Brush Strokes – Crosshatch:
Stroke Length: 37
Sharpness:  6
Strength: 1
OK
Click the Lock Icon at the top of your layers pallet to unlock the layer.
Delete the template layer.

Highlight Layer 1.
Repeat the above step except do not delete the template layer and do the following:
Image/Flip
Image/Mirror
Deselect
Delete the template layer.

Highlight Layer 5.
Click anywhere outside of it with your Magic Wand.
Copy and paste BG2 as a new layer.
Tap the delete key.
Deselect.

Highlight Layer 6.
Click on it with your Magic Wand.
New Raster layer.
Copy and paste BG1 Paper Into Selection.
Click your mouse on the lock icon at the top of the layers pallet to lock the layer.
Apply Brush Strokes – Crosshatch:
Use same settings.
OK
Click the lock at the top of the layers pallet to unlock the layer.
Deselect.
Give it the same slight Inner Bevel.
Delete the template layer.

Highlight Layer 7.
Repeat the above step.

Color Pallet:
Foreground:  #e5cba8
Background:  #e7c009

Highlight Layer 8.
Make your Color Replacer tool active and double right click on the template.
It should change to a yellow color.

Highlight Layer 9.
Click anywhere outside of it with your Magic Wand.
Copy and paste BG1 as a new layer and move it into a position over the template that you like.
Tap the delete key.
Deselect.
Delete the template layer.
Give the paper a slight Inner Bevel:

Repeat the above step with Layer 12 and Layer 15.

Highlight Layer 13.
Click on it with your Magic Wand.
New Raster layer.
Copy and paste BG2 Into Selection.
Deselect for now.
Add the following elements to this paper area – see my tag for reference.  Don’t worry about what overhangs the square.  We’ll clean that up in a bit.
Rock Slab:  Resize 20%
Tree 2:  Resize 15%
The Lion King:  Resize 15%
The Lion King Tree:  Resize 25%

After all elements are in their place –
Highlight Layer 13 template layer.
Click anywhere outside of it with your Magic Wand.
Highlight each element that you don’t want to overhang the paper and tap the delete key.
Deselect.
Delete the template layer.

Highlight Layer 16.
Click anywhere outside of it with your Magic Wand.
Copy and paste BG2 as a new layer.
Move it into a position you like.
Tap the delete key.
Copy and paste LionKingTiger as a new layer.
Resize 30%
Move into position – see my tag for reference.
Tap the delete key.
Deselect.
Delete the template layer.

Make BG2 active.
Image/Mirror
Copy

Highlight Layer 10.
Click on it with your Magic Wand.
New Raster layer.
Copy and paste BG2 Into Selection.
Deselect for now.
Like the other square, this one we’re going to add the elements to it as follows (don’t worry about what overhangs the paper, we’ll clean it up in a bit):
LionKingMound: Resize 20%. You want this element to fit nicely in the bottom of the square so tap the letter K on your keyboard (to activate the Pick Tool) and pull the side out just until the element fits really snug in the bottom of the square.
Paste LionKingMound again:  Resize 25%/Move into position in from of the other mound.
LionKingTree2:  Resize 15%
LionKingTree3:  Resize 20%
LionKing2:  Resize 15%

Highlight Layer 10 template layer.
Click anywhere outside of it with your Magic Wand.
Highlight each element you don’t want to overhang the paper and tap the delete key.
Deselect.
Delete the template layer.

Add your elements.  I used:
RockHill:  Resize 20%
LionKingZebra:  Resize 20%
LionKingEagle:  Resize 20%
LionKingFloral3:  Resize 10%
Tortoise:  Resize 10% and 30%

Highlight your white background.
New Raster layer.
Select All.
Copy and paste BG2 Paper Into Selection.
Deselect.
Apply the mask.
Merge Group.

Add your copyrights.

Add your name.
Color Pallet:
Foreground:  #000100
Background: #af3e00
Stroke: 0.5
Type your name.
Give it a slight Inner Bevel:

Close out your white background.
Merge Visible.
Resize all layers 85%.
   
I’d love to see your results.
Email me!
Hugs,
Bev

Ebony and Ivory


Supplies Needed

1 tube of choice – I used a beautiful FTU Poser by ©Angela Hobbs and can be found at Digi Scrap Cafe

Font of choice – I used Before the Rain here

Monti Circular Mask here

My template 209 here

Plug Ins used:
Xero - Porcelain

“Ebony and Ivory” is a gorgeous scrap kit created by Denise of Denise Creationz and can be purchased from Low Budget Scrapping
  
This tutorial was written assuming you have working knowledge of PSP. 

~~ Let’s get started ~~

Open up the template.
Shift + D.
Close out the original.
Image/Canvas Size:
700 x 700 Pixels
OK
Highlight the background layer.
Flood fill with #ffffff

Highlight LEVEL 1 layer.
Click on it with your Magic Wand.
New Raster layer.
Copy and paste Paper 3 Into Selection.
Deselect.
Delete the template layer.
Give the paper layer a slight Inner Bevel:

Highlight LEVEL 3 layer.
Repeat the above step.

Highlight LEVEL 2 layer.
Click on it with your Magic Wand.
New Raster layer.
Copy and paste Paper 5 Into Selection.
Deselect.
Delete the template layer.
Give it the same slight Inner Bevel.

Highlight LEVEL 4 layer.
Click on it with your Magic Wand.
New Raster layer.
Copy and paste Paper 7 Into Selection.
Deselect.
Delete the template layer.
Give it the same slight Inner Bevel.

Color Pallet:
Foreground:  #080808
Background: #f4f4f3
Set the foreground on Gradient:
Style: Rectangular
Invert checked
Horizontal: 61
Vertical: 52
Check off “Link Center and focal points”

Highlight LEVEL 5 layer.
Click on it with your Magic Wand.
New Raster layer.
Flood fill with the gradient.
Copy and paste your tube as a new layer over the gradient layer.
Change the Properties of the tube to Overlay.
Selections/Invert
Tap the delete key.
Apply Xero - Porcelain:
Use default settings accept turn the blue channel to 0.
Copy and paste Ele19 as a new layer and position over the tube layer.
Tap the delete key.
Deselect.
Delete the template layer.

Color Pallet:
Set foreground to Gradient and choose “Metal Steel” color
Change the style to Linear
Angle: 35
Repeat: 0
OK

Highlight LEVEL 7 layer and Merge Down with LEVEL 6 layer.
Click anywhere outside of the template with your Magic Wand.
Selections/Invert
New Raster layer.
Flood fill with the gradient.
Deselect.
Delete the template layer.
Give the gradient layer a slight Inner Bevel:

Highlight LEVEL 8 layer.
Click on it with your Magic Wand.
New Raster layer.
Copy and paste Paper 5 Into Selection.
Deselect.
Give it a slight Inner Bevel:

DO NOT DELETE THE TEMPLATE LAYER.

Copy and paste Ele2 as a new layer.
Resize 40%.
Duplicate 2x’s for a total of 3.
Move each element into position – see my tag for reference.
Highlight LEVEL 8 template layer.
Click anywhere outside of it with your Magic Wand.
Use your Eraser Tool and erase what overhangs on the right side of the rectangles.
Deselect.
Delete the template layer.

Highlight LEVEL 9 layer.
Click on each rectangle with your Magic Wand.
New Raster layer.
Copy and paste Paper 7 Into Selection.
DO NOT DESELECT.
Give the paper the same slight Inner Bevel.
Copy and paste your tube as a new layer over the paper.
Move into a position you like.
Lower the Opacity to about 32.
Apply Xero - Porcelain:
Use same settings.
OK
Selections/Invert
Tap the delete key.
Deselect.
Delete the template layer.

Highlight LEVEL 12 layer.
Merge Down with LEVEL 11 Layer.
Merge Down with LEVEL 10 layer.
Click anywhere outside of the template with your Magic Wand.
Selections/Invert
New Raster layer.
Flood fill with #000000
Deselect.
Delete the template layer.

Copy and paste your tube as a new layer.
Position it to the right of the small rectangles – see my tag for reference.

Add your elements.  I used:
Ele27:  Resize 80%
Ele41:  Resize 65% and 80%/Free rotate Right 55 degrees/Duplicate/Mirror
Ele24:  Resize 40%/Duplicate
Ele68:  Resize 20%/Duplicate 2x’s
Ele49:  Resize 45%/Duplicate/Mirror
Ele21:  Resize 30%/Duplicate/Mirror/Resize 70%
Ele8:  Resize 45%/Free rotate Right 35 degrees/Duplicate/Mirror
Ele46:  Resize 40%
Ele70:  Resize 40%
Ele15:  Resize 50%/Mirror
Ele1:  Resize 60%

Crop your image.

Highlight your white background.
New Raster layer.
Select All.
Copy and paste Paper 8 Into Selection.
Deselect.
Apply the mask.
Merge Group.

Add your copyrights.

Add your name.
Color Pallet:
Foreground and Background: #202020
Stroke: 0.5
Type your name.
Give it a slight Inner Bevel 4 x’s:

Select All/Float/Defloat
Selections/Modify/Expand by 2.
New Raster layer below your name layer.
Flood fill with #ffffff.
Deselect.
Merge the 2 name layers together.

Close out your white background.
Merge Visible.
Resize all layers 85%.
   
I’d love to see your results.
Email me!
Hugs,
Bev

Sunday, June 28, 2015

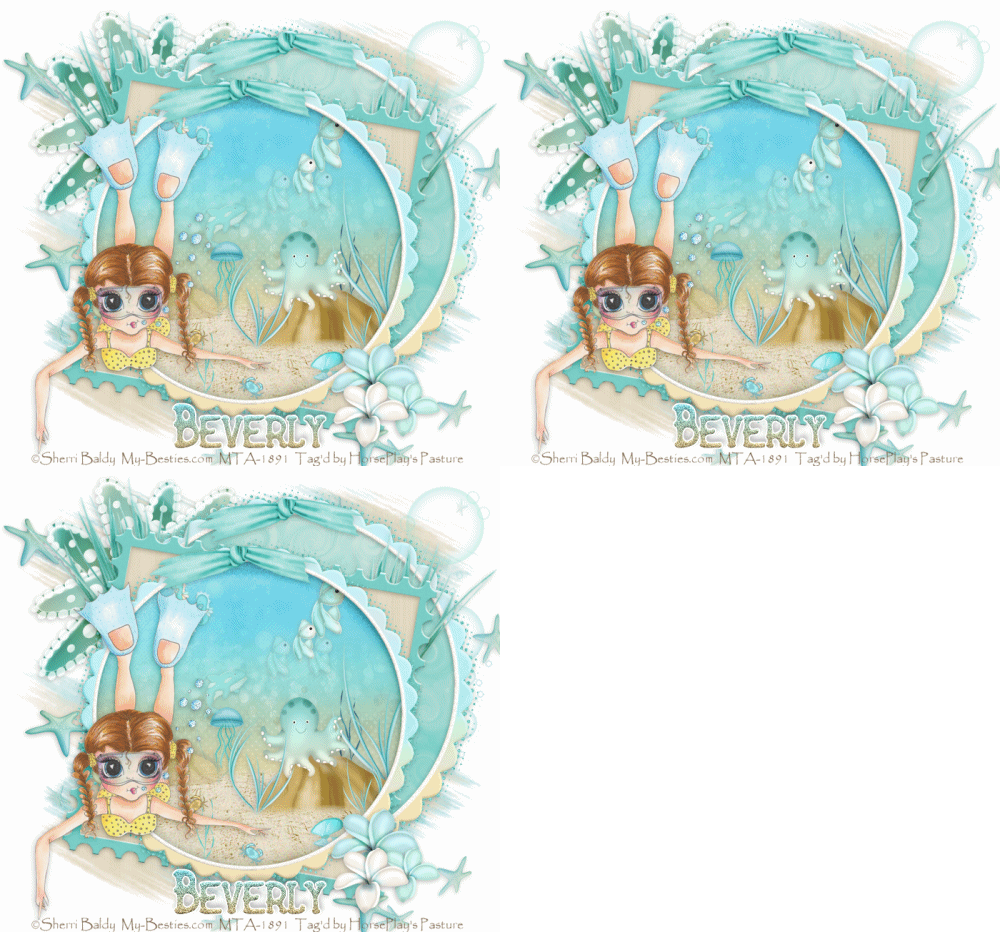
Swim Day


 photo Swim Day Bev_zpsyihofhdj.gif

Supplies Needed

1 tube of choice – I used the adorable artwork of Sherri Baldy which can be purchased from My Tubed Art.  You must have a license to use.

Font of choice – I used New Sailor here

Mask_71 Kreations here

Plugs Ins used:
Mura’s Meister – Copies

Animation Shop

“Surf ‘n Turf” is a FTU scrap kit created by me, Bev, HorsePlay’s Pasture Designs.  You can download it from my blog here
  
This tutorial was written assuming you have working knowledge of PSP. 

~~ Let’s get started ~~

Open up a 700 x 700 blank canvas.
Flood fill white.

Copy and paste 53 as a new layer.
Resize 90%
Click inside of it with your Magic Wand.
Select/Modify/Expand by 2.
Copy and paste Paper 6 as a new layer below the frame.
Move into a position you like.
Selections/Invert
Tap the delete key.
Deselect.
Duplicate the paper layer.
Change the Properties to Multiply and lower the Opacity to about 24.

Copy, Paste below the frame and move into position the following elements:
(Don’t worry about what overhangs the frame, we’ll clean it up in a bit)
***See NOTE below about placing a drop shadow on elements that have the Opacity of them lowered -
 29: Duplicate, in layers pallet make the bottom sand layer active and on your tag move it up a little.
42:  Resize 50% (position between the sand layers)/Duplicate/Resize 70%/Mirror
6:  Resize 35%
70:  Resize 25%
64:  Resize 15%
18:  Resize 40%/Duplicate as many times as you like and resize even smaller as you like.
62:  Resize 40%/Duplicate as many times as you like.
38 & 39: Resize 10%/Mirror one of the elements
7:  Resize 25%/Duplicate as many times as you like (lower the opacity of some to about 51)
1:  Resize 25%/ Duplicate as many times as you like and resize 70% (lower the opacity of some to about 36 or lower)
11:  Resize 20%/Lower the Opacity to about 42

After you have added all the elements, highlight the paper layer.
Click anywhere outside of it with your Magic Wand.
Any elements that overhang the paper, highlight them in your layers pallet and tap the delete key.
DO NOT DESELECT.

Create a new layer at the top of your layers pallet.
Copy and paste 30 Into Selection.
Deselect.
Change the Properties to Luminance and lower the Opacity to about 53.

***NOTE:  To add a drop shadow to any element that the Opacity has been lowered, do the following:
Add your drop shadow but be sure to check off “Shadow on New Layer” in the Drop Shadow box.
In your layers pallet highlight the element layer.
Click anywhere outside of the element with your Magic Wand.
Selections/Invert
Selections/Modify/Contract by 1.
Highlight the drop shadow layer.
Tap the delete key.
Deselect.

Close out your white background.
Merge Visible.
Reopen your white background.

Copy and paste 84 as a new layer just about your white background.
Resize 80%
Free rotate Right 10 degrees.
Move into position – see my tag for reference.
Click inside of it with your Magic Wand.
Selections/Modify/Expand by 2.
New Raster layer below the frame.
Copy and paste Paper 15 Into Selection.
Deselect.

Close out the merged layer and the white background.
Merge Visible.
Reopen the white background.

Copy and paste 53 as a new layer.
Move it into position – see my tag for reference.
Click inside of it with your Magic Wand.
Selections/Modify/Expand by 2.
New Raster layer below the frame.
Copy and paste Paper 13 Into Selection.
Deselect.

Close out your 2 merged layers and your white background.
Merge Visible.
Reopen all layers.

Copy and paste your tube as a new layer.

Add your elements.  I used:
32
31:  Free rotate Left 25 degrees
57:  Free rotate Left 80 degrees/Duplicate/Mirror
49:  Duplicate
59:  Resize 35%
60:  Resize 30%
58:  Resize 25%
65:  Resize 65%

Copy and paste 17 as a new layer.
Resize 30%
Apply Mura’s Meister – Copies
Choose Wallpaper (Prespective)
Use Default Settings
OK
Erase any starfish you don’t want.

Highlight your white background.
New Raster layer.
Select All.
Copy and paste Paper 12 Into Selection.
New Raster layer.
Copy and paste Paper 15 Into Selection.
Deselect.
To each paper layer:
Apply the mask.
Merge Group.
Resize the tan color mask layer 110%.
Duplicate the blue mask layer and move each mask layer a little in opposite diagonal directions.

Add your copyrights.

If you’re not going to animate then add your name and save your tag.

Add your name.
Color Pallet:
Foreground: #7ec7d0
Background: #dacca8
Stroke: 3.0
Type your name.
Give it a slight Inner Bevel:

Duplicate your name layer 2 times for a total of 3.
Rename them:
Name Layer 1
Name Layer 2
Name Layer 3

Highlight Name Layer 1.
Adjust/Add Remove Noise/Add Noise:
Uniform and Monochrome checked
Noise: 28%
OK

Highlight Name Layer 2.
Adjust/Add Remove Noise/Add Noise:
Uniform and Monochrome checked
Noise: 38%
OK

Highlight Name Layer 3.
Adjust/Add Remove Noise/Add Noise:
Uniform and Monochrome checked
Noise: 48%
OK

Highlight Name Layer 1.
Select All/Float/Defloat
Selections/Modify/Expand by 2.
Add a new Raster layer below Name 1 layer.
Flood fill with #ffffff.
Highlight Name Layer 1.
Merge Down.
The glitter name should now have a white outline to it.

Repeat the above step with Name Layer 2 and Name Layer 3.
You also may need to rename each name layer after it’s been merged with it’s white name layer.

Close out Name 2 & 3 layer.
Keep open Name 1 layer.

If you’re using the same tube as I did and you’d like to animate the bubbles with glitter as I did:

Duplicate the tube 2 times for a total of 3.
Rename them Tube 1, Tube 2, Tube 3.

Highlight Tube 1 layer.
Make your Selection Tool active set on Circle outline each of the little bubbles.
Adjust/Add Remove Noise/Add Noise:
Use the same settings as you did for your name but change the Noise % back to 28.
Highlight Tube 2.
Apply the same noise effect but change the % to 38.
Highlight Tube 3.
Apply same noise effect but change the % to 48.
Deselect.
Close out Tube 2 & Tube 3 layer.

Copy Merge.

~Time to Animate~

Open up Animation Shop.
Edit/Paste as New Animation.

Back in PSP.
Close out Name 1 layer.
Open up Name 2 layer.
Close out Tube 1 layer.
Open up Tube 2 layer.
Copy Merge.

Carry into AS.
Edit/Paste/After Current Frame.

Back in PSP.
Close out Name 2 layer.
Open up Name 3 layer.
Close out Tube 2 layer.
Open up Tube 3 layer.
Copy Merge.

Carry into AS.
Edit/Paste/After Current Frame.

View your animation.
If you like it then hit Ctrl + A (to highlight all frames)
Animation/Resize Animation:
Click Pixel Size:
Width: 500
OK

Save your animation.

I’d love to see your results.
Email me!
Hugs,
Bev