Wednesday, August 22, 2012

Under the Magic Tree


Supplies

1 tube of choice – I used the beautiful artwork of Christina Lank which can be purchased from PSP Tube Stop.  You must have a license to use.

Font of choice - I used Before the Rain here

Weescotlass Mask 208 here

Tracy F. Designz template 25 here
Her templates are in bulk downloads – scroll down and you’ll find them in the right side bar.

“Fairy Serenata” is a tagger size scrap kit created by Cindy of Cindy’s Creative Designs and can be purchased from ButterflyBlush Designs.  You can visit her blog here.
Thank you Cindy for a really terrific kit.
This tutorial was written assuming you have a working knowledge of PSP.

~~ Lets get started ~~

Open up the template.
Shift + D.
Close out the original.
Delete the top 5 layers.
Image/Canvas Size 700 x 600.
New Raster layer.
Flood fill white.
Send to Bottom.

Highlight Strips layer.
Click on each one with your Magic Wand.
Copy and paste Paper 7 as a new layer.
Resize 75%
Selections/Invert
Tap the delete key.
Deselect.
Delete the template layer.
Adjust/Add Remove Noise/Add Noise:
Uniform and Monochrome checked
Noise: 25%
OK
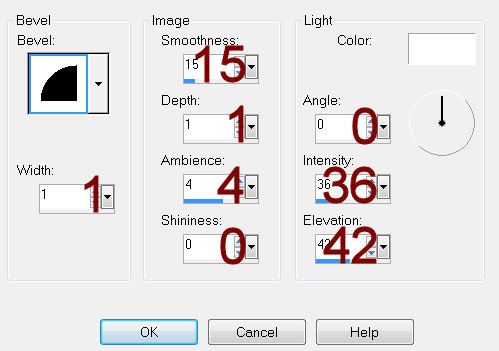
Give it a slight Inner Bevel:
Repeat the above step with the following layers:
Circle Frame
Rectangle Frame

Highlight Circle layer.
Click anywhere outside of it with your Magic Wand.
Copy and paste Paper 2 as a new layer.
Resize 70%
Tap the delete key.
Deselect.
Delete the template layer.

Color Pallet:
Forground: #000000
Background: #5e6b18

Highlight Dotted Circles layer.
Make your Color Replacer Tool active.
Zoom in on the dotted circles and position your mouse directly over one of the dots.
Double right click your mouse.
The circles should have turned green.

Color Pallet:
Foreground: #f1f1f1
Background: #5e6b18

Highlight Dotted Rectangle layer.
Repeat the above step.

Highlight Rectangle layer.
Click on it with your Magic Wand.
New Raster layer.
Copy and paste Paper 3 Into Selection.
Copy and paste your tube as a new layer over the paper layer.
If you’re using the same tube as I did, use layer “MorningsCharmTreeLayer” and resize 50%
Selections/Invert
Tap the delete key.
Duplicate the tube layer.
Move up and to the right just a little.  In your layers pallet move below the other tube layer.
Change the Properties to Overlay and lower the Opacity to about 69.
Tap the delete key.
Deselect.
Delete the template layer.

Add your elements.  I used:
Bow 1:  Resize 25%/Duplicate/Mirror
Leaves 1:  Resize 40%/Duplicate/Mirror/Flip
Leaves 2:  Resize 35%/Duplicate/Mirror/Flip
Lights 1:  Resize 30%
Bird 2:  Resize 25%
Leaves 6:  Resize 40%
Mouse 1:  Resize 25%
Leaves 3:  Resize 50%/Duplicate/Mirror

Highlight your white background.
New Raster layer.
Select All.
Copy and paste Paper 7 Into Selection.
Apply the mask.
Merge Group.
Duplicate

Add your credits.

Add your name.
Color Pallet:
Foreground: #1a1612
Background:  #b8488a
Stroke: 1.00
Type your name.
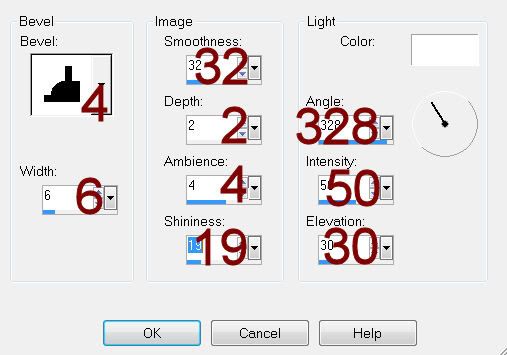
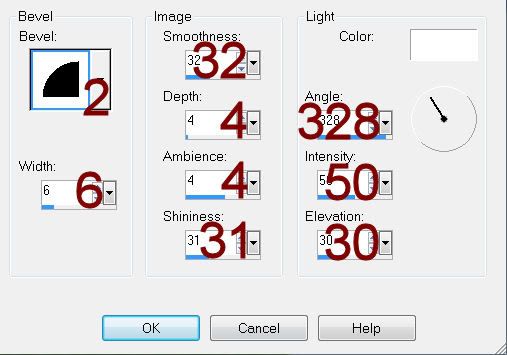
Give it a slight Inner Bevel:
Resize all layers 80%.

I’d love to see your results.
Email me!
Hugs,
Bev

Tuesday, August 21, 2012

The Frog Prince's Plan


Supplies

1 tube of choice – I used the beautiful artwork of Lisa Victoria which can be purchased from Up Your Art.  You must have a license to use.

Font of choice – Centeria Script here

Weescotlass Mask 138 here

Divine Intentionz template 268 here

Plug Ins used:
DSB Flux – Bright Noise

“The Sweet Honey” is a tagger size scrap kit created by Conchi of DNScraps and can be purchased from Lollipopsn Gumdrops.  You can visit her blog here.
Thank you Conchi for a truly wonderful kit.
This tutorial was written assuming you have a working knowledge of PSP.

~~ Lets get started ~~

Open up the template.
Shift + D.
Close out the original.
Delete the top 2 layers, Rectangle 2 and Rectangle 1 layer.
Image/Canvas Size 700 x 500.
Open up the background layer.
Flood fill white.

Highlight Square Shape layer.
Click on it with your Magic Wand.
New Raster layer.
Copy and paste Paper 8 Into Selection.
Deselect.
Delete the template layer.
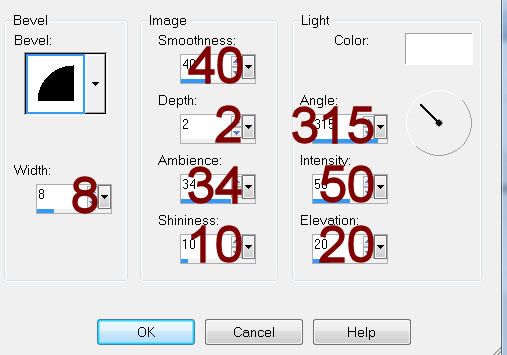
Give it a slight Inner Bevel:

Highlight Glitter Square Shape layer.
Click anywhere outside of it with your Magic Wand.
Selections/Invert
New Raster layer.
Copy and paste Paper 1 Into Selection.
Deselect.
Delete the template layer.
Give it the same slight Inner Bevel.
Apply DSB Flux – Bright Noise:
Intensity: 25
Mix checked
OK

Highlight Oval Half 2 layer.
Merge Down.
You should now have a big oval on one layer.
Click anywhere outside it with your Magic Wand.
Selections/Invert
New Raster layer.
Copy and paste Paper 12 Into Selection.
Copy and paste your tube as a new layer over the paper layer.
Change the Properties to Soft Light.
Move into position – see my tag for reference.
Selections/Invert
Tap the delete key.
Deselect.
Delete the template layer.
Give the oval paper layer the same slight Inner Bevel.

Highlight Thin Rectangle 2 layer.
Merge Down.
You should now have a very long thin rectangle on one layer.
Click anywhere outside it with your Magic Wand.
Selections/Invert

New Raster layer.
Copy and paste Paper 11 Into Selection.
Copy and paste your tube as a new layer over the paper layer.
Deselect.
Give the paper layer the same slight Inner bevel.

Highlight Circle layer.
Click on it with your Magic Wand.
New Raster layer.
Copy and paste Paper 15 Into Selection.
Copy and paste your tube as a new layer over the circle paper layer.
Lower the Opacity to about 18 – You could always just change the Properties to Soft Light but I found it put too much of a glare on the tube.
Selections/Invert
Tap the delete key.
Deselect.
Delete the template layer.
Give the paper layer the same slight Inner Bevel.

Copy and paste your tube as a new layer.

Add your elements.  I used:
Ribbon Bow 2:  Resize 80%/Free rotate Right 5 degrees/Flip
Lantern:  Resize 55%
Magic:  Resize 40%
Wheel:  Resize 35%
Stars:  Resize 60%

Highlight your white background.
New Raster layer.
Select All.
Copy and paste Paper 11 Into Selection.
Apply the mask.
Resize 130%
Merge Group.

Add your credits.

Add your name.
Color Pallet:
Foreground: #4d0f01
Background:  #f6da5c
Stroke: 1.25
Type your name.
Give it a slight Inner Bevel:
Apply DSB Flux – Bright Noise:
Use same settings.

Resize all layers 80%.

I’d love to see your results.
Email me!
Hugs,
Bev

Monday, August 20, 2012

The Messenger


Supplies

1 tube of choice – I used the beautiful artwork of Christina Lank which can be purchased from PSP TubeStop.  You must have a license to use.

Font of choice - I used Pieces of Eight here

Becky Mask 22 here

Tracy F. Designz template 35 here
Her templates are in bulk downloads – scroll down and you’ll find them in the right side bar.

Plug Ins used:
Eyecandy 3.1 – Glow
Xero - Porcelain

“Evil Queen” is a tagger size scrap kit created by Lysira’s Graphic World and can be purchased from Twilight Scraps.  You can visit her blog here.
Thank you Sue Ellen for a super fantastic kit.
This tutorial was written assuming you have a working knowledge of PSP.

~~ Lets get started ~~

Open up the template.
Shift + D.
Close out the original.
Delete the top 3 layers.
Image/Canvas Size 700 x 500.
New Raster layer.
Flood fill white.
Send to Bottom.

Highlight Circle 1 layer.
Click on it with your Magic Wand.
New Raster layer.
Copy and paste Paper 7 Into Selection.
Deselect.
Delete the template layer.
Apply Eyecandy 3.1 – Glow:
Width: 3
Opacity: 100%
Opacity Drop Off: Fat
Color: #000000

Highlight Circle 2 layer.
Repeat the above step.

Highlight Rectangle 1 layer.
Click on it with your Magic Wand.
New Raster layer.
Copy and paste Paper 9 Into Selection.
Deselect.
Delete the template layer.
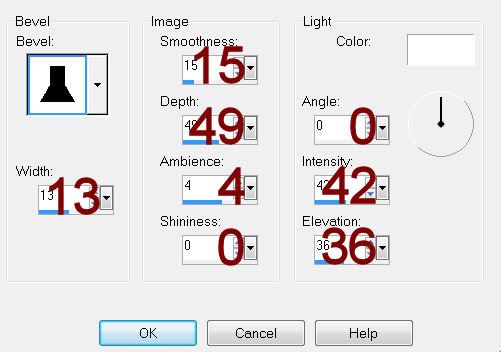
Give it a slight Inner Bevel:

Highlight Rectangle 2 layer.
Click on it with your Magic Wand.
New Raster layer.
Copy and paste Paper 2 Into Selection.
Deselect.
Delete the template layer.
Give it the same slight Inner Bevel.

Highlight Rectangle 3 layer.
Click on it with your Magic Wand.
New Raster layer.
Copy and paste Paper 6 Into Selection.
Copy and paste your tube as a new layer over the paper layer.
Change the Properties to Luminance (Legacy) and move into position – see my tag for reference.
Selections/Invert
Tap the delete key.
Deselect.
Apply Xero – Porcelain:
Use Default settings accept move the Blue Channel button to 0.
Delete the template layer.
Give the paper layer the same slight Inner bevel.

Copy and paste your tube as a new layer.

Add your elements.  I used:
Frame 6:  Resize 70%/Place behind the Right Circle.
Frame 6 again:  Resize 80%/Place behind the Left Circle
Dead Tree:  Resize 75%/Duplicate/Mirror
Bow 2:  Resize 30%
Raven:  Resize 50%
Ribbon Roses:  Resize 50%/Duplicate/Mirror
Tribal Heart:  Resize 50%
Glitter Doodle:  Resize 50%/Duplicate/Mirror

Highlight your white background.
New Raster layer.
Select All.
Copy and paste Paper 8 Into Selection.
Apply the mask.
Resize 110%
Use your Pick Tool and bring the bottom of the mask up a bit.
Merge Group.

Add your credits.

Add your name.
Color Pallet:
Foreground: Pattern/Paper 8
Background:  Pattern/Paper 7
Stroke: 1.25
Type your name.
Give it a slight Inner Bevel:

Resize all layers 80%.

I’d love to see your results.
Email me!
Hugs,
Bev