Thursday, June 14, 2012

By the Bay

Supplies

1 tube of choice – I used the artwork of Anna Marine which can be purchased from CDO.  You must have a license to use.

Font of choice - I used Havlova Austra here

Monti Circular Mask here

“By the Bay” is a tagger size scrap kit created by me, Bev of HorsePlay’s Pasture Designs and can be purchased from  either of your favorite stores – Lollipops n Gumdrops or Butterfly Blush Designs.   You can visit my designing blog here.

This tutorial was written assuming you have a working knowledge of PSP.

~~ Lets get started ~~

Open up a 700 x 700 blank canvas.
Flood fill white.

Copy and paste 22 as a new layer.
Resize 85%
Click inside of it with your Magic Wand.
Selections/Modify/Expand by 4.
New Raster layer below the frame.
Copy and paste Paper 13 Into Selection.
Deselect.

Copy and paste 24 as a new layer.
Resize 55%
Free rotate Left 7 degrees.
Duplicate
Mirror
Move both frames into position – see my tag for reference.

To each frame:
Click inside of it with your Magic Wand.
Selections/Modify/Expand by 4.
New Raster layer below the frame.
Copy and paste Paper 5 Into Selection.
Copy and paste your tube as a new layer just below the frame.
Selections/Invert
Tap the delete key.
Change the Properties to Soft Light.
Deselect.

Copy and paste your tube as a new layer.
Position it in front of both frames.

Add your elements.  I used:
49:  Resize 70%/Duplicate/Resize 60%
46:  Resize 60%/Duplicate/Mirror
57:  Resize 40%
15:  Resize 20%/Duplicate/Flip/Resize 70%/Duplicate both flowers
8:  Resize 15%/Free rotate Left 10 degrees
9:  Resize 15%/Free rotate Right 25 degrees/Duplicate/Mirror
71:  Resize 40%
36: Duplicate
The elements to go with the name are down further in the tutorial.
  
Highlight your white background.
New Raster layer.
Select All.
Copy and paste Paper 6 Into Selection.
Deselect.
Apply the mask.
Merge Group.

Add your credits.

Add your name.
Foreground: 551f15
Background: c53a1b
Stroke: 1
Type your name.
Give it a slight Inner Bevel 2x’s:
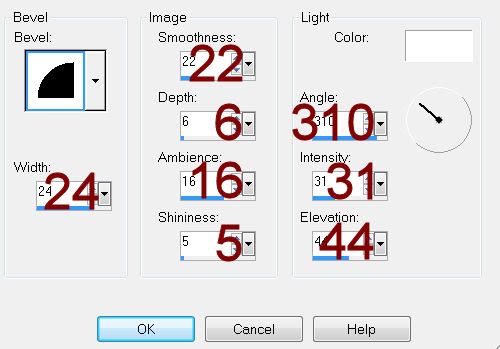
The elements I used to decorate around the name:
56:  Resize 45%
47:  Resize 15%/Duplciate/Mirror
1:  Resize 25%/Duplicate/Mirror
67:  Resize 25%
56 again:  Resize 20%/Duplicate/Move both sand layers into position to cover the bottom part of the ric rac.

Resize all layers 80%.

I’d love to see your results.
Email me!
Hugs,
Bev

Monday, June 11, 2012

OTH 12

Supplies

1 tube of choice – I used the artwork of PinUpToons which can now be purchased from CDO.  You must have a license to use.

Font of choice - I used Chicken Basket here

Monti Circular Mask here

My template 94 here

Plug Ins used:
Eyecandy 3.1 - Glow

“Over the Hill” is a tagger size scrap kit (also available in full size) created by ZaZa of Scraps and Tubes and is part of the TKO Birthday Collaboration and can be purchased from TKO Scraps.  You can visit her blog here.

This tutorial was written assuming you have a working knowledge of PSP.

~~ Lets get started ~~

Open up the template.
Shift + D.
Close out the original.
Delete the top 3 layers.
Image/Canvas Size
700 x 600
OK
Highlight the background layer.
Flood fill white.

Highlight Large Rec Back layer.
Click on it with your Magic Wand.
New Raster layer.
Flood fill with #313131.
Deselect.
Delete the template layer.

Repeat the above step with Vertical Rec Frame layer.

Highlight Large Rect layer.
Click anywhere outside of it with your Magic Wand.
Selections/Invert
New Raster layer.
Flood fill with a gradient of choice.
Deselect.
Delete the template layer.

Repeat the above step with Vertical Rec layer accept invert your gradient.

Copy and paste your tube as a new layer.
Position in front of the vertical rectangle frame.
Shift + L
The Colorize box should open up.
Hue and Saturation: 0
Ok

Add your elements.  I used:
10:  Resize 60%
1:  Resize 40%
6:  Resize 80%/Duplicate
3:  Resize 30%
12:  Resize 25%
13:  Resize 20%/Duplicate
14:  Resize 15%/Duplicate

Highlight your white background.
New Raster layer.
Select All.
Copy and paste 17 Into Selection.
Deselect.
Adjust/Blur/Gaussian Blur:
Radius: 20
OK
Apply the mask.
Merge Group.

Add your credits.

Add your name.
Convert to Raster layer.
Apply Eyecandy 3.1 – Glow:
Width: 3
Opacity: 100%
Opacity Drop Off: Fat
Color: White
OK

Resize all layers 80%.

I’d love to see your results.
Email me!
Hugs,
Bev

OTH 11

Supplies

1 tube of choice – I used the artwork of Barbara Jensen which can be purchased here.  You must have a license to use.

Font of choice - I used Epittazio here

Becky Mask 9 here

My template 60 here

“Over the Hill” is a tagger size scrap kit (also available in full size) created by Lisa of EAL Designs and is part of the TKO Birthday Collaboration and can be purchased from TKO Scraps.  You can visit her blog here.

This tutorial was written assuming you have a working knowledge of PSP.

~~ Lets get started ~~

Open up the template.
Shift + D.
Close out the original.
Delete the credit layer.
Image/Canvas Size
700 x 600
OK
Highlight the background layer.
Flood fill white.

Highlight Middle Oval.
Click on it with your Magic Wand.
New Raster layer.
Flood fill with a gradient of choice.
Deselect.
Delete the template layer.

Repeat the above step with Left Oval and Right Oval layers.

Highlight Middle Oval Frame layer.
Click on it with your Magic Wand.
New Raster layer.
Flood fill with #000000.
Deselect.
Delete the template layer.

Repeat the above step with Left Oval Frame and Right Oval Frame layers.

Copy and paste your tube as a new layer.
Position in front of the center frame.
Duplicate/Move this one below the center frame.
Highlight the gradient layer just below the tube.
Click anywhere outside of it with your Magic Wand.
Highlight the tube layer just above it.
Tap the delete key.
Deselect.
Highlight the tube layer that’s above the frame in your layers pallet.
Use your Eraser Tool and erase any part of the tube you don’t want to stick outside of the frame.

Paste your tube again.
Position it below the Left Frame.
Duplicate/Mirror/Move this tube layer just below the right frame.
Change the Properties of both tube layers to Soft Light.

Highlight the left gradient layer.
Click anywhere outside of it with your Magic Wand.
Highlight the tube just above it.
Tap the delete key.
Deselect.

Highlight the right gradient layer.
Repeat the above step.

Add your elements.  I used:
E12:  Resize 25%/Duplicate/Flip
E13:  Resize 20%/Duplicate/Mirror/Move both flowers into position/Merge Down/Duplicate/Flip
E2:  Resize 25%
E15:  Resize 40%/Flip/Duplicate/Mirror

Highlight your white background.
New Raster layer.
Select All.
Copy and paste Paper 4 Into Selection.
Deselect.
Apply the mask.
Merge Group.

Add your credits.

Add your name.

Resize all layers 80%.

I’d love to see your results.
Email me!
Hugs,
Bev

OTH 10

Supplies

1 tube of choice – I used the artwork of Ray Leaning which can be purchased from PSP Tubes Emporium.  You must have a license to use.

Font of choice - I used Aquarelle here

Weescotlass Mask 362 here

“Over the Hill” is a tagger size scrap kit (also available in full size) created by Tezza of Tezza’s Tagger Scraps and is part of the TKO Birthday Collaboration and can be purchased from TKO Scraps.  You can visit her blog here.

This tutorial was written assuming you have a working knowledge of PSP.

~~ Lets get started ~~

Open up a 700 x 700 blank canvas.
Flood fill white.

Copy and paste Frame 1 (copy) as a new layer.
Click inside of it with your Magic Wand.
Selections/Modify/Expand by 4.
New Raster layer below the frame.
Flood fill with a gradient of choice.
Deselect.

Copy and paste your tube as a new layer in front of the frame.

Copy and paste Banner Ribbon as a new layer.
Move into position at one side of the frame – see my tag for reference.
Duplicate/Slide to the opposite side.

Highlight your white background.
New Raster layer.
Select All.
Copy and paste Paper 3 Into Selection.
Deselect.
Apply the mask.
Merge Group.

Add your credits.

Add your name.

Resize all layers 80%.

I’d love to see your results.
Email me!
Hugs,
Bev

OTH 9

Supplies

1 tube of choice – I used this gorgeous Exclusive tube from Eugene Rzhevskii which was given to loyal customers at Pics for Design.

Font of choice - I used Al Sandra here

Weescotlass Mask 362 here

Scrap Rebellion Template 30 here

Plug Ins used:
Eyecandy 3.1 – Glow

“Over the Hill” is a tagger size scrap kit (also available in full size) created by Tamara of TLP Designz and is part of the TKO Birthday Collaboration and can be purchased from TKO Scraps.  You can visit Tamara’s blog here.

This tutorial was written assuming you have a working knowledge of PSP.

~~ Lets get started ~~

Open up the template.
Shift + D.
Close out the original.
Image/Canvas Size:
700 x 700
Highlight the background layer.
Flood fill white.
Delete the top 4 layers and the Shower Door layer.

Highlight Frame 1 layer.
Shift + B
The Brightness Contrast box should open up.
Brightness: -190
Contrast: 9
OK
Repeat the above step with:
Frame 2
Blue Rectangle

Highlight Purp Thic Rec layer.
Click anywhere outside of it with your Magic Wand.
Copy and paste Paper 5 as a new layer.
Resize 65%
Tap the delete key.
Deselect.
Delete the template layer.

Open up Paper 9.
Use your Selection Tool set on Rectangle and section out the entire center the paper – (avoid the shaded sides)
Copy.

Highlight Purp Circle layer.
Click on it with your Magic Wand.
New Raster layer.
Paste Into Selection.
Deselect.
Delete the template layer.

Highlight Blue Circle layer.
Click on it with your Magic Wand.
New Raster layer.
Paste Into Selection.
Copy and paste your tube as a new layer just over the paper.
Selections/Invert
Tap the delete key.
Deselect.
Delete the template layer.
Lower the Opacity of the tube layer to about 24.

Paste your tube as a new layer.
Position it in front of the circle.

Copy and paste Eyelet 2 as a new layer.
Duplicate
Overlap to create one ribbon.
Merge Down.
See my tag for placement.

Add your elements.  I used:
Balloon 1 & 2:  Resize 80%
Banner
Flower 2:  Resize 65%
Ribbon 6:  Duplicate

Highlight your white background.
New Raster layer.
Select All.
Copy and paste Paper 1 Into Selection.
Deselect.
Apply the mask.
Merge Group.

Add your credits.

Add your name.
Apply Eyecandy 3.1 – Glow:
Width: 3
Opacity: 100%
Opacity Drop Off: Fat
Color: White
OK

Resize all layers 80%.

I’d love to see your results.
Email me!
Hugs,
Bev

OTH 8

Supplies

Font of choice - I used Cinnamon Cake here

Vaybs Mask 2 here

“Over the Hill” is a tagger size scrap kit (also available in full size) created by Chris of Katelynn’s Designs and is part of the TKO Birthday Collaboration and can be purchased from TKO Scraps.  You can visit Chris’ blog here.

This tutorial was written assuming you have a working knowledge of PSP.

~~ Lets get started ~~

Open up a 700 x 700 blank canvas.
Flood fill white.

Copy and paste Frame 1 as a new layer.
Resize 90%
Free rotate Right 5 degrees.
Click inside of it with your Magic Wand.
Selections/Modify/Expand by 4.
New Raster layer below the frame.
Copy and paste Paper 6 Into Selection.
Deselect.

Add your elements.  I used:
Doodle
Balloon 1 & 2:  Resize 70%
Flower 2:  Resize 40%/Duplicate/Resize 70%
Caution Sign 2
Butterfly:  Resize 25%/Mirror

Crop your image.

Highlight your white background.
New Raster layer.
Select All.
Copy and paste Paper 1 Into Selection.
Deselect.
Apply the mask.
Merge Group.

Add your credits.

Add your name.

Resize all layers 80%.

I’d love to see your results.
Email me!
Hugs,
Bev