Saturday, July 2, 2011

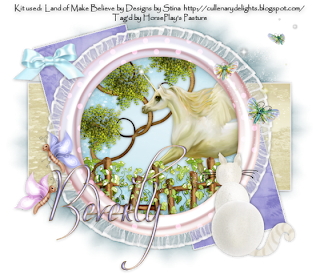
Land of Make Believe


Supplies

Font of choice - I used Oh Lara - a pay font.

Weescotlass Mask 138 here

Eyecandy 3.1 - Glow

“Land of Make Believe” is a tagger size scrap kit created by Stina of Designs by Stina and can be purchased from Aussie Scrap Designs. You can visit her blog here.
Thank you Stina for such a beautiful and enchanting kit!

This tutorial was written assuming you have a working knowledge of PSP.

~♥~ Let’s get started ~♥~

Open up a 700 x 700 blank canvas.
Flood fill white.

Copy and paste Frame 4 as a new layer.
Resize 80%
Click inside of it with your Magic Wand.
Selections/Modify/Expand by 4.
New Raster layer below the frame.
Copy and paste Paper 7 Into Selection.
Deselect.

We’re going to add the elements below the frame. Don’t worry about what overhands the frame as we’ll clean that up in a bit.
See my tag for all placements:
Tree: Resize 70%
Unicorn: Resize 80%
Fence: Resize 70%

Highlight the paper layer.
Click anywhere outside of it with your Magic Wand.
Highlight each element and tap the delete key.
Deselect.

New Raster layer.
Make your Selection Tool active - set on Rectangle.
Make a 200 x 250 rectangle.
Copy and paste Paper 14 Into Selection.
Deselect.
Apply Eyecandy 3.1 -Glow:
Width: 3
Opacity: 100
Opacity Drop off: Fat
Color: White
OK

Duplicate
Move both rectangle into position - see my tag for reference.

New Raster layer.
Make a 550 x 225 rectangle.
Copy and paste Paper 15 Into Selection.
Deselect.
Apply the same Glow Effect.

Add your embellishments. I used:
Bow 5: Resize 25%
Flutterflies: Erase what flies you don’t want.
Cat: Resize 35%
Flutterfly 2: Resize 25% and 60%
Flutterfly 4: Resize 25% and 60%/Mirror

Highlight your white canvas.
Select All
New Raster layer.
Copy and paste Paper 12 Into Selection.
Deselect.
Apply the mask.
Resize 120%
Merge Group.

Add your copyrights.

Add your name.
Give it a slight Inner Bevel:
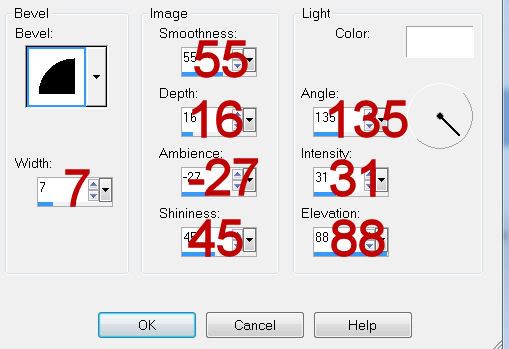

Resize all layers 80%.

I hope you enjoyed this tutorial.
I’d love to see your results and show it off in my gallery.
Email me!
Hugs,
Bev

Thursday, June 30, 2011

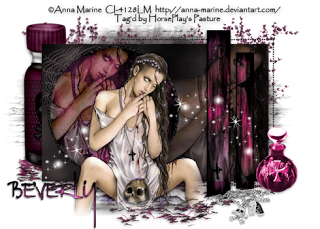
Gothic Queen


Supplies

1 tube of choice - I used the artwork of Anna Marine which can now be purchased from CDO. You must have a license to use.

Font of choice - I used Rat Infested Mailbox here

Creative Misfit - Template 1 by Deb & Tamie.
Can be found under June 15, 2011

Weescotlass Mask 236 here

Greg’s Factory Output Vol. II - Pool Shadow

“Gothic Queen” is tagger size scrap kit created by Sandy of Sandy’s Design and can be purchased from Inspirations of Scrap Friends. You can visit her blog here.
Thank you Sandy for such an incredible kit!

This tutorial was written assuming you have a working knowledge of PSP.

~♥~ Let’s get started ~♥~

Open up the template.
Shift + D.
Close out the original.
Resize all layers 85%
Image/Canvas Size:
700 x 500
Delete the top 5 layers, Copy of Vector 1, and Raster 4 layer.

Highlight Raster 9.
Select All/Float/Defloat
New Raster layer.
Copy and paste Paper 1 Into Selection.
Adjust/Add Remove Noise/Add Noise:
Monochrome and Gaussian checked
Noise: 66%
OK
Deselect.
Delete the template layer.

Highlight Raster 13.
Repeat the above step.

Highlight Raster 2 layer.
Click on it with your Magic Wand.
New Raster layer.
Copy and paste Paper 12 Into Selection.
Apply Greg’s Factory Output Vol. II - Pool Shadow:
Use Default Settings.
Deselect.
CLOSE OUT the template layer.
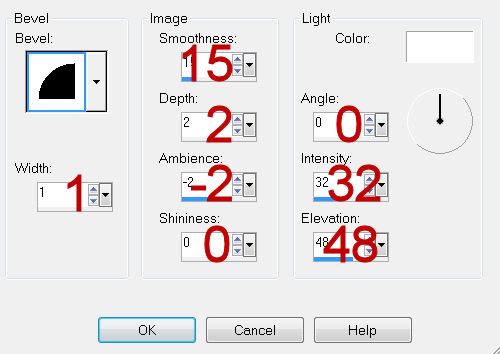
Give it a slight Inner Bevel:


Highlight Raster 6 layer..
Click on it with your Magic Wand.
New Raster layer.
Copy and paste Paper 2 Into Selection.
Deselect.
CLOSE OUT the template layer.
Give it the same Inner Bevel.

Highlight Raster 7 layer.
Repeat the above step.

Merge Visible Raster 6 & 7 template layers.
They should now both be on the same layer.
Use your Magic Wand and click on both of them.
Copy and paste your tube as a new layer above the template layer.
Change the Properties of the tube to Overlay.
Move your tube into position - make sure it’s where you’d like to see it not only on the large rectangle but also on the thin vertical slats - It’s the reason I had you use your Magic Wand on the slats…it gives some guidance as to placement.
Once you have your tube in the position you want Deselect.
Highlight Raster 2 template layer.
Click anywhere outside of it with your Magic Wand.
Highlight the tube layer.
Tap the delete key.
Deselect.
Delete the template layer.

Highlight the merged template layer - the vertical slats.
Click on each one with your Magic Wand.
Highlight your tube layer.
Right Click/Promote Section to layer.
Deselect.
Change the Properties of this layer to Saturation.

Copy and paste your tube as a new layer.
Position it where you want it in front of the circle template layer.

Highlight Raster 3 layer.
Click on it with your Magic Wand.
New Raster layer.
Copy and paste Paper 2 Into Selection.
Copy and paste your tube as a new layer over the paper.
Move it into exact position.
Selections/Invert
Tap the delete key.
Deselect.
Delete the template layer.
Change the Properties of this tube to Hard Light and lower the Opacity to about 53.

Add your embellishments. I used:
Ivy 2: Resize 60%/Duplicate/Mirror
Skulpolis1: Resize 70%
Chain 1: Resize 40%
Makeup: Resize 40%
Web: Resize 40%
Ivy 1: Erase top of it
Sparkles 1: 70%

Highlight your white canvas.
Select All
New Raster layer.
Copy and paste Paper 2 Into Selection.
Deselect.
Apply the mask.
Use your Pick Tool and pull the left side out slightly.
Merge Group.

Add your copyrights.

Add your name.
Color Pallet:
Foreground: Black
Background: Pattern/Paper 2
Type your name.
Convert to Raster layer.
Select All/Float/Defloat
Apply the Pool Shadow Effect - same settings.
Apply again.
Deselect.

Resize all layers 80%.

I hope you enjoyed this tutorial.
I’d love to see your results and show it off in my gallery.
Email me!
Hugs,
Bev
Wednesday, June 29, 2011

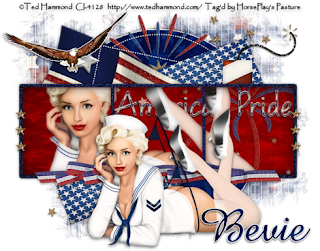
American Pride


Supplies

1 tube of choice - I used the artwork of Ted Hammond which can now be purchased from CDO. You must have a license to use.

Font of choice - I used Amaze Normal here

Creative by Nature Template 106 here

Weescotlass Mask 297 here

Eyecandy 3.1 - Glow

“Stars and Stripes Forever” is tagger size scrap kit created by Vickie of Gemini Creations and can be purchased from TKO Scraps. You can visit her blog here.
Thank you Vickie for such an awesome patriotic kit!

This tutorial was written assuming you have a working knowledge of PSP.

~♥~ Let’s get started ~♥~

Open up the template.
Shift + D.
Close out the original.
Resize all layers 85%
Image/Canvas Size:
700 x 550
New Raster layer.
Send to bottom.
Flood fill white.
Delete the top 6 layers and layer labeled 9.

Highlight 11.
Click on it with your Magic Wand.
New Raster layer.
Copy and paste Paper 12 Into Selection.
Deselect.
Delete the template layer.
Apply Eyecandy 3.1 - Glow:
Width: 3
Opacity: 100
Opacity Drop off: Fat
Color: White
OK

Highlight 10.
Adjust/Add Remove Noise/Add Noise:
Monochrome and Gaussian checked
Noise: 43%
OK

Highlight 8.
Click on it with your Magic Wand.
New Raster layer.
Copy and paste Paper 1 Into Selection.
Deselect.
Delete the template layer.

Make a new canvas.
Flood fill with #ffffff.
Copy.
Close it out. You won’t be needing it any more.

Highlight 7.
Select All/Float/Defloat
New Raster layer.
Paste.
Deselect.
Delete the template layer.
Apply the same noise effect.

Highlight 6.
Select All/Float/Defloat
New Raster layer.
Copy and paste Paper 10 Into Selection.
Deselect.
Delete the template layer.
Apply the same Noise Effect.

Highlight 5.
Click on it with your Magic Wand.
New Raster layer.
Copy and paste Paper 13 Into Selection.
Copy and paste your tube as a new layer over the paper.
Move it into exact position.
Right Click/Promote Section to layer.
Close out the tube that’s below the promoted layer.
Copy and paste Fireworks 1 as a new layer just above the paper layer.
Selections/Invert
Tap the delete key.
Copy and paste ProudAmericanwa as a new layer above Fireworks 1 layer.
Resize 80% and move into position - see my tag for reference.
Tap the delete key.
Deselect.
Delete the template layer.
Highlight the Promoted Section layer.
Apply Xerox - Porcelain:
Default Settings accept move the Blue Channel to 0.

Open up Gold Star Scatter.
Use your Selection Tool and section off one star.
Copy.
Deselect.
Make your working canvas active.
Paste as a new layer.
Duplicate 2 times for a total of 3 star layers.
Move them into position - see my tag for reference.
Merge Visible the 3 star layers.
Duplicate/Mirror

Add your embellishments. I used:
Gold Star Scatter: Resize 85%/Free rotate Right 30 degrees
Fireworks
US Flag: Free rotate Right 25 degrees
Folded Ribbon 2: Resize 70%/ Free rotate Right 90 degrees
Eagle Sticker: Resize 40%
Fireworks 3: Erase the tail that sticks out at the lower right side of your canvas.

Highlight your white canvas.
Select All
New Raster layer.
Copy and paste Paper 7 Into Selection.
Deselect.
Apply the mask.
Merge Group.

Add your copyrights.

Add your name.
Apply the same Glow Effect.

Resize all layers 80%.

I hope you enjoyed this tutorial.
I’d love to see your results and show it off in my gallery.
Email me!
Hugs,
Bev
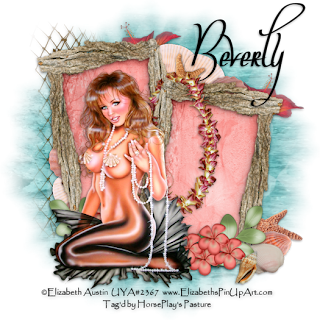
Ocean Pearl


Supplies

1 tube of choice - I used the artwork of Elizabeth Austin which can be purchased from Up Your Art. You must have a license to use.

Font of choice - I used Oh Lara - a pay font

Weescotlass Mask 138 here

“Caribbean Summer” is tagger size scrap kit created by Kathi of Kissed by Cari. This kit is exclusive and can only be purchased from TKO Scraps. You can visit her blog here.
Thank you Kathi for a most amazing summer kit. This one truly holds that Caribbean sparkle!

This tutorial was written assuming you have a working knowledge of PSP.

~♥~ Let’s get started ~♥~

Open up a 700 x 700 blank canvas.
Flood fill white.

Copy and paste Frame 1 as a new layer.
Resize 85%
Free rotate Left 10 degrees
Duplicate/Mirror
Move both frames into position - see my tag for reference.

Highlight the frame on the left.
Use your Magic Wand and click inside of it.
Selections/Modify/Expand by 4.
New Raster layer below the frame.
Copy and paste Paper 8 Into Selection.
Deselect.

Repeat the above step with the other frame.

Copy and paste your tube as a new layer.

Copy and paste Net as a new layer.
We’re going to feather the edges of it. It’s the top and left side of the net you really only need to feather….
Use your Freehand Selection Tool set on Freehand and draw around the net - be sure the dotted line is touching wherever you want the net to be feathered.
Selections/Modify/Inside Outside Feather:
Both checked
Feather amount: 52
OK
Selections/Invert
Tap the delete key a couple of times.
Deselect.
Move it into position behind the left frame.

Add your embellishments. I used:
Frame 2
Hibiscus 2: Resize 50%/Duplicate/Mirror
Lei: Resize 65%
Starfish: Resize 25%
Shells 1, 2, and 3: Resize 25% and 6%
Cluster 2: Resize 50%/Duplicate/Free rotate Left 10 degrees and position in front of the Left frame.

Highlight your white canvas.
Select All
New Raster layer.
Copy and paste Paper 7 Into Selection.
Deselect.
Apply the mask.
Resize 125%
Merge Group.

Add your copyrights.

Add your name.

Resize all layers 80%.

I hope you enjoyed this tutorial.
I’d love to see your results and show it off in my gallery.
Email me!
Hugs,
Bev
Tuesday, June 28, 2011

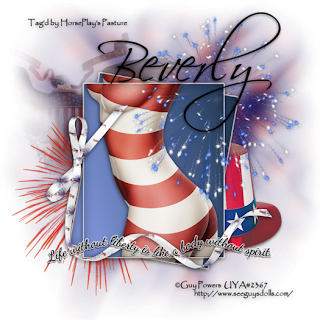
Life Without Liberty


Supplies

1 tube of choice - I used the artwork of Guy Powers which can be purchased from Up Your Art. You must have a license to use.

Font of choice - I used Dancing Script here and Scriptina here

Amy & Leah Mask 2 here

Eyecandy 3.1 - Glow

“4th of July” is a tagger size scrap kit created by Tonya of Broken Sky Dezine and can be purchased from Twilight Scraps. You can visit her blog here.
Thank you Tonya for an awesome celebration kit!

This tutorial was written assuming you have a working knowledge of PSP.

~♥~ Let’s get started ~♥~

Open up a 700 x 700 blank canvas.
Flood fill white.

Color Pallet:
Foreground: #849adf
Background: #2b4466
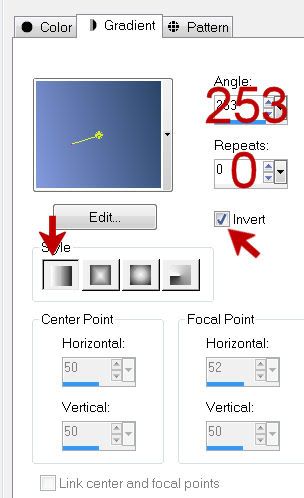
Set the foreground and background to Gradient.
March your settings to mine:


Copy and paste your tube as a new layer.
Resize to the size you want it to be.
Make your Rectangle Tool active and create a rectangle that will fit your tube nicely:


Convert to Raster layer.
Use your Magic Wand and click anywhere outside of the gradient layer.
Highlight the tube layer.
Tap the delete key.
Deselect.

Merge Visible the tube and gradient layer.
Apply Eyecandy 3.1 - Glow:
Width: 3
Opacity: 100
Opacity Drop off: Fat
Color: White
OK

Duplicate
Free rotate Right 10 degrees.
Move this layer below the original.

Copy and paste 22 as a new layer.
Move into position - see my tag for reference.

Color Pallet :
Foreground: Black
Background: Null

Make your Pen Tool active set on Draw Freehand.
Width: 2
Draw a wavy line and make it a point to have the waves go in the opposite direction as the ribbon waves.

Color Pallet:
Foreground and Background: Black
Stroke Width: 0.5

Move your curser along the center of the line until you see a Rocking A.
Click your mouse.
A text bow will appear.
Type the words “Life without liberty is like a body with spirit” or whatever you choose.
Apply
In your layers pallet click on the small plus sign of the Vector layer.
Click on the eye of New Path layer.
Highlight Vector layer.
Right Click/Convert to Raster layer.
Apply the same Glow effect.

Add your embellishments. I used:
28
29
9: Resize 70%

Highlight your white canvas.
Select All
New Raster layer.
Copy and paste Paper 9 Into Selection.
Deselect.
Adjust/Blur/Gaussian Blur:
Radius: 15
OK
Apply the mask.
Merge Group.

Copy and paste 1 above the mask layer.
Move into position.
Apply the mask.
Merge Group.

Add your copyrights.

Add your name.

Resize all layers 80%.

I hope you enjoyed this tutorial.
I’d love to see your results and show it off in my gallery.
Email me!
Hugs,
Bev