Friday, November 6, 2009

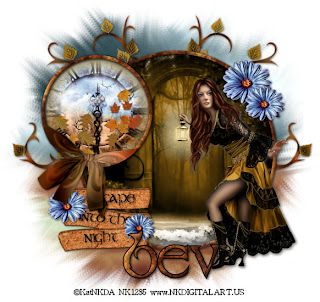
Escape Into the Night


Clicking on the image will enlarge to full view.

Supplies
1 tube and 1 image of choice - I used the amazing artwork of KatNKDA here
Font of choice - I Stonecross here
Weescotlass Mask 241 here
Dezigns by Ali Template 115 here
“Leaves Everywhere” is a PTU full size scrap kit created by Kat of KatNKDA and can be purchased at her store NK Art Shop. You can visit her blog here.
Thank you so much for another stunning kit, Kat!

This tutorial was written assuming you have a working knowledge of PSP.
~♥~ Let’s get started ~♥~

Open up the template.
Image/Canvas size
700 X 700
New Raster layer.
Flood fill white.
Send to bottom.
Delete credit layer.


Highlight Raster 2 layer.
Select All/Float/Defloat
New Raster Layer
Copy and paste a paper of choice Into Selection.
Deselect.
Delete the template layer.


Repeat the above step with Raster 4 layer.
Highlight Raster 1 layer.
Select All/Float/Defloat
Copy and paste your image of choice as a new layer.
Resize if need be. If you’re using the same image as I used Resize 60%.
Selections/Invert
Tap the delete key.
Deselect.
Delete the template layer.

Highlight Raster 3 layer.
Select All/Float/Defloat
New Raster Layer
Copy and paste a paper of choice Into Selection.
Deselect.
Delete the template layer.
DO NOT DESELECT

Copy and paste Element 26 as a new layer
(The Clock)
Resize 30% and 92%
Position over the circle.
Selections/Modify/Feather
Number of Pixels: 43
Tap the delete key until you have the feathered look you want.


Copy and paste Element 17 as a new layer.
Resize 25% & 50%
Move into position over the Merged Template Layer.
Delete the Merged Template layer.
Delete the staple templates.


Copy and paste Element 12 as a new layer.
(the bow)
Resize 25% and 40%
Free rotate right 20 degrees
Highlight the frame of the small circle.
Select All/Float/Defloat
Selections/Invert
Highlight the bow layer.
Using your Eraser tool erase the parts of the bow that overhang the clock frame.

Copy and paste Element 3 as a new layer.
(The tree)
Resize 25%
Move it just above your white canvas in your layers pallet.
Position near the left side.
Duplicate/Mirror
Move into better position.

Copy and paste Element 22 as a new layer.
(The blue flower)
Resize 25% and 45%
Position on your tag, duplicating and resizing as you like.

Copy and paste your tube as a new layer.

Type out the word “Escape”
Position it over the top rung of Element 17.
Type out the words “into the” and position over the middle rung.
Type out the word “Night” and position over the bottom rung.

Highlight your white background.
New Raster layer.
Select All.
Copy and paste a paper of choice Into Selection.
Deselect.
Apply the mask.
Merge Group.

Add your copyrights.

Add your name.

Crop your image and resize all layers 85%.


I hope you enjoyed this tutorial.
I’d love to see your results.

Email me!

Hugs,

Bev

Thursday, November 5, 2009

Diva a.k.a. Woman

Clicking on the image will enlarge to full view.

Supplies
4 tubes of choice - I used the beautiful artwork of Gennadiy Koufay here
2 Fonts of choice - I used Alsandra here and Impact which came with my pc
Becky Mask 9 here
DSB Flux - Bright Noise (optional)
“Cheeky Diva” is a PTU tagger size scrap kit created by Gina of Gina’s Gems Scraps and can be purchased at Butterfly Blush Designs. You can visit Gina’s blog here.
Thank you Gina for a wonderful kit!!

This tutorial was written assuming you have a working knowledge of PSP.

~♥~ Let’s get started ~♥~

Open up a 700 x 700 transparent image.
Flood fill white.
Copy and paste Triple Frame as a new layer.
Resize 80%
Use your Freehand Selections Tool and outline each of the squares.
Selections/Modify/Expand by 4.
New Raster Layer below the frame.
Copy and paste a paper of choice Into Selection.
DO NOT DESELECT.

Copy and paste a tube below the frame.
Position it in one of the squares.
Selections/Invert
Tap the delete key.
DO NOT DESELECT.
Repeat the above step with the remaining 2 squares.
Deselect.
Copy and paste Heart Frame 1 as a new layer.
Resize 40%
Free rotate left 20 degrees.
Move into position.
See my tag for reference.

Copy and paste Heart Frame 2 as a new layer.
Resize 40%.
Free rotate right 20 degrees.
Move into position.
See my tag for reference.

Erase part of Heart Frame 1 so it appears the frames are intertwined.
Apply DSB Flux - Bright Noise to both heart frames.
Or you can apply Noise in your PSP program.
Intensity 34
OK

Add your embellishments. I used:
Picot Bow 1: Resize 40%
Cherry Blossom 2 & 3: Resize 25%
Lipstick 1: Resize 25%
Butterfly 1 & 3: Resize 20%. Free rotate 15 degrees
Hair Brush Clip Art: Resize 35%

Highlight your white background.
New Raster layer.
Select All.
Copy and paste a paper of choice Into Selection.
Deselect.
Apply the mask.
Merge Group.
I used my Pick Tool to pull the mask out just a bit.

Add your copyrights.

Add your name.
First I used Impact Font
Foreground and Background set to Black.
Type out your name.
Convert to Raster layer.
Select All/Float/Defloat
Selections/Modify/Contract by 2
New Raster layer.
Copy and paste a paper of choice Into Selection.
Deselect.
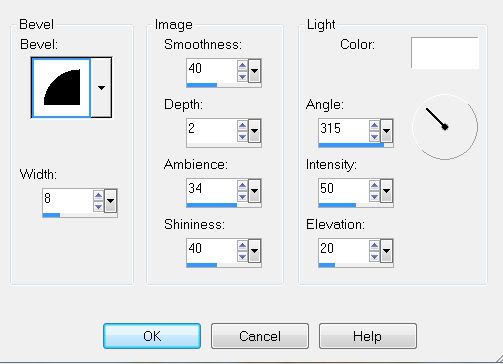
Give it a slight inner bevel:


Merge down.

Now change your font to Al Sandra.
Type your name out again.

Crop your image.

Resize all layers 85%.

I hope you enjoyed this tutorial.
I’d love to see your results..
Email me!
Hugs,
Bev

Spectacular Autumn

Clicking on the image will enlarge to full view.

Supplies
1 tube of choice - I used the beautiful artwork of Archie Dickens here
Font of choice - I used Fruitopia here
Weescotlass Mask 219 here
“Autumn Falls” is a PTU tagger size scrap kit created by Jo of Creationz by Jo and can be purchased at Aussie Scraps Designs. You can visit Jo’s blog here.
Thank you Jo for a beautiful kit!
The colors are amazing!

This tutorial was written assuming you have a working knowledge of PSP.

~♥~ Let’s get started ~♥~

Open up a 700 x 700 transparent image.
Flood fill white.
Copy and paste Stick Frame as a new layer.
Resize 50%
Use your Magic Wand and click inside of it.
Selections/Modify/Expand by 4.
You can either choose a color of choice and flood fill a new raster layer below the frame
Or
What I did was use my Selection Tool to section off a small portion of one of the papers, set my color pallet to Pattern and flood filled a new raster layer below the frame.
DO NOT DESELECT.

Copy and paste your tube as a new layer.
DO NOT DESELECT.

Copy and paste Flower Grass as a new layer.
Resize 30%
Move into position.
See my tag for reference.
Selections/Invert
Tap the delete key
Deselect.

Copy and paste Gerba Flower as a new layer.
Image/Mirror.
Move into position at the upper left side of the frame.
Duplicate/Flip
Move into position at the upper right side of the frame.
Duplicate/Mirror/Flip
Position at the lower left side of the frame.
Highlight the flowers that are positioned at the upper right side of the frame.
Duplicate and move lower just a bit.
I hope I didn’t lose you with all the duplicating and flipping!!

Add your embellishments. I used:
Hummingbird: Resize 45%
Flower 3: Resize 40%
Flower 2: Resize 35%
Beaut Glitter Bow: Resize 50%
Butterfly 4: Resize 10%
Butterfly 3: Resize 15%
Highlight your white background.
New Raster layer.
Select All.
Copy and paste a paper of choice Into Selection.
Deselect.
Apply the mask.
Resize 110%
Merge Group.
Add your copyrights.

Add your name.
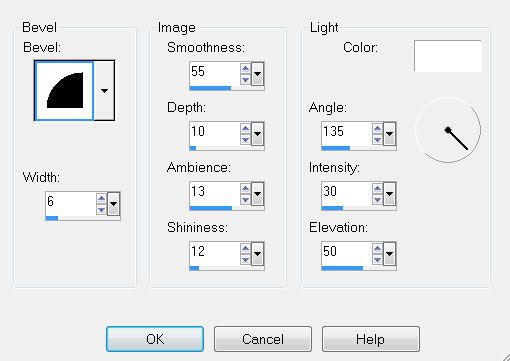
Give it an inner bevel:


Crop your image.

Resize all layers 85%
 
I hope you enjoyed this tutorial.
I’d love to see your results.
Email me!
Hugs,
Bev


Wednesday, November 4, 2009

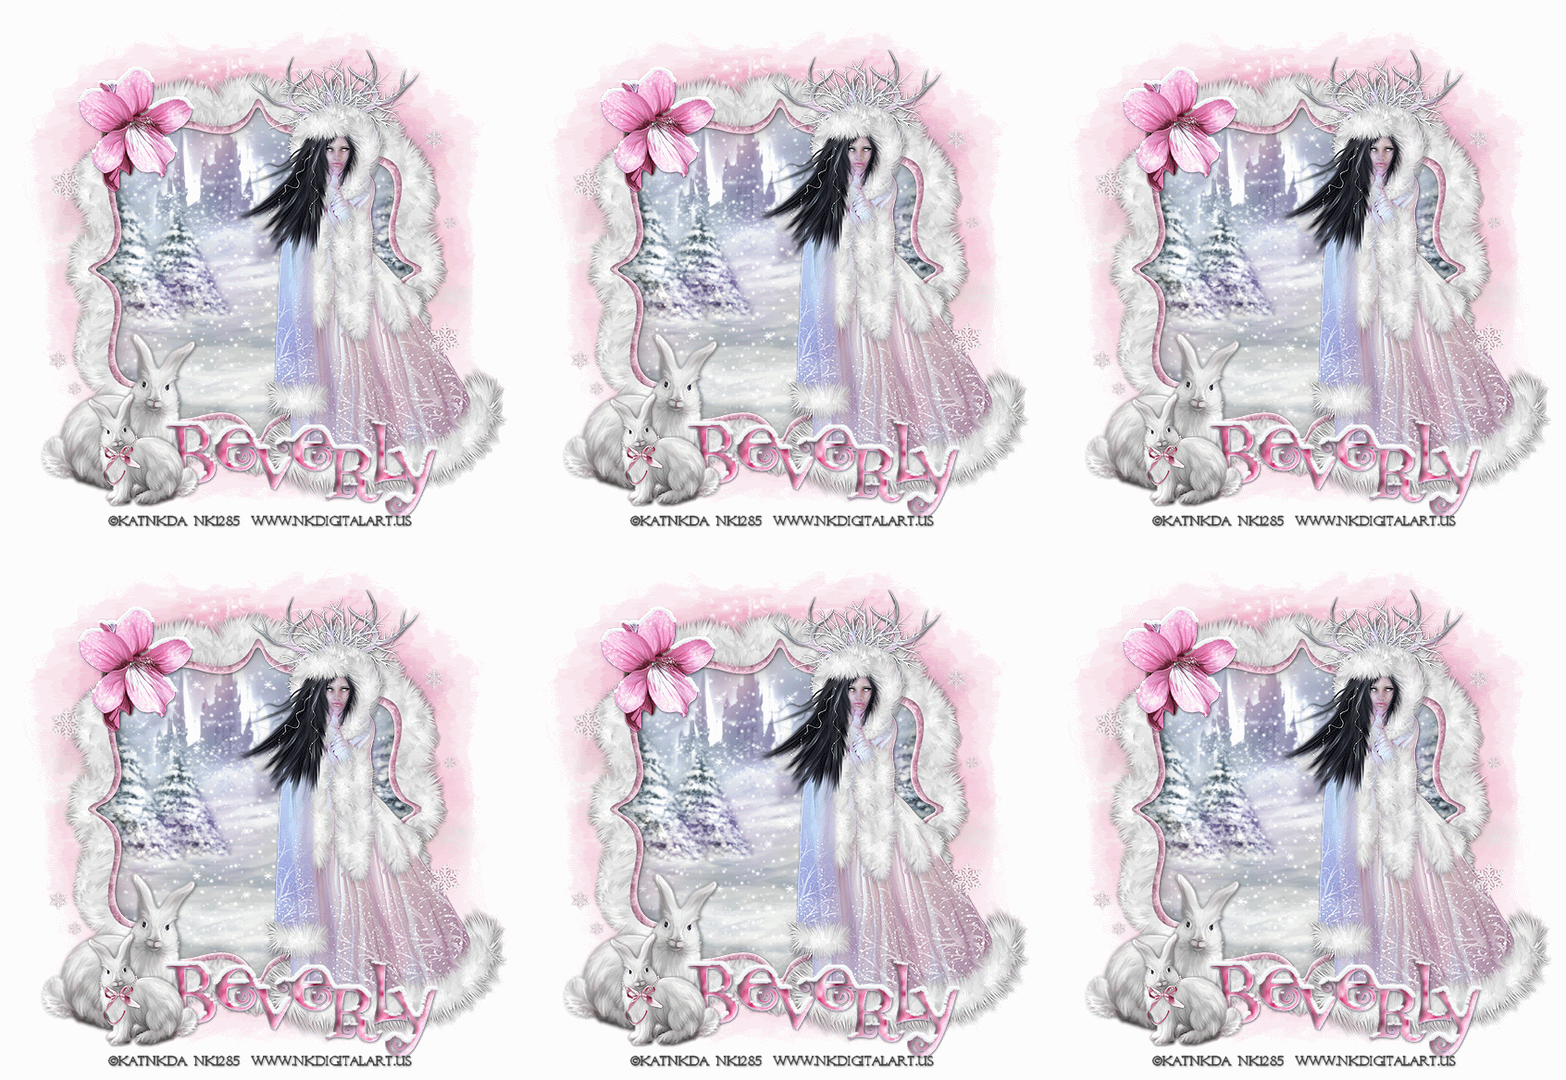
Season of Miralces


Supplies
1 tube of choice - I used the amazing artwork of KatNKDA here
Font of choice - I used TS Curly here
Insatiable Dreams Mask 164 here
Snow which I’ve supplied on Box or 4Shared
Alien Skin Eyecandy 5: Nature - Snow Drift
Animation Shop
“Bunny Love” is a PTU full size scrap kit created by Kat of KatNKDA and can be purchased a her store NK Art Shop. You can visit her blog here.
Your talent is truly amazing, Kat!
Thank you once again for yet another beautiful kit.

This tutorial was written assuming you have a working knowledge of PSP.

~♥~ Let’s get started ~♥~

Open up a 700 x 700 transparent image.
Flood fill white.

Copy and paste Element 1 as a new layer.
Resize 25% and 85%
Use your Magic Wand and click inside of it.
Selections/Modify/Expand by 6.
You can either copy and paste a paper of choice as a new layer
Or
I used the image that came with the tube.
Deselect.

Copy and paste your tube as a new layer.
The tube I used I resized 25% and 70%

Copy and paste Element 48 as a new layer.
Resize 25% and 50%
Mirror.
Move into position.

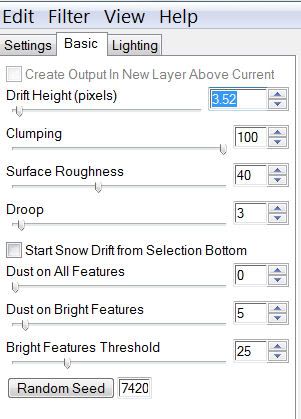
Keeping that layer highlighted, apply the Eyecandy Nature - Snow Drift


Copy and paste Element 50 as a new layer.
Resize 25% and 70%

Copy and paste Element 51 as a new layer.
Resize 25% and 50%
Mirror

Copy and paste Element 14 as a new layer.
Resize as small as you like.
Duplicate as many times as you like.

Highlight your white background.
New Raster layer.
Select All.
Copy and paste a paper of choice Into Selection.
Deselect.
Apply the mask.
Merge Group.

Add your copyrights.

Add your name.
Give it an inner bevel:


Apply Eyecandy: Nature - Snow Drift.
Same Settings

Now we’re going to apply the snowflakes so that the tag can be animated.
Highlight the frame layer.
Use your Magic Wand and click inside of it.
Selections/Modify/Expand by 6.
Open up the snow that I’ve supplied.
Highlight Frame 1
Copy
Make your working canvas active and paste the snow layer just below the frame.
(The snow will overhang. It’s OK. We’ll take care of that later.)
Rename Snow 1.

Make the snow layers active again.
Highlight Frame 2
CopyHighlight your working canvas.
Paste as a new layer just above Snow 1
Rename this new layer Snow 2.

Repeat the above steps with the remaining snow layers.
Take your time and concentrate so you don’t lost track of which layers you’re copying and pasting….I’m advising from experience:S...lol

Once you’ve copied and pasted all the snow layers onto your working image…
Selections/Invert
Highlight each layer and tap the delete key.
Deselect.

Resize all layers 85%.

Now it’s time to animate.

***********
Close out all snow layers accept for Snow 1.
Copy Merge.
Carry into Animation Shop.
Edit/Paste/As New Animation.

Back into PSP.
Close out Snow 1 and open up Snow 2.
Copy Merge.
Carry into AS.
Edit/Paste/After Current Frame.

Back into PSP.
Close out Snow 2 and open up Snow 3.
Copy Merge.
Carry into AS.
Edit/Paste/After Current Frame.

Back into PSP.
Close out Snow 3 and open up Snow 4.
Copy Merge.
Carry into AS.
Edit/Paste/After Current Frame.

Back into PSP.
Close out Snow 4 and open up Snow 5.
Copy Merge.
Carry into AS.
Edit/Paste/After Current Frame.

Back into PSP.
Close out Snow 5 and open up Snow 6.
Copy Merge.
Carry into AS.
Edit/Paste/After Current Frame.

Back into PSP.
Close out Snow 6 and open up Snow 7.
Copy Merge.
Carry into AS.
Edit/Paste/After Current Frame.

Back into PSP.
Close out Snow 7 and open up Snow 8.
Copy Merge.
Carry into AS.
Edit/Paste/After Current Frame.

Back into PSP.
Close out Snow 8 and open up Snow 9.
Copy Merge.
Carry into AS.
Edit/Paste/After Current Frame.

Back into PSP.
Close out Snow 9 and open up Snow 10.
Copy Merge.
Carry into AS.
Edit/Paste/After Current Frame.

View your animation.
Admire the snow!
If you’re happy then save.

I hope you enjoyed this tutorial.
I’d love to see your results.
Email me!
Hugs,
Bev

Christmas at My Place

Clicking on the image will enlarge to full view.

Supplies
1 tube of choice - I used the wonderful artwork of Elias Chatzoudis here
Font of choice - I used Jester here
Xenofex 1.0 - Shower Door
“Happy Holidays” is a PTU tagger size scrap kit created by Julie of Bits ’n Bobs and can be purchased at Exquisite Scraps. You can visit her blog here.
Thank you so much for another terrific holiday kit, Julie!

This tutorial was written assuming you have a working knowledge of PSP.

~♥~ Let’s get started ~♥~

Open up a 700 x 700 transparent image.
Flood fill white.

Copy and paste Frame s as a new layer.
Use your Magic Wand and click inside of it.
New Raster layer below the frame.
Flood fill white a gradient of choice.
Deselect.

Copy and paste Knot 4 as a new layer.
Free rotate left 90 degrees.
Resize 90%
Position at the right side of the frame.

Copy and paste Ivy 2 as a new layer.
Image/Flip
Image/Mirror
Resize 70%

Add your embellishments. I used:
Holly 2
Paper Christmas 1
Rudolf 2

Copy and paste your tube as a new layer.

Close out your white background.
Merge Visible.
Duplicate.
Highlight the merged layer.
Adjust/Blur/Gaussian Blur
Radius: 15
Apply Xenofex 1 - Shower Door
Default Settings

Crop your image.

Add your copyrights.

Add your name.

Resize all layers 80%.

I hope you enjoyed this tutorial.
I’d love to see your results.
Email me!
Hugs,
Bev

Tuesday, November 3, 2009

Santa Baby

Clicking on the image will enlarge to full view.
Supplies
One tube and one image of choice - I’m using the beautiful work of Bits ‘n Bob’s here
Font of choice - I used Santa’s Sleigh here
Zuzanna Mask 7 here
Designs by Ali Spring Fling Template 4 here
“Christmas Time” is a PTU tagger size scrap kit created by Julie of Bits ’n Bobs and can be purchased at AMI. You can visit her blog here.
Thank you so much for a festive kit and gorgeous tube, Julie!

This tutorial was written assuming you have a working knowledge of PSP.

~♥~ Let’s get started ~♥~

Open up the template.
Shift + D.
Close out the original.
Delete the credit layer.

Highlight Raster 1 layer.
Select All/Float/Defloat
New Raster layer.
Copy and paste a paper of choice Into Selection.
Selections/Modify/Contract by 7
Tap the delete key.
Selections/Modify/Expand by 2
New Raster layer below the new “circular frame” you just made.
Flood fill with a gradient of your choice.
Copy and paste a close up tube or image as a new layer.
Selections/Modify/Feather
Number of Pixels: 53
Selections/Invert
Tap the delete key until you have the feathered effect you like.
Deselect.
Delete the template layer.

Highlight Raster 3 layer.
Select All/Float/Defloat
New Raster layer.
Copy and paste a paper of choice Into Selection.
Selections/Modify/Contract by 7
Tap the delete key.
Selections/Modify/Expand by 2
New Raster layer below the new “frame” you just made.
Flood fill with a gradient of your choice.
Deselect.
Delete the template layer.

Repeat the above step with Raster 2 layer.

Add your embellishments. I used:
Element 24: Mirror
Element 6: Resize 70%. Duplicate/Resize 90%
Element 28
Element 47: Resize 85%
Frame 4: Resize 80%
Copy and paste your tube as a new layer.

Highlight your white canvas.
New Raster Layer.
Select All.
Copy and paste a paper of choice Into Selection.
Deselect.
Apply the mask.
Merge Group.
Add your copyrights.

Add your name.

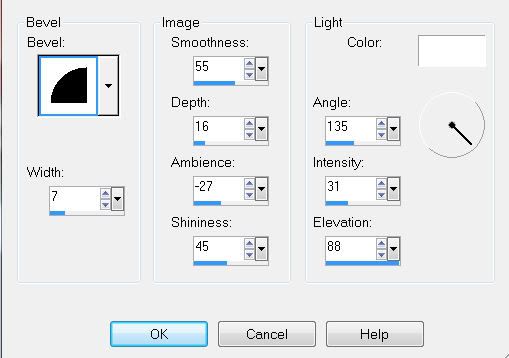
Give it an inner bevel.


Resize all layers 85%

I hope you enjoyed this tutorial.
I’d love to see your results.
Email me!
Hugs,
Bev

Santa's Stop

Clicking on the image will enlarge to full view.

Supplies
Font of choice - I used Christmas on Crack here
Weescotlass Mask 84 here
“Christmas Time” is a PTU tagger size scrap kit created by Julie of Bits ’n Bobs and can be purchased at AMI. You can visit her blog here.
Thank you so much for a festive kit, Julie!
This tutorial was written assuming you have a working knowledge of PSP.

~♥~ Let’s get started ~♥~

Open up a 700 x 700 transparent image.
Flood fill white.

Copy and paste Frame 1 as a new layer.
Resize 80%
Use your Magic Wand and click inside of it.
New Raster layer below the frame.
Flood fill white a gradient of choice.
Deselect.

Copy and paste element 19 as a new layer below the frame.
Use your Eraser tool and erase any that overhangs the frame..

Copy and paste Element 14 as a new layer.
Resize 150%

Copy and paste Element 13 as a new layer.
Resize 130%

Copy and paste Element 22 as a new layer.
Resize 60%

Copy and paste Element 29 as a new layer.

Copy and paste Element 2 as a new layer.
Resize 50%

Close out your white background, Element 29, and Element 2 layers.
Merge Visible.
Duplicate.
Highlight the merged layer.
Adjust/Blur/Gaussian Blur
Radius: 20
OK
Image/Resize 120%
Apply the mask.
Merge Group.
Resize 110%

Reopen all your layers.

Add your copyrights.

Add your name.

Crop your image.

Resize all layers 90%.

I hope you enjoyed this tutorial.
I’d love to see your results.
Email me!
Hugs,
Bev