Supplies
1 tube of choice – I used the fantastic artwork of Janna Prosvirina
which can be purchased from DreamscapeImaging. You must have a license to use.
Weescotlass Mask 208 here
Plug Ins used:
Greg’s Factory Output Vol. II – Pool Shadow
Mura’s Meister - Copies
“Tiny Gothic Xmas” is a tagger
size scrap kit created by Pixie of Kissed by Pix and can be purchased from her
store TKO Scraps. You can visit
her blog here.
Thank you Pix for a really awesome kit!
~♥~ Let’s get started ~♥~
Open up a 700 x 700 blank canvas.
Flood fill white.
Copy and paste Barb Frame 3 as a new layer.
Resize 45%
Use your Magic Wand and click inside of each of the spaces around the
frame.
Selections/Modify/Expand by 1.
New Raster layer below the frame.
Copy and paste Paper 1 Into Selection.
Apply Greg’s Factory Output Vol. II – Pool Shadow:
Use Default settings accept move the Intensity bar up to 248.
Deselect.
Apply the Pool Shadow effect once more.
Merge Visible the frame and paper.
Duplicate.
Free rotate Right 90 degrees and move into position to the right of the
original frame.
Highlight the original frame layer.
Duplicate
Free rotate Left 90 degrees and move into position to the left of the
original frame.
To each frame:
Click inside the frame with your Magic Wand.
Selections/Modify/Expand by 1.
New Raster layer below the frame.
Copy and paste Paper 8 Into Selection.
Apply Greg’s Factory Output Vol. II – Pool Shadow:
Use the same settings accept lower the Intensity bar to about 33.
Deselect.
Copy and paste your tube as a new layer.
Center it in front of the center frame.
Duplicate your tube layer.
Resize just a little larger.
Move into position below the right frame.
Lower the Opacity of the tube to about 16.
Duplicate/Mirror
Move this tube below the left frame.
Highlight the paper that’s below the left frame.
Click anywhere outside of it with your Magic Wand.
Highlight the tube layer just above it.
Tap the delete key.
Deselect.
Repeat the above step with the tube on the right.
Copy and paste Barb Round 3 as a new layer.
Resize 130%
Click inside of each space around the frame.
Selections/Modify/Expand by 2.
New Raster layer below the frame.
Copy and paste Paper 1 Into Selection.
Apply Greg’s Factory Output Vol. II – Pool Shadow:
Use same settings accept bring the Intensity bar back up to 248.
Deselect.
Apply Pool Shadow effect again.
You’ll notice there are gaps where the paper didn’t reach to cover the
small areas completely. To fix that –
Be sure the paper layer is highlighted and use your Clone Tool to fill
in those gaps.
Merge Visible the frame and paper layer.
Move into position – see my tag for reference.
Click inside the frame with your Magic Wand.
Selections/Modify/Expand by 2.
New Raster layer below the frame.
Copy and paste Paper 3 Into Selection.
Apply the Pool Shadow effect using the same settings.
Deselect.
Copy and paste Lights 1 as a new layer.
Use your Selection Tool set on Rectangle and section around the first 3
lights of the strange.
Copy.
Deselect.
Delete the lights layer.
Edit/Paste as a New layer.
You should just have a the 3 little lights from the strange.
Resize 70%
Apply Mura’s Meister – Copies:
Choose Encircle.
Use Default settings accept change Number to 20.
OK
Resize the circle of lights 120%
Move into position behind the circle paper layer – see my tag for
reference.
Add your elements. I used:
Ornament 2: Resize
50%/Duplicate/Mirror
Sad Tree: Resize 50%/Duplicate/Mirror
Highlight your white background.
New Raster layer.
Select All.
Copy and paste Paper 4 Into Selection.
Deselect.
Apply the mask.
Resize 90%
Move up slightly on your canvas.
Merge Group.
Add your credits.
Add your name.
Color Pallet:
Foreground: #000002
Background: #5e0404
Stroke: 2
Type your name.
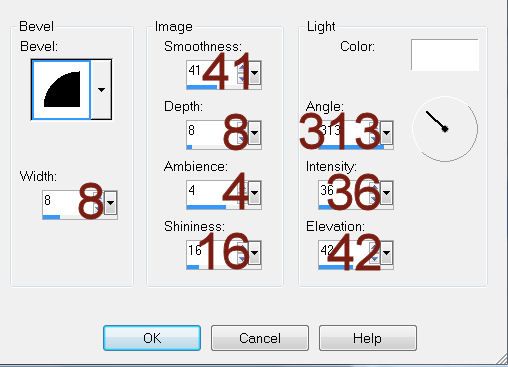
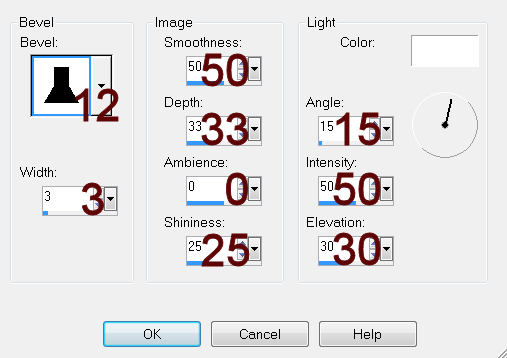
Give it a slight Inner Bevel.
Give it a drop shadow.
Give it another drop shadow on its own layer.
Use your Pick Tool to squash the drop shadow layer a little.
Resize all layers 80%.