Saturday, April 28, 2012

Lest We Forget

Supplies

Font of choice - I used Nadall here

Becky Mask 22 here

Twisted T’s Playroom Template 1 here

Plug Ins used:
Greg’s Factory Output Vol. II – Pool Shadow
Eyecandy 3.1 - Glow

“Lest We Remember” is a FTU tagger size scrap kit created by Krissy of Krissy’s Scraps and can be downloaded from her store Exquisite Scraps.
 You can visit her blog here.
Thank you Krissy for a beautiful kit.

This tutorial was written assuming you have a working knowledge of PSP.

~~ Lets get started ~~

Open up the template.
Shift + D.
Close out the original.
Delete the top 4 layers.
Resize all layers 90%.
Image/Canvas Size:
700 x 550
OK
New Raster layer.
Send to bottom.
Flood fill white.

Highlight Back Rectangle layer.
Click on it with your Magic Wand.
New Raster layer.
Copy and paste Paper 5 Into Selection.
Deselect.
Delete the template layer.
Apply Greg’s Factor Output Vol. II – Pool Shadow:
Use default settings accept change the Intensity bar down to 45.

Highlight Back Rectangle Frame layer.
Click on it with your magic Wand.
New Raster layer.
Copy and paste Paper 1 Into Selection.
Deselect.
Delete the template layer.
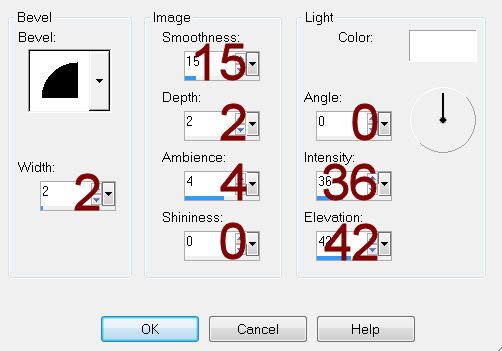
Give it a slight Inner Bevel:
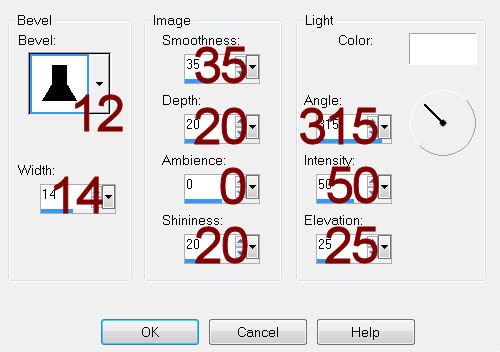
Repeat the above step with:
Sides Rec. Frames layer.
Center Rec. Frame layer.

Highlight Sides Recs layer.
Click on each of them with your Magic Wand.
New Raster layer.
Copy and paste Paper 2 Into Selecction.
Deselect.
Delete the template layer.
Apply the same Pool Shadow effect using same settings.

Repeat the above step with Center Rec layer.

Highlight Center Circle layer.
Click on it with your Magic Wand.
New Raster layer.
Copy and paste Paper 3 Into Selection.
Deselect.
Delete the template layer.
Apply the same Pool Shadow effect accept lower the Intensity bar to 24.
Apply Eyecandy 3.1 – Glow:
Width: 5
Opacity: 100
Opacity Drop Off: Fat
Color:  #3d301d
OK

Add your elements.  I used:
Wooden Cross 1:  Resize 70% (be sure to erase the credit)
Army Boots 1:  Resize 70% (be sure to erase the credit)
Beaded String 1:  Resize 40%/Flip
Buckle 2:  Resize 35%/Duplicate/Mirror
Dogs Tags 1 & 2:  Resize 45%/Free rotate Left 65 degrees
Dry Foliage 1:  Resize 60%
Envelope 1:  Resize 60%/Free rotate Left 7 degrees
Tied Envelope 1:  Resize 65%
Poppy 1 & 2:  Resize 40%
Word Art 1:  Resize 50%

To give the cross and shoes a thrown drop shadow:
Give the element a drop shadow on its own layer.
Click the Layer Link Toggle at the top of the layers pallet until it says “None”
Move the drop shadow off to the side just a bit.
For the drop shadow of the cross, after you’ve moved it off to the side a bit make your Pick Tool active and pull the top down just a bit.  Press the Ctrl key and stretch the top of the shadow out just a little.

Highlight your white background.
New Raster layer.
Select All.
Copy and paste Paper 9 Into Selection.
Deselect.
Apply the mask.
Merge Group.
Duplicate.

Be sure to place Krissy’s credit on your tag.

Add your name.
Color Pallet:
Foreground: #000000
Background: #8f2512
Stroke: 1
Type your name.
Give it the same Inner Bevel.

Resize all layers 80%.

I’d love to see your results.
Email me!
Hugs,
Bev

Forgotten Place

Supplies

1 tube of choice – I used the beautiful artwork of Tin which can be purchased from CDO.  You must have a license to use.

Font of choice - I used Aquarelle here

Weescotlass Mask 208 here

 “Forgotten Place” is a tagger size scrap kit (also available in full size) created by Shell of Shell’s Scraps can be purchased from Exquisite Scraps.  You can visit her blog here.
Thank you Shell for a beautiful kit.

This tutorial was written assuming you have a working knowledge of PSP.

~~ Lets get started ~~

Open up a 700 x 700 blank canvas.
Flood fill white.

Copy and paste Frame 2 as a new layer.
Resize 60%
Free rotate Left 90 degrees – rename Frame 1
Duplicate
Free rotate left 7 degrees – rename Frame 2
Move both frames into position – see my tag for reference.

Highlight Frame 2 layer.
Click inside of it with your Magic Wand.
Selections/Modify/Expand by 4.
New Raster layer below the frame.
Copy and paste Paper 9 Into Selection.
Deselect.

Highlight Frame 1 layer.
 Click inside of it with your Magic Wand.
Selections/Modify/Expand by 4.
New Raster layer below the frame.
Copy and paste Paper 10 Into Selection.
Deselect for now.

Copy and paste your tube as a new layer.
Move into position in front of the frame.
Give it a drop shadow.
Highlight the frame layer.
Click inside of it with your Magic Wand.
Selections/Invert
Use your Eraser Tool and erase the parts of the tube you don’t want to be see outside of the frame.
Deselect.

Paste your tube again as a new layer.
You want to keep it slightly larger than the other tube.
Change the Properties to Soft light.
In your layers pallet move it just below Frame 1.
Duplicate – move this tube layer below Frame 2 in your layers pallet.

Highlight the paper layer that’s below Frame 2.
Click anywhere outside of the paper with your Magic Wand.
Highlight the tube layer just above it.
Tap the delete key.
Deselect.

Highlight the paper layer that’s below Frame 1.
Click anywhere outside of the paper with your Magic Wand.
Highlight the tube layer just above it.
Tap the delete key.
Deselect.

Add your elements.  I used:
Light 2:  Resize 50%
Jewelry Box 1:  Resize 30%
Grammaphone 1:  50%
Film 1:  Resize 30%
Glasses 2:  Resize 30%

Highlight your white background.
New Raster layer.
Select All.
Copy and paste Paper 8 Into Selection.
Deselect.
Apply the mask.
Merge Group.

Crop your image but be sure not to crop any of your mask!!

Add your credits.

Add your name.
Color Pallet:
Foreground: #896e4c
Background:  #261b0f
Stroke: 1
Give it a slight Inner Bevel:

I’d love to see your results.
Email me!
Hugs,
Bev

Tuesday, April 24, 2012

Lazy Vacation Morning

Supplies

2 tubes of choice – I used the beautiful artwork of Dean Yeagle which can now be purchased from CDO.  You must have a license to use.

Font of choice - I used Chicken Basket here

Becky Mask 22 here

“Whimsical” is a tagger size scrap kit created by me, Bev of HorsePlay’s Pasture Designs can be purchased from either of my stores:  Lollipops n Gumdrops or Butterfly Blush Designs.  You can visit my designing blog here for freebies and more as well as see where my latest sales are.

This tutorial was written assuming you have a working knowledge of PSP.

~~ Lets get started ~~

Open up a 700 x 700 blank canvas.
Flood fill white.

Copy and paste 44 as a new layer.
Resize 50%
Free rotate Left 15 degrees

Paste 44 again.
Resize 50%
Mirror

Move both frames into position – see my tag for reference.

To each frame:
Click inside of it with your Magic Wand.
Selections/Modify/Expand by 4.
New Raster layer below the frame.
Copy and paste Paper 17 Into Selection.
Deselect.

Working with the bottom frame:
Copy and paste your tube as a new layer below the frame.
Resize as needed.
Paste your tube again as a new layer just above the paper layer.  Resize as needed but keeping it slightly larger than the other tube layer.
Change the Properties to Luminance Legacy.
Lower the Opacity to about 36.
Highlight the paper layer.
Click anywhere outside of it with your Magic Wand.
Highlight each tube layer and tap the delete key.
Deselect.

Working with the top frame:
If you’re not using a tube that overhangs the frame then repeat the above step.
If you’re using a tube that you want to overhang the frame –
Copy and paste your tube as a new layer.
Resize as needed and move it into position in front of the frame.
Paste your tube again as a new layer just above the paper layer.
Resize as needed but keep it slightly larger than the other tube.
Change the Properties to Luminance Legacy.
Lower the Opacity to about 36.
Highlight the paper layer.
Click anywhere outside of it with your Magic Wand.
Highlight the tube layer just above the paper layer and tap the delete key.
Deselect.

Add your embellishments.  I used:
14:  Resize 70%
32:  Resize 30%/Duplicate/Duplicate/Mirror
31:  Resize 50%/Duplicate/Mirror
33:  Resize 35%
37:  Resize 60%
24:  Resize 15%/Mirror
22:  Resize 10%
28:  Resize25%
29:  Resize 20%/Mirror
5:  Resize 25%
49:  Resize 40%/Duplicate 3x’s
49 again:  Resize 40%/Move into position at the base of one of the flowers (to cover up the blunt bottom of the flower) Use your Eraser Tool to erase the part of the grass you don’t want.  Duplicate this grass layer 2 more times and place at the bottom of each flower.
54:  Resize 10% and 60%/Duplicate as many times as you like.  Use your Pick Tool to turn them this way and that.

Crop your image.

Highlight your white background.
New Raster layer.
Select All.
Copy and paste Paper 5 Into Selection.
Deslect.
Apply the mask.
Use your Pick Tool and pull the sides out just a little.
Merge Group.
Duplicate

Add your credits.

Add your name.
Color Pallet:
Foreground:  #59a6ad
Background: #000000
Stroke Width: 1
Type your name.
Convert your name to a Raster layer.

Resize all layers 85%.

I’d love to see your results.
Email me!
Hugs,
Bev

Sunday, April 22, 2012

Magical Illusion

Supplies

1 tube of choice – I used the beautiful artwork of Rachel Anderson which can be purchased from CDO.  You must have a license to use.

Font of choice - I used Wretched here

Weescotlass Mask 138 here

My template 18 here

Plug Ins used:
Greg’s Factory Output Vol. II – Pool Shadow

“Spirit Lights” is a full size scrap kit created by Myst Designs can be purchased from Scrappin Naturally.  You can visit her blog here.
Thank you Myst for a beautiful kit.

This tutorial was written assuming you have a working knowledge of PSP.

~~ Lets get started ~~

Open up the template.
Shift + D.
Close out the original.
Delete the top 3 layers.

Highlight Back 1 layer.
Click anywhere outside of it with your Magic Wand.
Copy and paste Paper 9 as a new layer.
 Move into a position over the template layer that you like.
Tap the delete key.
Deselect.
Delete the template layer.
Give it a slight Inner Bevel:

Highlight Back 2 layer.
Click on it with your magic Wand.
New Raster layer.
Copy and paste Paper 9 Into Selection.
Deselect.
Delete the template layer.
Give it the same slight Inner Bevel.

Highlight Back 3 layer.
Click anywhere outside of it with your Magic Wand.
Copy and paste Paper 7 as a new layer.
Resize 70%
Move into a position you like over the template layer.
Tap the delete key.
Deselect.
Delete the template layer.
Give it the same slight Inner Bevel.

Highlight Frame back layer.
Click anywhere outside of it with your Magic Wand.
Copy and paste Paper 7 as a new layer – Rename this layer Frame Back.
Resize 20%
Move into a position you like.
Tap the delete key.
Deselect.
Delete the template layer.

Highlight Frame layer.
Select All/Float/Defloat
New Raster layer.
Copy and paste Paper 7 Into Selection.
Deselect.
Change the Properties to Burn.

Copy and paste your tube as a new layer.
Position at the left side of your canvas.
Duplicate/Mirror
Position below the frame.
Highlight Frame Back paper layer.
Click anywhere outside of it with your Magic Wand.
Highlight the tube layer above it.
Tap the delete key.
Deselect.
Change the Properties of the tube layer to Hard Light.
Lower the Opacity to about 42.

New Raster layer.
Make your Tube tool active.
Choose the Artistic category.
Choose Flare.
On your canvas click to make a flare appear.  If you don’t like the flare simply “undo” until you have the flare you want.
Move the flare so that it’s between where both tube fingers touch.

Copy and paste Ribbon 3 as a new layer.
Resize 10%
Free rotate Left 7 degrees.

Copy and paste Flower 6 as a new layer.
Resize 25%
Copy and paste flower 8 as a new layer.
Resize 10% and 70%
Center it over the larger flower and give it a drop shadow.
Merge Down.
Both flowers should be on the same layer now.
Resize 40% and 80%
Duplicate/Resize 80%/Flip/Duplicate

Duplicate all 3 flower layers.
See my tag for placement.

Crop your image.

Highlight your white background.
Copy and paste Paper 9 as a new layer.
Apply the mask.
Resize 105%
Merge Group.
Duplicate
Move each mask layer to each side of your canvas.

Add your credits.

Add your name.

I’d love to see your results.
Email me!
Hugs,
Bev