Supplies
1 tube of choice - I used the beautiful artwork of Tatjana Williams which can be purchased from Dreamscape Imaging. You must have a license to use.
Font of choice - I used Oh Lara - a pay font
My Mask 27 here
“A Summer That Never Was” is a tagger size scrap kit created by Heppy of HF Projekte and can purchased from his store Inspirations of Scrap Friends. You can visit his blog here.
Thank you Heppy for a kit that‘s truly beautiful.
This tutorial was written assuming you have a working knowledge of PSP.
~♥~ Let’s get started ~♥~
Open up a 700 x 700 blank canvas.
Flood fill white.
Copy and paste 25 as a new layer.
Resize 45%
Click inside of it with your Magic Wand - be sure to also click in that tiny area in the upper right corner.
Selections/Modify/Expand by 4.
New Raster layer below the frame.
Copy and paste Paper 6 Into Selection.
Deselect.
Copy and paste your tube as a new layer.
Add your embellishments. I used:
19: Resize 25% and 25%
33: Resize 50%
23: Resize 30%/Duplciate/Mirror
26: Resize 25% and 40%
21: Resize 30%/Duplciate/Mirror
10: Resize 25% and 40%/Free rotate Right 25 degrees
17: Resize 25% and 30%/Duplciate/Mirror/Resize 70%
Highlight your white canvas.
New Raster layer.
Select All.
Copy and paste Paper 4 Into Selection.
Deselect.
Apply the mask.
Merge Group.
Duplicate
Change Properties to Multiply.
Add your copyrights.
Add your name:
Open up element 10.
Use your Selection Tool set on Rectangle and section out a small area of the wing.
Color Pallet:
Foreground: #3c3113
Background: Pattern/Find the section of the wing.
Type your name.
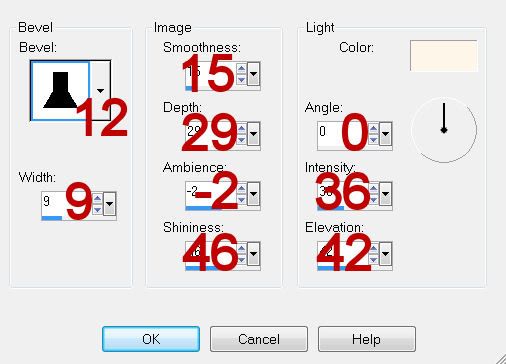
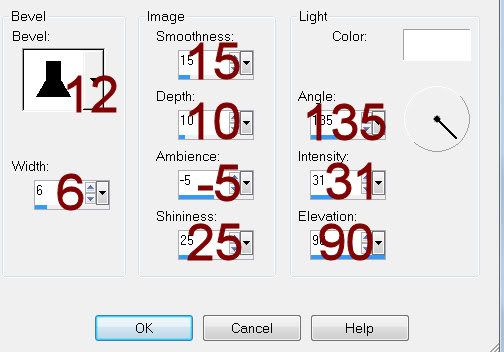
Give it a slight Inner Bevel:
Resize all layers 80%.
I hope you enjoyed this tutorial.
I’d love to see your results and show it off in my gallery.
Email me!
Hugs,
Bev