
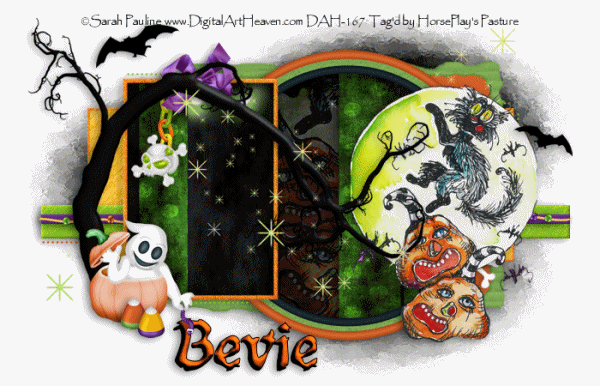
Supplies Needed
1 tube of choice – I
used the adorable artwork of Sarah Pauline which can be purchased from Digital
Art Heaven here
A Space Between Template 4:
It can be found under CM Temp Challenge Templates here
(it’s about ¾ of the way down the page)
Animation Shop
Plug Ins used:
Brush Strokes – Sprayed Strokes
“Spooks on the Loose” is a FTU tagger size scrap kit
created by me and can be downloaded from my designing blog here.
This tutorial was
written assuming you have working knowledge of PSP.
~♥~ Let’s get started ~♥~
Open up the template.
Shift + D
Close out the original.
Delete Border Circle layer and the
credit layer.
Resize all layers 90%
Image/Canvas Size:
700 x 450 pixels
OK
Highlight the background layer.
Flood fill white.
Highlight Big Rectangle layer.
Click on it with your Magic Wand.
New Raster layer.
Copy and paste Paper 4 Into
Selection.
Apply Brush Strokes – Sprayed
Strokes:
Stroke Length: 20
Spray Radius: 22
Stroke Direction: Right Diagonal
OK
Deselect.
Delete the template layer.
Highlight Border Big Rectangle
layer.
Select All/Float/Defloat
New Raster layer.
Copy and paste Paper 6 Into
Selection.
Deselect.
Delete the template layer.
Give it a slight Inner Bevel:

Adjust/Add Remove Noise/Add Noise:
Uniform and Monochrome checked
Noise: 20
OK
Repeat the above step with Border
Gray Rectangle
Highlight Small Rectangle layer.
Click on it with your Magic Wand.
New Raster layer.
Copy and paste Paper 3 Into
Selection.
Apply Brush Strokes – Sprayed
Strokes:
Use same settings
OK
Give it the same slight Inner Bevel.
Deselect.
Delete the template layer.
Highlight Rectangle Stripe layer.
Click on it with your Magic Wand.
New Raster layer.
Copy and paste Paper 7 Into
Selection.
Deselect.
Give it the same slight Inner Bevel.
Highlight Circle layer.
Click on it with your Magic Wand.
New Raster layer.
Copy and paste Paper 8 Into Selection.
Copy and paste your tube as a new
layer. If you’re using the same tube as
I did, resize 60%
Move into position – see my tag for
reference.
Right click on the tube layer in
your layers pallet and choose “Promote Section to layer” from the sub menu.
Delete the original tube layer.
Deselect.
Change the Properties of the
Promoted Selection layer to Soft Light.
Highlight Line 2 template layer.
Merge Down.
Line 1 and 2 should now both be on
the same layer.
Click on both shapes.
Highlight the Promoted Selection
layer (your tube layer)
Tap the delete key.
Highlight the merged template layer.
Copy and paste Paper 3 as a new
layer.
Resize the paper 55%
Right click on the paper in your
layers pallet. Choose “Promote Section
to layer” from the sub menu.
Delete the template layer.
Change the Properties of the
promoted layer to Dodge.
Deselect.
Move the resized paper just above
Line Gray Rectangle layer.
Highlight Line Gray Rectangle layer.
Click on it with your Magic Wand.
Highlight the paper layer and right
click on it. Choose “Promote Section to
Layer” from the sub menu.
DO NOT Delete the template layer.
Change the Properties of the
promoted layer to Dodge.
Deselect.
Delete the resized paper layer.
Highlight Gray Rectangle layer.
Click on it with your Magic Wand.
New Raster layer.
Copy and paste Paper 8 Into
Selection.
Copy and paste El 28 as a new layer.
Resize 40%
Move into position and change the
Properties to Hard Light.
Selections/Invert
Tap the delete key.
Deselect.
Delete the template layer.
Highlight Line Gray Rectangle
template layer.
Click on it with your Magic Wand.
Highlight the ghost element.
Tap the delete key.
Deselect.
Delete the template layer.
Color Pallet:
Foreground: #000000
Background: #85c634
Highlight Dotted Lines 1
Make your Color Replacer Tool active
and double right click on the template.
Repeat the above step with Lines 2.
Color Pallet:
Change the background color to #d64c0e
Highlight Dotted Lines layer.
Make your Color Replacer Tool active
and double right click on the template.
Copy and paste Element 10 as a new
layer.
Resize 70%
Move into position over the strips
that belong to the circle.
Copy and paste your tube as a new
layer.
If you’re using the same one as I
did, Resize 40%
Add your elements. I used:
El 15: Resize 30%
El 38: Resize 70%
El 1: Resize 30%
El 17: Resize 30%
El 21: Resize 25%
El 11: Resize 70%
El 25: Resize 40%/Duplicate
El 35: Resize 20%/Duplicate & Mirror as many
times as you like
El 37: Use Target Tool and change to #eaeeba
El 26 & 27: Resize 15%
Highlight your white background.
New Raster layer.
Select All.
Copy and Paste Paper 8 Into
Selection.
Deselect.
Apply the mask.
Mirror
Merge Group.
Move the mask down just slightly on
your canvas.
Add your copyrights.
Add your name.
Color Pallet:
Foreground: #000000
Background: #d64c0e
Stroke: 1.0
Type your name.
Give it a slight Inner Bevel:

If you do not want to animate your
tag then save.
If you do want to animate:
Highlight the ghost element.
Duplicate it 4x’s for a total of
five ghost layers.
Rename them G1, G2, G3, G4, and G5.
Lower the Opacity as follows:
G2: 80
G3: 60
G4: 40
G5: 20
Close out all ghost layers.
Copy Merged.
~Time to Animate~
Open up Animation shop.
Edit/Paste as New Animation
Back in PSP.
Open up G5.
Copy Merged.
Carry Into AS.
Edit/Paste/After Current Frame.
Back in PSP.
Close out G5.
Open up G4.
Copy Merged.
Carry Into AS.
Edit/Paste/After Current Frame.
Back in PSP.
Close out G4.
Open up G3.
Copy Merged.
Carry into AS.
Edit/Paste/After Current Frame.
Back in PSP.
Close out G3.
Open up G2.
Copy Merged.
Carry into AS.
Edit/Paste/After Current Frame.
Back in PSP
Close out G2.
Open up G1.
Copy Merged.
Carry into AS.
Edit/Paste/After Current Frame.
You should not have a total of 6
frames.
Ctrl + A (to highlight all frames)
Edit/Copy
Edit/Paste as New Animation.
Animation/Reverse Frames.
Edit/Copy
Highlight your original animation.
Highlight frame 6.
Edit/Paste/After Current Frame.
View your animation.
The ghost should appear and
disappear.
Ctrl + A (to highlight all frames)
Animation/Frame Properties:
Change the Display time to 17.
OK
Highlight Frame 1.
Animation/Frame Properties:
Change the Display time to 150.
OK
Highlight Frame 6.
Animation/Frame Properties:
Change the Display time to 200.
OK
View your animation.
If you’re happy then resize.
Animation/Resize Animation:
Pixel Size – Width: 600
OK
Save your animation.
I hope you enjoyed this tutorial.
I’d love to see your results.
Hugs,
Bev