Supplies
1 tube of choice – I used the beautiful artwork of Carol Moore which
can be purchased from PSP Tube Stop. You must have a license to
use.
Weescotlass Mask 208 here
Plug Ins used:
Xero - Porcelain
Eyecandy 5: Nature – Fire
Animation Shop
“Wintry Magic” is a tagger size
scrap kit, also available as a page kit by Krissy of Krissy’s Scraps and
Imaging and can be purchased from her store ExquisiteScraps. You can visit her blog here.
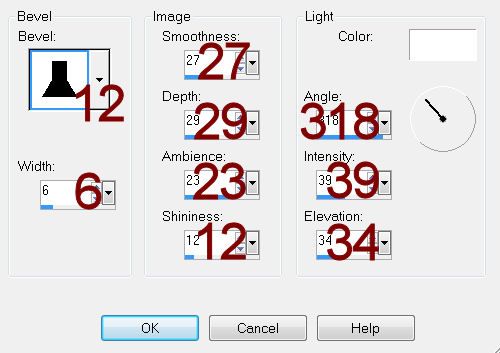
Thank you Krissy for a really pretty kit.
~♥~ Let’s get started ~♥~
Open up a 700 x 700 blank canvas.
Flood fill white.
New Raster layer.
Make your Selection Tool active set on Circle.
Create a circle approximately 550 pixels.
Copy and paste Paper 10 Into Selection.
Adjust/Add Remove Noise/Add Noise:
Gaussian and Monochrome checked
Noise: 35%
Selections/Modify/Contract by 5.
New Raster layer.
Copy and paste Paper 5 Into Selection.
Copy and paste your tube as a new layer.
Change the Properties to Multiply.
Lower the Opacity to about 22.
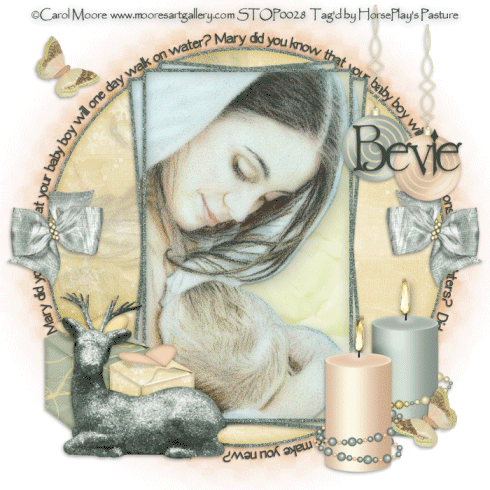
Move into position on the left side of the circle – see my tag for
reference.
Selections/Invert
Tap the delete key.
Deselect.
To the tube layer apply Xero – Porcelain:
Use Default settings accept lower the Blue channel button to 13.
OK
Close out your white background layer.
Merge Visible.
Reopen your background layer.
Move the merged circle layer into the center of the canvas.
New Raster layer.
Make your Selection Tool active set on Rectangle.
Create a rectangle approximately 300 x 500 pixels.
Copy and paste Paper 10 Into Selection.
Apply the same Noise effect.
Selections/Modify/Contract by 5.
New Raster layer.
Copy and paste Paper 5 Into Selection.
Copy and paste your tube as a new layer over the rectangle paper.
Selections/Invert
Tap the delete key.
Deselect.
Merge down.
The tube and paper layer should now be on the same layer.
Apply Xero – Porcelain:
Use same settings.
Merge Down.
Center this over the merged circle layer.
Duplicate 2 x’s
Free rotate one of the duplicates Left 5 degrees.
Free rotate the other Right 5 degrees.
Add your elements. I used:
Bow 1: Resize
40%/Duplicate/Mirror
Bauble 1 & 3: Resize 70%
Gift Box 1: Resize 50%
Gift Box 3: Resize 40%
Deer 1: Resize 65%
Candles 1 & 3: Resize 60%
Butterfly 1: Resize
25%/Duplicate/Mirror
Color Pallet:
Foreground: #000000
Background: Null
Width: 2
Make your Ellipse Tool active set on Circle.
Create a circle that’s slightly larger than the merged circle layer.
Color Pallet:
Forgeound and Background: #3e4640
Close out the foreground
Move your mouse along the circle until you see a Rocking A.
Click your mouse.
A Text box will appear.
Using the font Epifania type the words:
Mary did you know that your baby boy will one day walk on water?
Mary did you know that your baby boy will save our sons and daughters?
Did you know that your baby boy has come to make you new?
Click apply.
In your layers pallet Click on the + sign.
Close out the New Ellipse layer by clicking on the eye.
Right Click on the Vector 1 layer.
Convert to Raster layer.
Highlight your white background.
New Raster layer.
Select All.
Copy and paste Paper 10 Into Selection.
Deselect.
Apply the mask.
Resize 120%
Merge Group.
Use your Target Tool and change the color to #f3d5b9.
Add your credits.
Add your name.
Color Pallet:
Open up the foreground.
Type your name using the font Wretched.
Merge Visible the candle layer.
Duplicate 3x’s for a total of 4 layers.
Rename them Candle 1, 2, 3, and 4.
Highlight Candle 1 layer.
Use your Freehand Selection Tool set on Freehand and trace around the
flame.
Apply Eyecandy 5 – Nature:
Settings Tab:
Small, Candle
Basic Tab:
Default settings accept lower the Column Length to 54.03.
OK
Highlight Candle 2 layer.
Apply the same fire effect accept hit the random seed button until you
like the flame.
Repeat the above step with Candle 3 and 4 layers.
Deselect.
Close out Candle layers 2, 3, and 4.
Leaving only Candle 1 layer open.
Copy Merge.
~Time to Animate~
Carry Into Animation Shop.
Edit/Paste/As New Animation
Back in PSP.
Close out Candle 1 layer.
Open up Candle 2 layer.
Copy Merge.
Carry Into AS
Edit/Paste/After Current Frame.
Back in PSP.
Close out Candle 2 layer.
Open up Candle 3 layer.
Copy Merge.
Carry Into AS
Edit/Paste/After Current Frame.
Back in PSP.
Close out Candle 3 layer.
Open up Candle 4 layer.
Copy Merge.
Carry Into AS
Edit/Paste/After Current Frame.
Control A – to highlight all the frames.
Animation/Frame Properties:
Display Time: 25
OK
Animation/Resize Animation:
Percentage of Origial:
Height X Width: 70
OK
View your animation.
If you’re happy with it then save.
Resize all layers 80%.