Supplies Needed
1 tube of choice – I used the beautiful artwork of Ellie Milk which can be purchased from Pics for Design. You must generate a license to use.
Font of choice – I used Inspiration
Weescotlass Mask 208 here
Plug Ins used:
Mura's Meister - Copies
Dangerously Delicious Designs "Sinners" template here.
Can be found under Thursday, August 1, 2013.
"Enamorte Yellow" is a FTU scrap kit created by Mirella of A Space Between and can be downloaded from her blog here. Don't forget to leave a thank you in the comment box for her generosity.
~♥~ Let’s get started ~♥~
Open up the template.
Shift + D.
Close out the original.
Resize all layers 90%
Image/Canvas Size:
750 x 600
OK
Highlight the background layer.
Flood fill white.
Delete the top 9 layers and Bottom Creme Circle layer.
Highlight Bottom Brown Rectangle layer.
Click on it with your Magic Wand.
New Raster layer.
Copy and paste Paper Paper 3 Into Selection.
Deselect.
Delete the template layer.
Highlight Top Bown Rectangle layer.
Repeat the above step.
Highlight Teal Square layer.
Click on it with your Magic Wand.
New Raster layer.
Copy and paste Paper 6 Into Selection.
Deselect.
Delete the template layer.
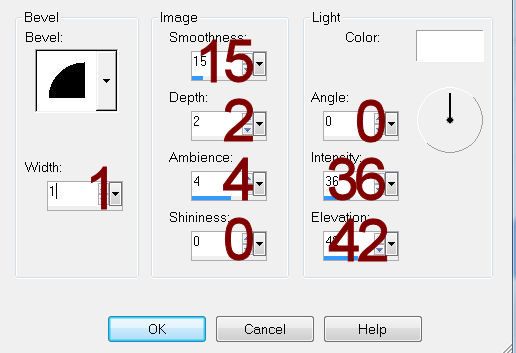
Give the paper a slight Inner Bevel:

Highlight Left Rust Strip layer.
Click on it with your Magic Wand.
New Raster layer.
Copy and paste Paper 4 Into Selection.
Deselect.
Delete the template layer.
Give the paper the same Inner Bevel.
Repeat the above step with Rust Right Strip layer and Brown Strip layer.
Highlight Teal Strip layer.
Click on it with our Magic Wand.
New Raster layer.
Copy and paste Paper 1 Into Selection.
Deselect.
Delete the template layer.
Give it the same Inner Bevel.
Highlight Large Dark Circle layer.
Click on it with your Magic Wand.
New Raster layer.
Copy and paste Element 38 Into Selection.
Deselect.
Delete the template layer.
Highlight Grey Rectangle layer.
Click anywhere outside of it with your Magic Wand.
Copy and paste Paper 5 as a new layer.
Resize 70%
Move into position over the template layer.
Tap the delete key.
Deselect.
Delete the template layer.
Give the paper the same Inner Bevel.
Highlight Top Creme Circle layer.
Click on it with your Magic Wand.
New Raster layer.
Copy and paste Paper 3 Into Selection.
Copy and paste your tube as a new layer.
Move into position over the circle paper layer.
Change the Properties of the tube to Luminance (Legacy).
Selections/Invert
Tap the delete key.
Selections/Modify/Inside Outside Feather:
Both checked
Feather amount: 30
OK
Tap the delete key until you have the feathered effect you like.
Deselect.
Delete the template layer.
Give the paper layer the same slight Inner Bevel.
Color Pallet:
Foreground: #000000
Background: #5b6024
Highlight Dotted Circle layer.
Make your Color Replacer Tool active.
Double right click on the dotted circle.
It should change to the color green.
Highlght Tiny Dark Circles layer.
Click on the top Dark Circle with your Magic Wand.
New Raster layer above the template layer.
Copy and paste Element 38 Into Selection.
Deselect.
Highlight the Tiny Dark Circle template layer again.
Click on the bottom dark circle with your Magic Wand.
Highlight the layer you just pasted the element into.
Paste the element Into Selection.
Deselect.
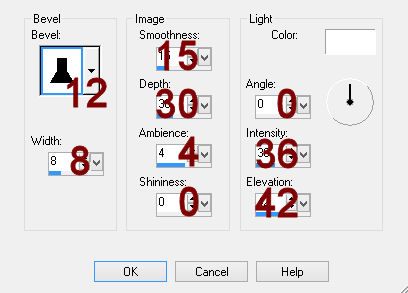
Adjust/Sharpness/Unsharpen Mask:
Radius: 2
Strength: 50
Clipping: 4
OK
Delete the template layer.
Copy and paste Element 29 as a new layer.
Resize 20%
Apply Mura's Meister - Copies:
Choose Encircle
Use Default settings accept change the following numbers:
Number: 20
Shift x: 60
Shifty Y: 60
OK
Move the circle of flowers into position - see my tag for reference.
Copy and paste your tube as a new layer.
Add your elements. I used:
13: Resize 70%/Duplicate
18: Resize 50%
30: Resize 30%/Mirror/Free rotate Left 30 degrees
2: Resize 50%
24: Resize 50%
41: Resize 20%
29: Resize 20%/Duplicate/Resize 70%
12: Resize 20%
23: Resize 20%/Duplicate/Mirror
Highlight your white background.
New Raster layer.
Select All.
Copy and paste Paper 5 Into Selection.
Deselect.
Apply the mask.
REsize 110%
Merge Group.
Add your copyright.
Color Pallet:
Background & Foreground: #648a2c
Type your name.
Convert to Raster layer.
Select All/Float/Defloat
Selections/Modify/Expand by 2.
New Raster layer below your name.
Flood fill with #ffffff
Deselect.
Merge Visible both name layers.
Merge Visible all layers.
Resize 80%
I’d love to see your results.
Email me!
Hugs,
Bev