Saturday, August 3, 2013

Rock It


Supplies Needed  

1 tube of choice – I used the artwork of Arthur Crowe which can be purchased from here.  You must have a license to use. 

Font of choice – I used Rat Infested Mailbox here

Becky Mask 9 here

Plugs Ins used:
Greg's Factory Output Vol. II - Pool Shadow
DSB Flux - Bright Noise

 "Rock Diva" is a tagger size scrap kit created by Julie of Bits n Bobs and can be purchased from Pics For Design.  You can visit her blog here.  Thank you Julie for an awesome kit!

~♥~ Let’s get started ~♥~

Open up the templates.
Shift + D.
Close out the original.
Image/Canvas Size:
700 x 700 
OK
Highlight Raster 1 layer.
Flood fill white.
Delete the credit layer, Raster 7, Raster 6 layer, and Raster 2 layer.

Raster 3 layer.
Copy and paste your tube as a new layer.
Change the Properties to Soft Light and position it at the side of the template layer - see my tag for reference.
Duplicate the tube layer.
Mirror
Once both tubes are in positon over the template layer, highlight the template layer.
Click anywhere outside of it with your Magic Wand.
Highlight each tube layer and tap the delete key.
Selections/Invert
Highlight the template layer.
Apply Greg's Factory Output Vol. II - Pool Shadow:
Use default settings accept move the intensity bar to 255.
Deselect.
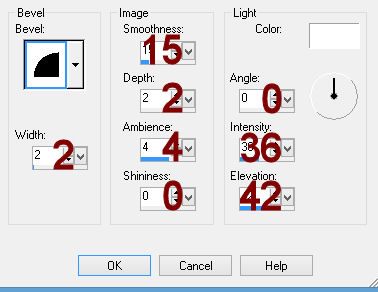
Give the template layer a slight Inner Bevel:

Color Pallet:
Foreground: #3a3a3c
Background: #000000

Highlight Raster 4 layer.
Make your Color Replacer Tool active.
Double Right Click on the template layer.
It should've turned to your background color.
Give the template layer the same slight Inner Bevel.

Highlight Raster 5 layer.
Repeat the above step.

Color Pallet:
Change the foreground to #818286

Highlight Raster 9 layer.
Repeat the above step.

Highlight Raster 9 layer.
Click on it with your Magic Wand.
New Raster layer.
Copy and paste Paper 5 Into Selection.
Duplicate
Apply Tramages - Wee Scratches
Use default setting.
Deselect.

Copy and paste Element 18 as a new layer.
Resize 30%
Apply Mura's Meister - Copies:
Choose "Encircle"
Use Default settings accept change the top 3 numbers:
Number: 50
Shift X: 45
Shift Y: 45

Move this ring into position over the round paper layer - see my tag for reference.

Highlight Raster 10 layer.
Click on the center circle with your Magic Wand.
New Raster layer above the template layer.
Copy and paste Element 19 Into Selection.
Deselect.
Highlight the template layer again.
Click on another circle.
Highlight the layer above (that you already pasted Element 19 Into).
Paste the element Into Selection.
Deselect.
Repeat until the element is covering each template circle.
Once you've done that, delete the template layer.

Copy and paste Element 20 as a new layer.
Free rotate Left 90 degrees
Move into position at the left side of the rectangle - see my tag for reference.
Using your Selection Tool set on Point to Point, section around the area that's the lenth of the rectangle.
Selections/Invert
Tap the delete key.
Deselect.
Duplicate/Mirror

Copy and paste your tube as a new layer.

Add your elements.  I used:
Frame 6
43
44
4:  REsize 50%/Duplicate/Mirror
17:  Resize 60%
40:  Resize 65%/Free rotate Left 25 degrees
3:  Resize 50%/Mirror
50:  Duplicate/Mirror

Highlight your white background.
New Raster layer.
Select All
Copy and paste Paper 4 Into Selection.
Deselect.
Apply the mask.
Use your Pick Tool and pull the sides out and top down just a little.
Merge Group.

Highlight 

Add your copyright.

Add your name:
Color Pallet: 
Foreground and Background: #000000
Type your name.
Convert to Raster layer.
Select All/Float/Defloat
Selections/Modify/Expand by 2
New Raster layer below your name.
Flood fill with #ffffff
Deselect.
Merge Visible both name layers.

Resize all layers 80%.

I’d love to see your results.
Email me!
Hugs,
Bev 

Thursday, August 1, 2013

Girlz Rock


Supplies Needed  

1 tube of choice – I used the wonderful artwork of Alex Prihodko which can be purchased from Pics For Design.  You must generate a license to use. 

Font of choice – I used Jellyka Delicious Cake here

Vaybs Mask 2 here

Plugs Ins used:
Greg's Factory Output Vol. II - Pool Shadow
DSB Flux - Bright Noise

 "Rock Diva" is a tagger size scrap kit created by Julie of Bits n Bobs and can be purchased from Pics For Design.  You can visit her blog here.  Thank you Julie for an awesome kit!

~♥~ Let’s get started ~♥~

Open up a 700 x 700 blank canvas.
Flood fill white.

Copy and Paste Frame 1 as a new layer.
Click inside of it with your Magic Wand.
Selections/Modify/Expand by 4.
New Raster layer below the frame.
Copy and paste Paper 5 Into Selection.
Deselect.

New Raster layer above the white canvas.
Make your Selection Tool active set on Rectangle.
Create a rectangle approximately 290 x 525 pixels.
Copy and paste Paper 5 Into Selection.
New Raster layer.
Copy and paste Paper 12 Into Selection.
Deselect.
Give a slight Inner Bevel to each paper:

Move both papers into position - see my tag for reference.
Duplicate the darker paper.
Click anywhere outside of it with your Magic Wand.
Selections/Invert
Apply Greg's Factory Output Vol. II - Pool Shadow:
Use Default settings.
Deselect.
Change the Properties of this layer to Dissolve.

Copy and paste Frame 5 as a new layer.
Resize 40%
Duplicate 2x's for a total of 3 frames.
Move all 3 frames into position - see my tag for reference.
Merge Visible all 3 frames.
Make your Selection Tool active - should still be set on Rectangle.
Section around each frame keeping the dotted line along the center of the edges.
New Raster layer below the merged frames layer.
Copy and paste Paper 12 Into Selection.
Copy and paste your tube as a new layer just above the paper.
Change the Properties of the tube to Hard Light and move it into position - see my tag for reference.
Selections/Invert
Tap the delete key.
Deselect.

Copy and paste your tube as a new layer.

Add your elements.  I used:
20:  Free rotate Left 90 degrees
7:  Resize 50%/Duplicate
10:  Resize 70%
64
19:  Resize 30%/Duplicate 2x's for a total of 3
52:  Resize 15%/Duplicate 2x's for a total of 3
61:  Free rotate Left 25 degrees

Highlight your white background.
New Raster layer.
Select All
Copy and paste Paper 7 Into Selection.
Deselect.
Apply the mask.
Merge Group.

Add your copyright.

Add your name:
Color Pallet: 
Foreground and Background: #000000
Type your name.
Convert to Raster layer.
Select All/Float/Defloat
Selections/Modify/Expand by 2
New Raster layer below your name.
Flood fill with #fcb5e6
Deselect.
Apply DSB Flux - Bright Noise:
Mixed checked
Noise: 48%
OK
Merge Visible both name layers.

Resize all layers 80%.

I’d love to see your results.
Email me!
Hugs,
Bev 


Pwetty Fairy Princess


Supplies Needed  

1 tube of choice – I used the wonderful artwork of Carla Lee Marlow which can be purchased from PSP Tube Stop.  You must have a license to use. 

Font of choice – I used Versitia here

Becky Mask 22 here

Divine Intentions template 112 here

 "A Dragon's Dreamy Day" is a tagger size scrap kit created by me, Bev of HorsePlay's Pasture Designs and can be purchased from any of my stores here.  

~♥~ Let’s get started ~♥~

Open up the template.
Shift + D.
Close out the original.
Image/Canvas Size 600 x 450 pixels.
OK
Highlight the background layer.
Flood fill white.
Delete the watermark layer, Circle 1, and Circle 2 layers.

Highlight Thin Rectangle 2 layer.
Merge Down.
Both thing Rectangles should be on the same layer.
Use your Magic Wand and click on both of the rectangles.
New Raster layer.
Copy and paste Paper 17 Into Selection.
New Raster layer.
Copy and paste Paper 16 Into Selection.
Deselect.
Delete the template layer.
Move the purple rectangles slightly up at a diagonal angle.
To each rectangle give it a slight Inner Bevel:

Highlight Rectangle layer.
Click anywhere outside of it with your Magic Wand.
Copy and paste Paper 5 as a new layer.
Move into a position you like.
Tap the delete key.
Deselect.
Delete the template layer.
Give the paper the same slight Inner Bevel.

Highlight Frame layer.
Click on it with your Magic Wand.
New Raster layer.
Copy and paste Paper 17 Into Selection.
Deselect.
Give it the same slight Inner Bevel.
Adjust/Add Remove Noise/Add Noise:
Uniform and Monochrome checked
Noise: 53%
OK
Click inside of each frame with your Magic Wand.
Selections/Modify/Expand by 4.
New Raster layer below the frame.
Copy and paste Paper 11 Into Selection.
Copy and paste El47 as a new layer over the paper layer.
Resize 70%
Move into a position you like - see my tag for reference.
Selections/Invert
Tap the delete key.
Deselect.

Copy and paste your tube as a new layer.
If you're using the same tube as I did, resize 55%

Add your elements.  I used:
El 48
El 3:  Resize 45%/Duplicate/Mirror/Flip
El 34:  Resize 40%/Duplicate/Free rotate Right 15 degrees
El 17:  Resize 25%/Free rotate Right 25 degrees
El 79
El 43:  Resize 50%
El 57:  Resize 40%/Duplicate/Mirror
El 55:  Resize 50%/Duplicate/Resize 70%/Duplicate both stars
El 65:  Resize 50%

Highlight your white canvas.
New Raster layer.
Select All.
Copy and paste Paper 15 Into Selection.
Deselect.
Apply the mask.
Use your Pick Tool and pull all sides out slightly.
Merge Group.

Add your copyright.

Add your name:
Foreground and Background: #404040

Resize all layers 80%.

I’d love to see your results.
Email me!
Hugs,
Bev 

Sunday, July 28, 2013

Old Salt


Supplies Needed  

1 tube of choice – I used the adorable artwork of Lisa Victoria which can be purchased from Up Your Art.  You must have a license to use. 

Font of choice – I used Kennebunkport here

Vix Mask 451 here

Vickie's template 34 here

 "Yo Ho Ho" is a tagger size scrap kit created by Vickie of Vickie's Scraps and can be purchased here.

~♥~ Let’s get started ~♥~

Open up the template.
Shift + D.
Close out the original.
Delete the top 4 layers.
Image/Canvas Size:
700 x 700
OK
Highlight the Background layer.
Flood fill white.

Highlight Strip layer.
Click on it with your Magic Wand.
New Raster layer.
Copy and paste Paper 14 Into Selection.
Deselect.
Delete the template layer.
Give the paper layer a slight Inner Bevel:
 photo PaperBevel_zps3f05d75b.jpg

Highlight Circle layer.
Click on it with your Magic Wand.
New Raster layer.
Copy and paste Paper 13 Into Seleciton.
Deselect.
Delete the template layer.
Give the paper the same slight Inner Bevel.

Highlight Rec 1 layer.
Click on it with your Magic Wand.
New Raster layer.
Copy and paste Paper 7 Into Selection.
Copy and paste your tube as a new layer.
Move into position over the paper layer.
Selections/Invert
Tap the delete key.
Change the Properties of the tube to Soft Light.
Deselect.
Delete the template layer.

Highlight Red 2 layer.
Click on it with your Magic Wand.
New Raster layer.
Copy and paste Paper 17 Into Selection.
Copy and paste your tube as a new layer.
Selections/Invert
Tap the delete key.
Deselect.
Delete the template layer.

Add your elements.  I used:
El 89: Use Pick Tool to flatten the element slightly
El 58: Select a starfish of choice/Resize 30%/Duplicate/Use Pick tool to turn slightly
El 57: Choose a starfish/I resized mine 50%
El 59:  Resize 30%
El 90:  Resize 35%
El 56:  Choose a shell/I resized mine 50%
El 48;  Resize 90%/Duplicate
El 21
El 46:  Resize 60%
El 67:  Resize 50%
El 102:  Resize 35%/Free rotate Right 15 degrees
El 76:  Resize 80%
El 74:  Resize 80%

Highlight your white background.
New Raster layer.
Select All
Copy and paste Paper 10 Into Selection.
Deselect.
Apply the mask.
Resize 120%
Merge Group.

Add your copyright.

Add your name:
Color Pallet: 
Foreground: 000000
Background: #5c9ed8

Stroke: .8

Type your name.
Give it a slight Inner Bevel:

Resize all layers 80%.

I’d love to see your results.
Email me!
Hugs,
Bev