

Supplies
Poser used is by ©Moody Designz and is included in the kit. You can visit her sit here
Font of choice - I used Annabelle - I’m sorry I couldn ’t find a link
Mask 71 here
“Dorm Room Drama Queen” is a scrap kit created by Deb of Debs Designs and is part of a collaboration that can be purchased at TKO Scraps and is available in tagger and full size. You can visit her blog here.
Thank you Deb for your adorable contribution!
Plus Ins:
Eyecandy 3.1 - Glow
This tutorial was written assuming you have a working knowledge of PSP.
~♥~ Let’s get started ~♥~
Open up a 700 x 700 blank canvas.
Flood fill white.
Make your Selection Tool active set on circular.
Create a circle approximately 400 pixels - don’t worry if it’s not centered.
New Raster layer.
Copy and paste Paper 1 Into Selection.
Adjust/Blur/Gaussian Blur:
Radius: 20
OK
Adjust/Add Remove Noise/Add Noise:
Uniform and Gaussian checked
Noise: 43%
OK
Deselect.
New Raster layer.
Change your Selection Tool to rectangle.
Create a rectangle approximately 150 x 500 pixels.
Copy and paste Paper 2 Into Selection.
Adjust/Blur/Gaussian Blur:
Radius: 20
OK
Add the same Noise effect.
Deselect.
New Raster layer.
Create a rectangle approximately 125 x 600 pixels.
Copy and paste Paper 1 Into Selection.
Adjust/Blur/Gaussian Blur:
Radius: 20
OK
Add the same noise effect.
Deselect.
Move all layers into position - see my tag for reference.
Highlight the largest rectangle.
Click anywhere outside of it with your Magic Wand.
Selections/Invert
Selections/Modify/Contract by 8
New Raster layer.
Flood fill with a gradient of your choice.
Apply Eyecandy 3.1 - Glow
Width: 3
Opacity: 100
Opacity Drop off: Fat
Color: White
OK
Deselect.
Highlight the smaller rectangle.
Repeat the above step.
Highlight the Circular layer.
Click anywhere outside of it with your Magic Wand.
Selections/Invert
Selections/Modify/Contract by 8
New Raster layer.
Flood fill with a gradient of your choice.
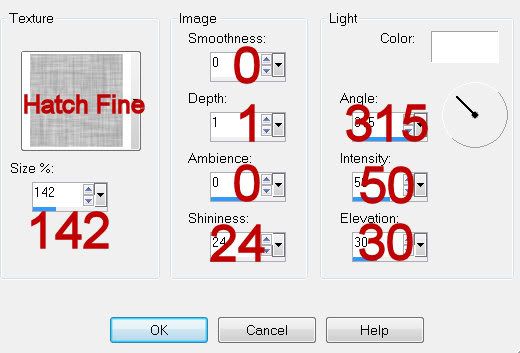
Effect/Texture Effects/Texture
Match your settings to mine:
Apply Eyecandy 3.1 - Glow
Width: 3
Opacity: 100
Opacity Drop off: Fat
Color: White
OK
Deselect.
Add your embellishments. I used:
Flower Feather 2
Award 2: Resize 45%
Bear: Resize 35%
Game Machine: Resize 25%
Notes: This is behind the circle layer with noise
Lip 1: Resize 40%/Free rotate Left 15 degrees
Guitar 2: Resize 70%/Mirror/Free rotate Left 5 degrees
Backpack: Resize 50%/Mirror
Jazmine: (Moody Designz folder) Resize 75%
Highlight your white canvas.
New Raster layer.
Select All.
Copy and paste Paper 2 Into Selection.
Deselect.
Apply the mask.
Merge Group.
Crop your image.
Add your copyrights.
Add your name:
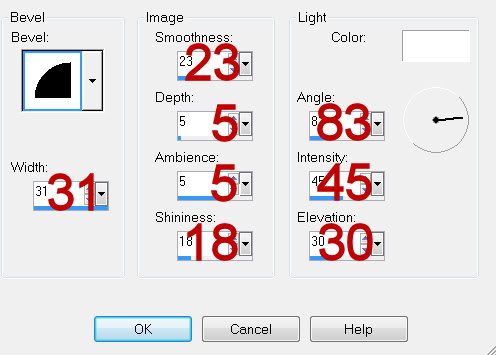
Give it a slight Inner Bevel:
Resize all layers 80%.
I hope you enjoyed this tutorial.
I’d love to see your results and show it off in my gallery.
Email me!
Hugs,
Bev
Poser used is by ©Moody Designz and is included in the kit. You can visit her sit here
Font of choice - I used Annabelle - I’m sorry I couldn
Mask 71 here
“Dorm Room Drama Queen” is a scrap kit created by Deb of Debs Designs and is part of a collaboration that can be purchased at TKO Scraps and is available in tagger and full size. You can visit her blog here.
Thank you Deb for your adorable contribution!
Plus Ins:
Eyecandy 3.1 - Glow
This tutorial was written assuming you have a working knowledge of PSP.
~♥~ Let’s get started ~♥~
Open up a 700 x 700 blank canvas.
Flood fill white.
Make your Selection Tool active set on circular.
Create a circle approximately 400 pixels - don’t worry if it’s not centered.
New Raster layer.
Copy and paste Paper 1 Into Selection.
Adjust/Blur/Gaussian Blur:
Radius: 20
OK
Adjust/Add Remove Noise/Add Noise:
Uniform and Gaussian checked
Noise: 43%
OK
Deselect.
New Raster layer.
Change your Selection Tool to rectangle.
Create a rectangle approximately 150 x 500 pixels.
Copy and paste Paper 2 Into Selection.
Adjust/Blur/Gaussian Blur:
Radius: 20
OK
Add the same Noise effect.
Deselect.
New Raster layer.
Create a rectangle approximately 125 x 600 pixels.
Copy and paste Paper 1 Into Selection.
Adjust/Blur/Gaussian Blur:
Radius: 20
OK
Add the same noise effect.
Deselect.
Move all layers into position - see my tag for reference.
Highlight the largest rectangle.
Click anywhere outside of it with your Magic Wand.
Selections/Invert
Selections/Modify/Contract by 8
New Raster layer.
Flood fill with a gradient of your choice.
Apply Eyecandy 3.1 - Glow
Width: 3
Opacity: 100
Opacity Drop off: Fat
Color: White
OK
Deselect.
Highlight the smaller rectangle.
Repeat the above step.
Highlight the Circular layer.
Click anywhere outside of it with your Magic Wand.
Selections/Invert
Selections/Modify/Contract by 8
New Raster layer.
Flood fill with a gradient of your choice.
Effect/Texture Effects/Texture
Match your settings to mine:
Apply Eyecandy 3.1 - Glow
Width: 3
Opacity: 100
Opacity Drop off: Fat
Color: White
OK
Deselect.
Add your embellishments. I used:
Flower Feather 2
Award 2: Resize 45%
Bear: Resize 35%
Game Machine: Resize 25%
Notes: This is behind the circle layer with noise
Lip 1: Resize 40%/Free rotate Left 15 degrees
Guitar 2: Resize 70%/Mirror/Free rotate Left 5 degrees
Backpack: Resize 50%/Mirror
Jazmine: (Moody Designz folder) Resize 75%
Highlight your white canvas.
New Raster layer.
Select All.
Copy and paste Paper 2 Into Selection.
Deselect.
Apply the mask.
Merge Group.
Crop your image.
Add your copyrights.
Add your name:
Give it a slight Inner Bevel:
Resize all layers 80%.
I hope you enjoyed this tutorial.
I’d love to see your results and show it off in my gallery.
Email me!
Hugs,
Bev
No comments:
Post a Comment