Saturday, June 23, 2012

Celebration of Independence

Supplies

1 tube of choice – I used the artwork of Thomas Hoover which can be purchased from PSP Tubes Emporium.  You must have a license to use.

Font of choice - I used Simply Glamorous here

Weescotlass Mask 208 here

Plug Ins used:
Eyecandy 3.1 – Glow

“Celebration of Independance” is a tagger size scrap kit created by me, Bev of HorsePlay’s Pasture Designs and can be downloaded from my blog here.
Hope you enjoy!

This tutorial was written assuming you have a working knowledge of PSP.

~~ Lets get started ~~

Open up a 700 x 700 blank canvas.
Flood fill white.

Copy and paste 11 as a new layer.
Resize 85%
Click inside of it with your Magic Wand.
Selections/Modify/Expand by 4.
New Raster layer below the frame.
Copy and paste Paper 5 Into Selection.
Copy and paste your tube as a new layer above the frame – move into position.
Duplicate
Move below the frame.
Selections/Invert
Tap the delete key.
Deselect.
Highlight the tube above the frame.
Use your Eraser Tool and erase only the parts of the tube you don’t want to overhang the frame.

Close out your white background.
Merge Visible.
Reopen your white background.

Copy and paste 13 as a new layer.
Resize 50%
Duplicate/Mirror
Move both frames into position behind the merged layer – see my tag for reference.
To each frame:
Click inside of it with your Magic Wand.
Selections/Modify/Expand by 4.
New Raster layer below the frame.
Copy and paste Paper 7 Into Selection.
Deselect.

Add your elements.  I used:
14:  Resize 70%
15
16:  Resize 80%/Duplicate
35:  Resize 10%/Duplicate/Resize 70%/Duplicate 2x’s
31:  Resize 80%
30:  Resize 70%
23:  Resize 40%
24:  Resize 40%/Duplicate/Mirror/Flip
2:  Resize 35%
1:  Resize 35% and 70%/Mirror

Highlight your white background.
New Raster layer.
Select All.
Copy and paste Paper 1 Into Selection.
Deselect.
Apply the mask.
Merge Group.

Add your credits.

Add your name.
Foreground: #800000
Background: #223850
Stroke: .50
Type your name.
Convert to Raster layer.
Apply Eyecandy 3.1 – Glow:
Width: 3
Opacity: 100
Opacity Drop Off: Fat
Color: #ffffff
OK

Resize all layers 80%.

I’d love to see your results.
Email me!
Hugs,
Bev

America Rocks

Supplies

1 tube of choice – I used the artwork of Ted Hammond which can be now be purchased from CDO.  You must have a license to use.

Font of choice - I used Anglo Saxon here

Weescotlass Mask 138 here

Plug Ins used:
Eyecandy 3.1 – Glow

“Celebration of Independence” is a tagger size scrap kit created by me, Bev of HorsePlay’s Pasture Designs and can be downloaded from my designing blog here
Hope you enjoy!

This tutorial was written assuming you have a working knowledge of PSP.

~~ Lets get started ~~

Open up a 700 x 700 blank canvas.
Flood fill white.

Copy and paste 11 as a new layer.
Resize 85%
Move slightly up and to the left on your canvas.
Click inside of it with your Magic Wand.
Selections/Modify/Expand by 4.
New Raster layer below the frame.
Copy and paste Paper 5 Into Selection.
Deselect.

Close out your white background.
Merge Visible.
Reopen your white background.

Copy and paste 13 as a new layer.
Resize 60%
Click inside of it with your Magic Wand.
Selections/Modify/Expand by 4.
New Raster layer below the frame.
Copy and paste Paper 2 Into Selection.
Deselect.

Close out your white background and the merged layer.
Merge Visible.
Reopen all layers.
Don’t worry about placement yet.

Copy and paste 12 as a new layer.
Resize 60%
Click inside of it with your Magic Wand.
Selections/Modify/Expand by 4.
New Raster layer below the frame.
Copy and paste Paper 7 Into Selection.
Deselect.
Merge Visible this frame and layer.

Move all 3 merged layers into position – see my tag for reference.

Copy and paste your tube as a new layer.

Add your elements.  I used:
16: Duplicate
14:  Duplicate
15
19:  Resize 20%/Duplicate/Flip
18:  Resize 20%/Duplicate/Flip
28
29
8: 10/70/Duplicate 3x’s
36:  Resize 80%

Highlight your white background.
New Raster layer.
Select All.
Copy and paste Paper 8 Into Selection.
Deselect.
Apply the mask.
Merge Group.

Add your credits.

Add your name.
Foreground: #223850
Background: #780000
Stroke: 1.50
Type your name.
Convert to Raster layer.
Apply Eyecandy 3.1 – Glow:
Width: 3
Opacity: 100
Opacity Drop Off: Fat
Color: #ffffff
OK

Resize all layers 80%.

I’d love to see your results.
Email me!
Hugs,
Bev

Thursday, June 21, 2012

Sweet Temptation

Supplies

1 tube of choice and 1 close up image – I used the artwork of Amy Matthews which can be purchased from CDO.  You must have a license to use.

Font of choice - I used Allura here

Weescotlass Mask 208 here

Scrap Rebellion Template 69 here

Plug Ins used:
Eyecandy 3.1 – Glow

“Sweet Temptation” is a tagger size scrap kit created by Lysira’s Graphic World and can be purchased from Heartbeatz Creationz.  You can visit her blog here.
Thank you Lysira for a really sweet kit!

This tutorial was written assuming you have a working knowledge of PSP.

~~ Lets get started ~~

Open up the template.
Shift + D.
Close out the original.
Delete the top 3 layers.

Highlight Copy of Raster 5 layer.
Click on it with your Magic Wand.
New Raster layer.
Copy and paste 9 Into Selection.
Deselect.
Delete the template layer.
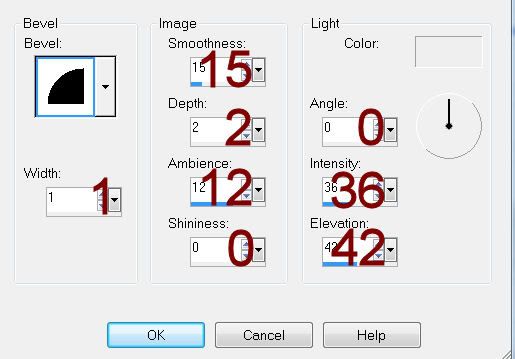
Give it a slight Inner Bevel:

Highlight Raster 5 layer.
Repeat the above step.

Highlight Raster 2 layer.
Click on it with your Magic Wand.
New Raster layer.
Copy and paste 7 Into Selection.
Deselect.
Delete the template layer.
Give it the same slight Inner Bevel.

Highlight Copy of Raster 2 layer.
Repeat the above step.

Highlight Raster 3 layer.
Click on it with your Magic Wand.
New Raster layer.
Copy and paste 12 Into Selection.
Deselect.
Delete the template layer.
Give it the same slight Inner Bevel.

Highlight Copy of Raster 3 layer.
Repeat the above step.

Highlight Raster 4 layer.
Click on it with your Magic Wand.
New Raster layer.
Copy and paste 9 Into Selection.
Copy and paste your close up image as a new layer over the oval paper.
Move into position – see my tag for reference.
Selections/Invert
Tap the delete key.
Deselect.
Delete the template layer.
Change the Properties of the tube layer to Overlay.
Highlight the Oval paper layer.
Apply Eyecandy 3.1 – Glow:
Width: 3
Opacity: 100%
Opacity Drop Off: Fat
Color: #ffffff
OK

Copy and paste your tube as a new layer.

Add your elements.  I used:
Heart String 01
Pretty Bougainvillea 01:  Resize 70%/Duplicate/Mirror
Pretty Bougainvillea 03:  Resize 60%
Flower 02:  Resize 25%/Duplicate
Flower 4:  Resize 20%/Flip/Duplicate
Flower 01:  Resize 10%/Duplicate
Butterfly 4:  Resize 25%/Duplicate/Mirror/Resize 70%

Highlight your white background.
New Raster layer.
Select All.
Copy and paste Paper 3 Into Selection.
Deselect.
Apply the mask.
Use your Pick Tool and pull the sides out slighty.
Merge Group.

Add your credits.

Add your name.
Foreground: #2b2020
Background: #795c3e
Stroke: 1
Type your name.
Convert to Raster layer.
Select All/Float/Defloat
Selections/Modify/Contract by 1
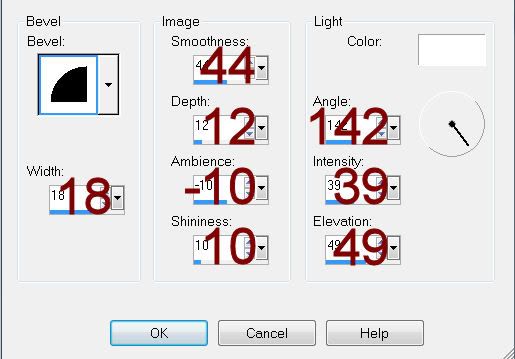
Apply a slight Inner Bevel:


Resize all layers 80%.

I’d love to see your results.
Email me!
Hugs,
Bev

Wednesday, June 20, 2012

Retro Sonic

Supplies

1 tube of choice – I used the artwork of Alfadesire which can be purchased from Pics for Design.  You must generate a license to use.

Font of choice - I used Rat Infested Mailbox here

Dee’s Sign Post Mask 26 here

Plug Ins used:
Brush Strokes – Cross Hatch
Xero - Porcelain
Eyecandy 3.1 – Glow

“Retro Sonic” is a tagger size scrap kit created by Stu of Creative Crazy Scraps and can be purchased from ExquisiteScraps.  You can visit his blog here.
Thank you Stu for a really awesome kit!

This tutorial was written assuming you have a working knowledge of PSP.

~~ Lets get started ~~

Open up a 700 x 700 blank canvas.
Flood fill white.

New Raster layer.
Make your Selection Tool active set on Circle.
Create a circle approximately 425 pixels.
Flood fill white.
Adjust/Add Remove Noise/Add Noise:
Gaussian and Monochrome checked
Noise: 50%
OK
Deselect.
Move to the right on your canvas – see my tag for reference.
Click anywhere outside of the circle with your Magic Wand.
Selections/Invert
Selections/Modify/Contract by 5.
New Raster layer.
Flood fill with #202020
Copy and paste your tube as a new layer – position over the flood fill layer.
Selections/Invert
Tap the delete key.
Deselect.
Change the Properties of the tube to Soft Light.

New Raster layer.
Make your Selection Tool active set on Rectangle.
Create a rectangle approximately 450 x 350 pixels.
Flood fill white.
Apply the same noise effect.
Deselect.
Move the rectangle into position – see my tag for reference.
Click anywhere outside of the rectangle with your Magic Wand.
Selections/Invert
New Raster layer.
Copy and paste Paper 9 Into Selection.
Deselect.

Copy and paste E23 as a new layer.
Resize 120%
Free rotate Left 7 degrees.
Move into position – see my tag for reference.
Click inside of each film frame with your Magic Wand.
Selections/Modify/Expand by 4.
New Raster layer below the frame.
Copy and paste Paper 6 Into Selection.
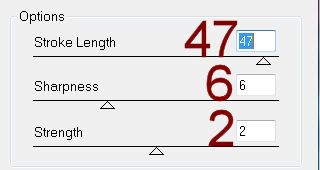
Apply Brush Strokes – Cross Hatch:
Deselect.

Highlight the film strip.
Click inside the first frame with your Magic Wand.
Selections/Modify/Expand by 4.
Copy and paste your tube as a new layer below the frame.
Move into a position you like.
Selections/Invert
Tap the delete key.
Deselect.

Repeat the above step with the remaining film frames positioning your tube in a different position for each frame.

Merge Visible the tube layers that are below the film frames.
Apply Xero – Porcelain:
Use Default settings.
Change the Properties to Lighten.

Copy and paste your tube as a new layer.

Add your elements.  I used:
E34
E17: Duplicate 2x’s
E27:  Resize 60%
E6
E19:  Resize 60%/Duplicate/Mirror
E12:  Resize 70%
   
Highlight your white background.
New Raster layer.
Select All.
Copy and paste Paper 5 Into Selection.
Deselect.
Apply the mask.
Merge Group.
Duplicate

Add your credits.

Add your name.
Convert to Raster layer.
Apply Eyecandy 3.1 – Glow:
Width: 3
Opacity: 100%
Opacity Drop Off: Fat
Color: #f47e5e
OK

Resize all layers 80%.

I’d love to see your results.
Email me!
Hugs,
Bev

Monday, June 18, 2012

The Tropics


Supplies

1 tube of choice – I used the artwork of Keith Garvey which can be purchased from PSP Tubes Emporium.  You must have a license to use.

Font of choice - I used Epifania here

Becky Mask 22 here

“Summer Cocktail” is a tagger size scrap kit created by Aurelie of Pink Candy Designs and can be downloaded from her blog here.
Please leave a thank you when downloading as it’s a small gesture for something given freely.

This tutorial was written assuming you have a working knowledge of PSP.

~~ Lets get started ~~

Open up a 700 x 700 blank canvas.
Flood fill white.

Copy and paste Frame 2 as a new layer.
Resize 85%
Click inside of it with your Magic Wand.
Selections/Modify/Expand by 4.
New Raster layer below the frame.
Copy and paste Paper 2 Into Selection.
Deselect for now.

Add the following elements below the frame – see my tag for reference:
(Don’t worry about the elements that overhang the frame.  We’ll clean that up in a bit)
Palm Tree: Duplicate/Mirror/Resize 75%
Umbrella:  Resize 80%/Free rotate Left 10 degrees
Withechair:  Resize 50%/Mirror
Décor:  Resize 50%
Sun 2

Highlight the paper layer.
Click anywhere outside of it with your Magic Wand.
Highlight each elements that overhangs the frame and tap the delete key.
Deselect.

Copy and paste your tube as a new layer.

Add the rest of your elements.  I used:
Fern: Resize 60%
Flowers:  Resize 60%/Mirror/Position at bottom left of frame/Duplicate/Flip/Mirror
Drink:  Resize 50%
Coconut:  Resize 45%
Shells chain:  Resize 60%/Duplicate/Flip
Palm Frond:  Duplicate/Mirror/Duplicate
Parrot:  Resize 60%/Mirror
   
Highlight your white background.
New Raster layer.
Select All.
Copy and paste Paper 6 Into Selection.
Deselect.
Apply the mask.
Merge Group.
Duplicate
Change the Properties to Overlay

Add your credits.

Add your name.
Foreground: #2e1404
Background: Pattern/Paper 6
Stroke: 1
Type your name.
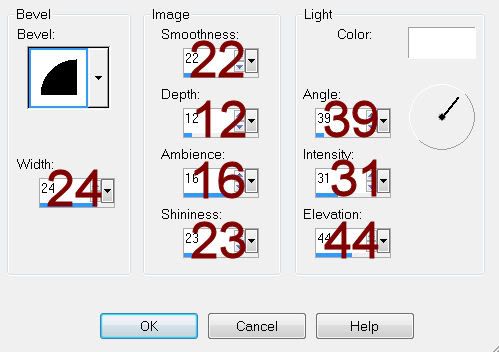
Give it a slight Inner Bevel:
Resize all layers 80%.

I’d love to see your results.
Email me!
Hugs,
Bev