

Clicking on the image will allow you to enlarge for bigger view.
Supplies
1 tube of choice - I used the artwork of Irene Shpak at MPT
Font of Choice - I used Pendulum
Vix Mask 393 here
Mura’s Meister - Cloud
This tutorial was created with HF-Projekte’s portion of the New Beginnings store collaboration kit. This kit is available for FREE with an $8 purchase at the store.
It is available EXCLUSIVELY at Heartbeatz Creationz. You can visit Heppy’s blog here.
This tutorial was written assuming you have a working knowledge of PSP.
~♥~ Let’s get started ~♥~
Open up a 700 x 700 blank canvas.
Flood fill white.
Copy and paste Val5 as a new layer.
Resize 50%
Click inside each heart with your Magic Wand.
Selections/Modify/Expand by 2.
New Raster layer below the frame.
In your layers pallet choose colors in your foreground and background that you want the cloud effect to be.
Apply Mura’s Meister - Cloud:
Default Settings.
Hit the rest button.
OK
Deselect.
Copy and paste your tube as a new layer.
Position it to the right of the frame.
Duplicate/Mirror
Move below the frame you layers pallet.
Move into position.
Highlight the cloud layer.
Click anywhere outside of it with your Magic Wand.
Highlight the duplicated tube layer.
Tap the delete key.
Deselect.
Change the Properties to Overlay.
Highlight your white background.
New Raster layer.
Select All.
Copy and paste Paper 5 Into Selection.
Deselect.
Adjust/Blur/Gaussian Blur:
Radius: 6
OK
Apply the mask.
Merge Group.
Add your credits.
Add your name.
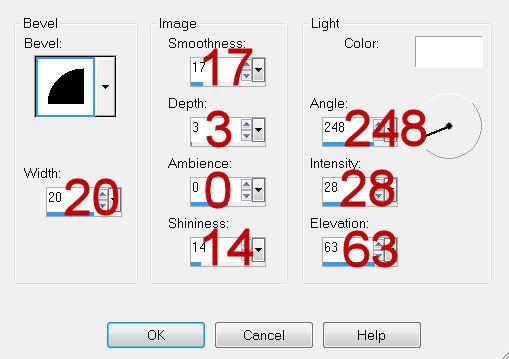
Give it a slight Inner Bevel:
Resize all layers 80%
I hope you enjoyed this tutorial.
I’d love to see your results and show it off in my gallery.
Email me!
Hugs,
Bev
Supplies
1 tube of choice - I used the artwork of Irene Shpak at MPT
Font of Choice - I used Pendulum
Vix Mask 393 here
Mura’s Meister - Cloud
This tutorial was created with HF-Projekte’s portion of the New Beginnings store collaboration kit. This kit is available for FREE with an $8 purchase at the store.
It is available EXCLUSIVELY at Heartbeatz Creationz. You can visit Heppy’s blog here.
This tutorial was written assuming you have a working knowledge of PSP.
~♥~ Let’s get started ~♥~
Open up a 700 x 700 blank canvas.
Flood fill white.
Copy and paste Val5 as a new layer.
Resize 50%
Click inside each heart with your Magic Wand.
Selections/Modify/Expand by 2.
New Raster layer below the frame.
In your layers pallet choose colors in your foreground and background that you want the cloud effect to be.
Apply Mura’s Meister - Cloud:
Default Settings.
Hit the rest button.
OK
Deselect.
Copy and paste your tube as a new layer.
Position it to the right of the frame.
Duplicate/Mirror
Move below the frame you layers pallet.
Move into position.
Highlight the cloud layer.
Click anywhere outside of it with your Magic Wand.
Highlight the duplicated tube layer.
Tap the delete key.
Deselect.
Change the Properties to Overlay.
Highlight your white background.
New Raster layer.
Select All.
Copy and paste Paper 5 Into Selection.
Deselect.
Adjust/Blur/Gaussian Blur:
Radius: 6
OK
Apply the mask.
Merge Group.
Add your credits.
Add your name.
Give it a slight Inner Bevel:
Resize all layers 80%
I hope you enjoyed this tutorial.
I’d love to see your results and show it off in my gallery.
Email me!
Hugs,
Bev
No comments:
Post a Comment