

Clicking on the image will allow you to enlarge for bigger view.
Supplies
1 image of choice - I used the artwork of Gary George at Up Your Art
Font of Choice - I used Jellyka Castle’s Queen here
Weescotlass Mask 249 here
Mura’s Meister - Copies
Brush Stroke - Sprayed Stroke
This tutorial was created with Tammy Bunch’s portion of the New Beginnings store collaboration kit. This kit is available for FREE with an $8 purchase at the store.
It is available EXCLUSIVELY at Heartbeatz Creationz. You can visit Tammy’s blog here.
This tutorial was written assuming you have a working knowledge of PSP.
~♥~ Let’s get started ~♥~
Open up a 700 x 700 blank canvas.
Flood fill white.
Copy and paste Paper bg2 as a new layer.
Resize 60%
Free rotate right 45 degrees.
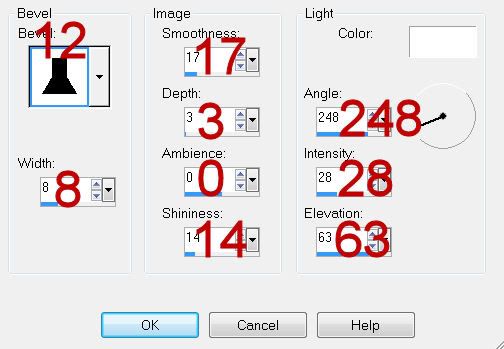
Give it a slight Inner Bevel:
Copy and paste bg 7 as a new layer.
Resize 60%
Give it the same slight Inner Bevel.
Copy and paste your image as a new layer at the top of your layers pallet.
Resize as needed and position over bg7 paper.
Highlight bg7 paper layer.
Click anywhere outside of it with your Magic Wand.
Selections/Modify/Inside Outside Feather
Both checked
Feather amount: 43
OK
Highlight your image layer and tap the delete key until you have a nice feathered effect that isn’t hanging over the edges of the paper.
Deselect.
Copy and paste Brad 3 as a new layer.
Resize 25%
Move it into position over the back paper at the top corner.
Duplicate 3 times and move each brad into each of the corners of the paper.
Copy and paste Brad 2 as a new layer at the top of your layers pallet.
Resize 25%
Apply Mura’s Mesiter - Copies:
Line
Change the number to 9
OK
Free rotate the line of brads left 90 degrees
Position at the left side of the paper - see my tag for reference.
Highlight the paper layer.
Click anywhere outside of it with your Magic Wand.
Highlight the line of brads.
Tap the delete key.
Deselect.
Duplicate/Move to the right side of the paper.
Paste your image again -
We’re going to make the paper for the mask layer!
I resized my image 50%
Apply Mura’s Meister - Copies:
Wallpaper
Keep an eye on the preview window and move the slider until your image covers the entire window.
OK
Adjust/Blur/Gaussian Blur:
Radius: 6
OK
Apply Brush Strokes - Sprayed Strokes:
Default settings.
Apply it once more.
Apply the mask.
Merge Group.
Add your credits.
Add your name.
Give it the same slight Inner Bevel.
Resize all layers 80%
I hope you enjoyed this tutorial.
I’d love to see your results and show it off in my gallery.
Email me!
Hugs,
Bev
No comments:
Post a Comment