Clicking on the image will allow you to enlarge for bigger view.
Supplies
1 tube of choice - I used the artwork of Barbara Jensen here
Font of Choice - I used HarabaraHand here
Divine Intentions Template 288 here
“Cute Little Girl‘” is a PTU scrap kit by Seven’s Scraps and can be purchased at Twilight Scraps. You can visit her blog here.
Thank you Seven for a super precious kit!!
This tutorial was written assuming you have a working knowledge of PSP.
~♥~ Let’s get started ~♥~
Open up the template.
Shift & D.
Close out the original.
Delete the top 3 layers.
Image/Canvas Size
700 x 600
OK
Highlight the background layer and flood fill white.
Highlight Square layer.
Click on it with your Magic Wand.
New Raster layer.
Copy and paste Paper 15 Into Selection.
Copy and paste your tube above the paper.
Move into position - see my tag for reference.
Selections/Invert
Tap the delete key.
Deselect.
Change the Properties to Overlay.
Delete the template layer.
Highlight Glittered Oval 1 layer.
Select All/Float/Defloat
New Raster layer.
Copy and paste Paper 4 Into Selection.
Adjust/Add Remove Noise/Add Noise:
Uniform and Monochrome checked
Noise: 35%
OK
Deselect.
Delete the template layer.
Highlight Glittered Rectangle layer.
Repeat the above step.
Highlight Glittered Frame layer.
Repeat the above step.
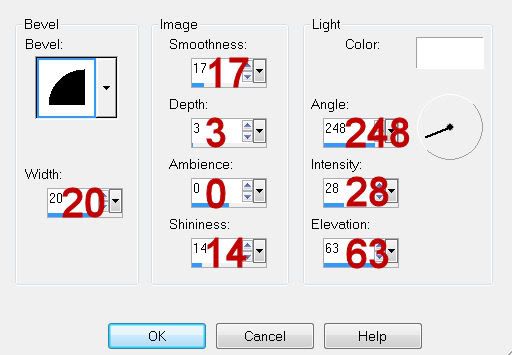
Give it a slight Inner bevel:

Highlight Oval layer.
Click on it with your Magic Wand.
New Raster layer.
Copy and paste Paper 13 Into Selection.
Deselect.
Delete the template layer.
Highlight Circle layer.
Click on it with your Magic Wand.
New Raster layer.
Copy and paste Paper 3 Into Selection.
Copy and paste your close up image as a new layer (or resize your tube)
Move into position over the circle.
Selections/Invert
Tap the delete key.
Change the Properties to Soft Light.
Duplicate/Change the Properties to Multiply and lower the Opacity to about 51.
Deselect.
Delete the template layer.
Highlight Frame Background layer.
Click on it with your Magic Wand.
New Raster layer.
Copy and paste Paper 3 Into Selection.
Deselect.
Delete the template layer.
Highlight Rectangle layer.
Click on it with your Magic Wand.
New Raster layer.
Copy and paste Paper 6 Into Selection.
Deselect.
Delete the template layer.
Copy and paste your tube as a new layer.
Position it in front of the frame.
Add your embellishments. I used:
Flower 1: Resize 50%
Flower 5: Resize 50%
Bead 2: Resize 30%
Leaves 1: Resize 90%/Free rotate Left 50 degrees
Flower Boarder 1: Resize 50%
Ribbon 5: Resize 80%Wings 1: Resize 25% and 80%/Free rotate Left 25 degrees
Highlight your white background.
New Raster layer.
Select All.
Copy and paste a paper of choice Into Selection.
Deselect.
Apply the mask.
Resize 110%
Because I am anal with my tags (lol) if you notice at the top of your mask you can see an “edge” line at the top of it. Make your eraser tool active, set the size to about 83, Hardness 50 and barely touch that line with the eraser to get rid of it.
Merge Group.
Copy and paste 8 as a new layer just above the mask layer.
Apply the mask.
Merge Group.
Add your credits.
Add your name.
Give it the same inner bevel.
Resize all layers 80%
I hope you enjoyed this tutorial.
I’d love to see your results and show it off in my gallery.
Email me!
Hugs,
Bev
Supplies
1 tube of choice - I used the artwork of Barbara Jensen here
Font of Choice - I used HarabaraHand here
Divine Intentions Template 288 here
“Cute Little Girl‘” is a PTU scrap kit by Seven’s Scraps and can be purchased at Twilight Scraps. You can visit her blog here.
Thank you Seven for a super precious kit!!
This tutorial was written assuming you have a working knowledge of PSP.
~♥~ Let’s get started ~♥~
Open up the template.
Shift & D.
Close out the original.
Delete the top 3 layers.
Image/Canvas Size
700 x 600
OK
Highlight the background layer and flood fill white.
Highlight Square layer.
Click on it with your Magic Wand.
New Raster layer.
Copy and paste Paper 15 Into Selection.
Copy and paste your tube above the paper.
Move into position - see my tag for reference.
Selections/Invert
Tap the delete key.
Deselect.
Change the Properties to Overlay.
Delete the template layer.
Highlight Glittered Oval 1 layer.
Select All/Float/Defloat
New Raster layer.
Copy and paste Paper 4 Into Selection.
Adjust/Add Remove Noise/Add Noise:
Uniform and Monochrome checked
Noise: 35%
OK
Deselect.
Delete the template layer.
Highlight Glittered Rectangle layer.
Repeat the above step.
Highlight Glittered Frame layer.
Repeat the above step.
Give it a slight Inner bevel:

Highlight Oval layer.
Click on it with your Magic Wand.
New Raster layer.
Copy and paste Paper 13 Into Selection.
Deselect.
Delete the template layer.
Highlight Circle layer.
Click on it with your Magic Wand.
New Raster layer.
Copy and paste Paper 3 Into Selection.
Copy and paste your close up image as a new layer (or resize your tube)
Move into position over the circle.
Selections/Invert
Tap the delete key.
Change the Properties to Soft Light.
Duplicate/Change the Properties to Multiply and lower the Opacity to about 51.
Deselect.
Delete the template layer.
Highlight Frame Background layer.
Click on it with your Magic Wand.
New Raster layer.
Copy and paste Paper 3 Into Selection.
Deselect.
Delete the template layer.
Highlight Rectangle layer.
Click on it with your Magic Wand.
New Raster layer.
Copy and paste Paper 6 Into Selection.
Deselect.
Delete the template layer.
Copy and paste your tube as a new layer.
Position it in front of the frame.
Add your embellishments. I used:
Flower 1: Resize 50%
Flower 5: Resize 50%
Bead 2: Resize 30%
Leaves 1: Resize 90%/Free rotate Left 50 degrees
Flower Boarder 1: Resize 50%
Ribbon 5: Resize 80%Wings 1: Resize 25% and 80%/Free rotate Left 25 degrees
Highlight your white background.
New Raster layer.
Select All.
Copy and paste a paper of choice Into Selection.
Deselect.
Apply the mask.
Resize 110%
Because I am anal with my tags (lol) if you notice at the top of your mask you can see an “edge” line at the top of it. Make your eraser tool active, set the size to about 83, Hardness 50 and barely touch that line with the eraser to get rid of it.
Merge Group.
Copy and paste 8 as a new layer just above the mask layer.
Apply the mask.
Merge Group.
Add your credits.
Add your name.
Give it the same inner bevel.
Resize all layers 80%
I hope you enjoyed this tutorial.
I’d love to see your results and show it off in my gallery.
Email me!
Hugs,
Bev

No comments:
Post a Comment