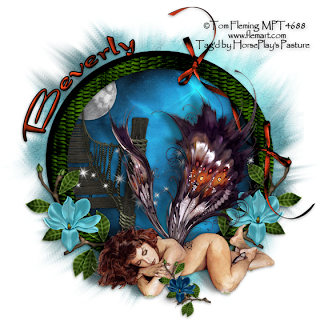
Clicking on the image will enlarge for full view.
Supplies
1 tube of choice - I used the artwork of Tom Fleming at MPT
Font of Choice - I used Dragonfly here
Weescotlass Mask 241 here
Greg’s Factory Output Vol. II - Pool Shadow
“Total Eclipse” is a PTU scrap kit created by Gina’s Gems Scraps and can be purchased from Twilight Scraps. You can visit her blog here.
Thank you Gina for a really amazing fairy kit!
This tutorial was written assuming you have a working knowledge of PSP.
~♥~ Let’s get started ~♥~
Open up a 700 x 700 blank canvas.
Flood fill white.
Copy and paste Round Frame 2 as a new layer.
Click inside of it with your Magic Wand.
Selections/Modify/Expand by 6.
New Raster layer below the frame.
Copy and paste the Paper 1 Into Selection.
Deselect.
We’re going to add the elements below the frame. They’ll still out from the edges of it, but that’s ok. We’ll clean it all up in a bit.
Copy and paste Rope Bridge as a new layer below the frame.
Resize 70%
Move into position - see my tag for reference.
Copy and paste Sparkle Trail 1 as a new layer below the frame.
Resize 70%
Move into position - see my tag for reference.
Copy and paste Moon as a new layer.
Resize 25%
Move into position.
Highlight the paper layer.
Click anywhere outside of it with your Magic Wand.
Highlight each of the elements that are below the frame and tap the delete key.
Deselect.
Copy and paste your tube as a new layer.
Give it a drop shadow.
Give it an exaggerated drop shadow on a layer of it’s own.
Add your embellishments. I used:
Magnolia 4: Resize 50%
Magnolia 1: Resize 25%
Ribbon 4: Resize 80%
Highlight your white background.
New Raster layer.
Select All.
Copy and paste 12 Into Selection.
Deselect.
Apply the mask.
Merge Group.
Add your credits.
Add your name.
In your colors palllet:
Foreground: Black
Background: Null
Make your Ellipse Tool active - set on Circle
Width: 2
Draw a circle that’s a little bigger than your frame. It’s alright if it’s too big because you can resize in just a bit.
Objects/Align/Center in Canvas
Resize it larger or smaller now if you have to.
Choose the colors your want your text to be.
I used:
Foreground: Black
Background: #85250f
Stroke: 2
Make your Text Tool active and run your curor along the edge of the circle where you want your name. When you see a Rocking A click your mouse. A text box will appear.
Type your name.
Apply.
In your layers pallet click on the plus sign.
Close out the New Ellipse layer.
Highlight the top layer.
Convert to Raster layer.
Select All/Float/Defloat
Selections/Invert/Contract by 2
Give it a slight Inner Bevel:
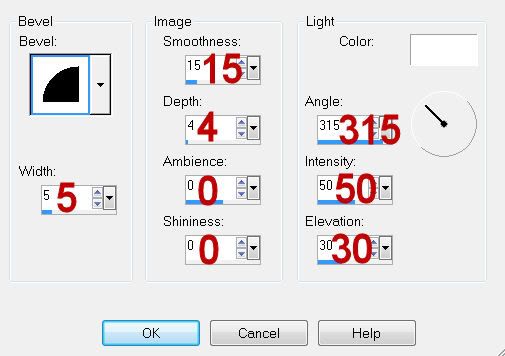
Apply Greg’s Factory Output Vol. II - Pool Shadow:
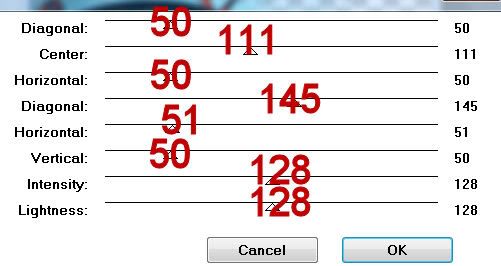
Resize all layers 80%.
I hope you enjoyed this tutorial.
I’d love to see your results and show it off in my gallery.
Email me!
Hugs,
Bev
Supplies
1 tube of choice - I used the artwork of Tom Fleming at MPT
Font of Choice - I used Dragonfly here
Weescotlass Mask 241 here
Greg’s Factory Output Vol. II - Pool Shadow
“Total Eclipse” is a PTU scrap kit created by Gina’s Gems Scraps and can be purchased from Twilight Scraps. You can visit her blog here.
Thank you Gina for a really amazing fairy kit!
This tutorial was written assuming you have a working knowledge of PSP.
~♥~ Let’s get started ~♥~
Open up a 700 x 700 blank canvas.
Flood fill white.
Copy and paste Round Frame 2 as a new layer.
Click inside of it with your Magic Wand.
Selections/Modify/Expand by 6.
New Raster layer below the frame.
Copy and paste the Paper 1 Into Selection.
Deselect.
We’re going to add the elements below the frame. They’ll still out from the edges of it, but that’s ok. We’ll clean it all up in a bit.
Copy and paste Rope Bridge as a new layer below the frame.
Resize 70%
Move into position - see my tag for reference.
Copy and paste Sparkle Trail 1 as a new layer below the frame.
Resize 70%
Move into position - see my tag for reference.
Copy and paste Moon as a new layer.
Resize 25%
Move into position.
Highlight the paper layer.
Click anywhere outside of it with your Magic Wand.
Highlight each of the elements that are below the frame and tap the delete key.
Deselect.
Copy and paste your tube as a new layer.
Give it a drop shadow.
Give it an exaggerated drop shadow on a layer of it’s own.
Add your embellishments. I used:
Magnolia 4: Resize 50%
Magnolia 1: Resize 25%
Ribbon 4: Resize 80%
Highlight your white background.
New Raster layer.
Select All.
Copy and paste 12 Into Selection.
Deselect.
Apply the mask.
Merge Group.
Add your credits.
Add your name.
In your colors palllet:
Foreground: Black
Background: Null
Make your Ellipse Tool active - set on Circle
Width: 2
Draw a circle that’s a little bigger than your frame. It’s alright if it’s too big because you can resize in just a bit.
Objects/Align/Center in Canvas
Resize it larger or smaller now if you have to.
Choose the colors your want your text to be.
I used:
Foreground: Black
Background: #85250f
Stroke: 2
Make your Text Tool active and run your curor along the edge of the circle where you want your name. When you see a Rocking A click your mouse. A text box will appear.
Type your name.
Apply.
In your layers pallet click on the plus sign.
Close out the New Ellipse layer.
Highlight the top layer.
Convert to Raster layer.
Select All/Float/Defloat
Selections/Invert/Contract by 2
Give it a slight Inner Bevel:

Apply Greg’s Factory Output Vol. II - Pool Shadow:

Resize all layers 80%.
I hope you enjoyed this tutorial.
I’d love to see your results and show it off in my gallery.
Email me!
Hugs,
Bev

No comments:
Post a Comment