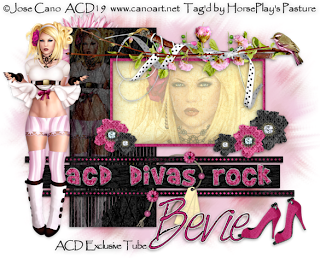
Clicking on the image will allow you to enlarge for bigger view.
Supplies
1 tube of choice - I used the artwork of Jose Cano. This is an exclusive tube for ACDiva forum. Simply reach 600 posts and it’s yours! So head on over there now.
Font of Choice - I used HarabaraHand here
Divine Intentionz Template 259 here
Weescotlass Mask 241 here
Eyecandy 3.1 - Glow
This tutorial was created with Bits N Bob’s Diva’s Rule portion of the AC Diva’s collaboration kit. This kit is available for purchase only at Exquisite Scraps. You can visit Julie’s blog here.
This tutorial was written assuming you have a working knowledge of PSP.
~♥~ Let’s get started ~♥~
Open up the template.
Shift + D.
Close out the original.
Delete the following layers:
By Missy, Words, and Circle.
Highlight the background layer.
Image/Canvas Size
650 x 525
OK
Flood fill white.
Highlight Rectangle layer.
Click on it with your Magic Wand.
New Raster layer.
Copy and paste Paper 5 Into Selection.
Copy and paste ACD Main (tube) as a new layer.
Resize 50%
Move it just inside the rectangle - see my tag for reference.
Selections/Invert
Tap the delete key.
Deselect.
Change the Properties to Hard Light and Lower the Opacity to about 26.
Delete the template layer.
Highlight Thin Rectangle 3 layer.
Merge Down.
Merge Down.
3 template layers should now all be on one layer.
Click on each on with your Magic Wand.
New Raster layer.
Copy and paste Paper 5 Into Selection.
Deselect.
Delete the template layer.
Highlight Dotted Line 2.
Merge Down.
Select All/Float/Defloat
Open up element 50 from the kit.
Us your Selection Tool set on rectangle and section out a portion of the shoe.
In your color pallet set the Foreground to pattern and look for the section of shoe you chose.
Open up a new 700 x 700 blank canvas.
Flood fill with your pattern.
Edit/Copy
Make your working canvas active.
Edit/Paste Into Selection.
Deselect.
Delete the template layer.
Highlight Frame layer.
Click on it with your Magic Wand.
New Raster layer.
Paste the pattern paper you made Into Selection.
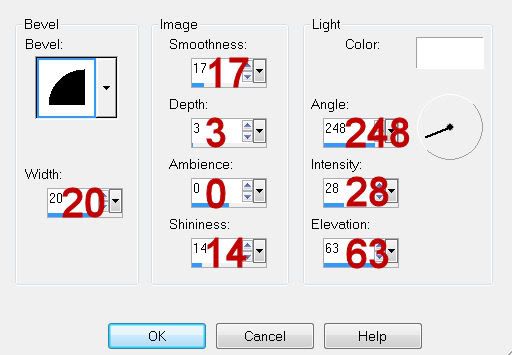
Give it a slight Inner Bevel:

Deselect.
Delete the template layer.
Highlight Frame Background layer.
Click on it with your Magic Wand.
New Raster layer.
Open up Paper 6.
Use your Selection Tool again and section out a plain area of the paper.
In your color pallet set the foreground to pattern and look for section of paper.
Make your working canvas active.
Flood fill.
Copy and paste ACD-CU2 (the close up tube) as a new layer just below the frame.
Move into position - see my tag for reference.
Selections/Invert
Tap the delete key.
Deselect.
Delete the template layer.
Copy and paste ACD Main (tube) again.
Resize 50%
Position beside the rectangle - see my tag for reference.
Add your embellishments. I used:
10: Use your Eraser Tool (or Freehand Selection Tool) to eliminate the hanging leaves. Resize 60%
48:
50: Resize 35%
51: Resize 30%/Duplicate/Resize 60%
52: Resize 25%/Duplicate
56, 57 and 58: Resize 30%
39: Resize 25%
55: Resize 40%
Highlight your white Background.
New Raster layer.
Select All.
Copy and paste a paper of choice Into Selection.
Deselect.
Apply the mask.
Merge Group.
Add your credits.
Add your name.
Apply Eyecandy 3.1 - Glow:
Width: 3
Opacity: 100
Opacity Dropoff: Medium
Color: White
Resize all layers 90%
I hope you enjoyed this tutorial.
I’d love to see your results and show it off in my gallery.
Email me!
Hugs,
Bev
Supplies
1 tube of choice - I used the artwork of Jose Cano. This is an exclusive tube for ACDiva forum. Simply reach 600 posts and it’s yours! So head on over there now.
Font of Choice - I used HarabaraHand here
Divine Intentionz Template 259 here
Weescotlass Mask 241 here
Eyecandy 3.1 - Glow
This tutorial was created with Bits N Bob’s Diva’s Rule portion of the AC Diva’s collaboration kit. This kit is available for purchase only at Exquisite Scraps. You can visit Julie’s blog here.
This tutorial was written assuming you have a working knowledge of PSP.
~♥~ Let’s get started ~♥~
Open up the template.
Shift + D.
Close out the original.
Delete the following layers:
By Missy, Words, and Circle.
Highlight the background layer.
Image/Canvas Size
650 x 525
OK
Flood fill white.
Highlight Rectangle layer.
Click on it with your Magic Wand.
New Raster layer.
Copy and paste Paper 5 Into Selection.
Copy and paste ACD Main (tube) as a new layer.
Resize 50%
Move it just inside the rectangle - see my tag for reference.
Selections/Invert
Tap the delete key.
Deselect.
Change the Properties to Hard Light and Lower the Opacity to about 26.
Delete the template layer.
Highlight Thin Rectangle 3 layer.
Merge Down.
Merge Down.
3 template layers should now all be on one layer.
Click on each on with your Magic Wand.
New Raster layer.
Copy and paste Paper 5 Into Selection.
Deselect.
Delete the template layer.
Highlight Dotted Line 2.
Merge Down.
Select All/Float/Defloat
Open up element 50 from the kit.
Us your Selection Tool set on rectangle and section out a portion of the shoe.
In your color pallet set the Foreground to pattern and look for the section of shoe you chose.
Open up a new 700 x 700 blank canvas.
Flood fill with your pattern.
Edit/Copy
Make your working canvas active.
Edit/Paste Into Selection.
Deselect.
Delete the template layer.
Highlight Frame layer.
Click on it with your Magic Wand.
New Raster layer.
Paste the pattern paper you made Into Selection.
Give it a slight Inner Bevel:

Deselect.
Delete the template layer.
Highlight Frame Background layer.
Click on it with your Magic Wand.
New Raster layer.
Open up Paper 6.
Use your Selection Tool again and section out a plain area of the paper.
In your color pallet set the foreground to pattern and look for section of paper.
Make your working canvas active.
Flood fill.
Copy and paste ACD-CU2 (the close up tube) as a new layer just below the frame.
Move into position - see my tag for reference.
Selections/Invert
Tap the delete key.
Deselect.
Delete the template layer.
Copy and paste ACD Main (tube) again.
Resize 50%
Position beside the rectangle - see my tag for reference.
Add your embellishments. I used:
10: Use your Eraser Tool (or Freehand Selection Tool) to eliminate the hanging leaves. Resize 60%
48:
50: Resize 35%
51: Resize 30%/Duplicate/Resize 60%
52: Resize 25%/Duplicate
56, 57 and 58: Resize 30%
39: Resize 25%
55: Resize 40%
Highlight your white Background.
New Raster layer.
Select All.
Copy and paste a paper of choice Into Selection.
Deselect.
Apply the mask.
Merge Group.
Add your credits.
Add your name.
Apply Eyecandy 3.1 - Glow:
Width: 3
Opacity: 100
Opacity Dropoff: Medium
Color: White
Resize all layers 90%
I hope you enjoyed this tutorial.
I’d love to see your results and show it off in my gallery.
Email me!
Hugs,
Bev

No comments:
Post a Comment