

Clicking on the image will allow you to enlarge for bigger view.
Supplies
1 tube of choice and one close up image - I used the artwork of Ismael Rac here
Font of Choice - I used Single Malta here
Gem Mask 70 here
Blissfully Beth template 175 here
“Retro Punk” is a PTU scrap kit created by Nikki of Creative Intentionz and can be purchased from her store Twilight Scraps. You can visit her blog here.
Thank you Nikki for such a cheerful colored kit. I had so much fun with this!
This tutorial was written assuming you have a working knowledge of PSP.
~♥~ Let’s get started ~♥~
Open up the template.
Shift + D.
Close out the original.
Delete the top 3 layers.
New Raster layer.
Send to Bottom.
Image/Canvas size
700 x 700
Flood fill white.
Highlight Pink Square 2 layer.
Click on it with your Magic Wand.
New Raster layer.
Copy and paste Paper 8 Into Selection.
Deselect.
Delete the template layer.
Highlight White Frame 2 layer.
Click on it with your Magic Wand.
New Raster layer.
Copy and paste Paper 1 Into Selection.
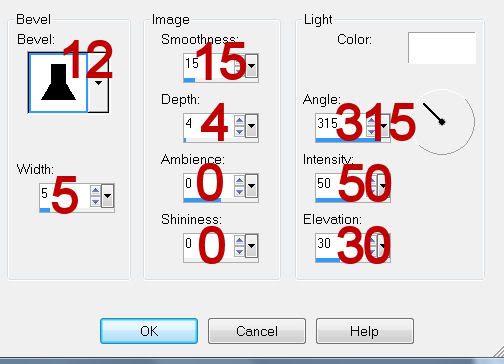
Give it a slight Inner Bevel:
Deselect.
Delete the template layer.
Repeat the above step with White Frame layer.
Highlight Black Circle layer.
Click on it with your Magic Wand.
New Raster layer.
Copy and paste Paper 11 Into Selection.
Deselect.
Delete the template layer.
Give it a slight inner bevel:

Highlight Pink Square layer.
Click on it with your Magic Wand.
New Raster layer.
Copy and paste Paper 4 Into Selection.
Copy and paste your close up Image as a new layer above the paper.
Move into position.
Selections/Invert
Tap the delete key.
Deselect.
Delete the template layer.
Copy and paste your tube as a new layer.
Copy and paste Flower 1 as a new layer.
Move it behind the circle layer so that the petals peek out at the top. Duplicate the flower as many times as you have to and move them so that the petals peek out around the circle.
Copy and paste Chrome Swirl 2 as a new layer.
Flip
Position in front of the circle so that the beads can be seen - se my tag for reference.
Duplicate 2 more times and move them around the circle so you can see the beads.
Add your embellishments. I used:
Clip 2: Resize 40%/Free rotate Right 25 degrees
Bug Globe - Resize 50%
Barb wire Heart: Resize 50%
Branch: Resize 80%
Sparkles
Flame
Highlight your white background.
New Raster layer.
Select All.
Copy and paste Paper 12 Into Selection.
Deselect.
Adjust/Blur/Gaussian blur:
Radius: 10
OK
Apply the mask.
Resize 110%.
Merge Group.
Move the mask down slightly. You’ll notice you can see an “edge” to the top of the mask. Make your Eraser Tool active and use these settings:

Run your eraser along the “edge” so that it disappears and blends into the background.
Add your credits.
Add your name.
For my name I typed each letter individually using a different color for each, but kept the Foreground color the same, stroke set on 2.
After all letters in my name were typed I Merged Visible all of them.
Select All/Float/Defloat
Selections/Modify/Contract by 2
Give it the same inner bevel you did for the circle.
Deselect.
Resize all layers 80%.
I hope you enjoyed this tutorial.
I’d love to see your results and show it off in my gallery.
Email me!
Hugs,
Bev
Supplies
1 tube of choice and one close up image - I used the artwork of Ismael Rac here
Font of Choice - I used Single Malta here
Gem Mask 70 here
Blissfully Beth template 175 here
“Retro Punk” is a PTU scrap kit created by Nikki of Creative Intentionz and can be purchased from her store Twilight Scraps. You can visit her blog here.
Thank you Nikki for such a cheerful colored kit. I had so much fun with this!
This tutorial was written assuming you have a working knowledge of PSP.
~♥~ Let’s get started ~♥~
Open up the template.
Shift + D.
Close out the original.
Delete the top 3 layers.
New Raster layer.
Send to Bottom.
Image/Canvas size
700 x 700
Flood fill white.
Highlight Pink Square 2 layer.
Click on it with your Magic Wand.
New Raster layer.
Copy and paste Paper 8 Into Selection.
Deselect.
Delete the template layer.
Highlight White Frame 2 layer.
Click on it with your Magic Wand.
New Raster layer.
Copy and paste Paper 1 Into Selection.
Give it a slight Inner Bevel:
Deselect.
Delete the template layer.
Repeat the above step with White Frame layer.
Highlight Black Circle layer.
Click on it with your Magic Wand.
New Raster layer.
Copy and paste Paper 11 Into Selection.
Deselect.
Delete the template layer.
Give it a slight inner bevel:
Highlight Pink Square layer.
Click on it with your Magic Wand.
New Raster layer.
Copy and paste Paper 4 Into Selection.
Copy and paste your close up Image as a new layer above the paper.
Move into position.
Selections/Invert
Tap the delete key.
Deselect.
Delete the template layer.
Copy and paste your tube as a new layer.
Copy and paste Flower 1 as a new layer.
Move it behind the circle layer so that the petals peek out at the top. Duplicate the flower as many times as you have to and move them so that the petals peek out around the circle.
Copy and paste Chrome Swirl 2 as a new layer.
Flip
Position in front of the circle so that the beads can be seen - se my tag for reference.
Duplicate 2 more times and move them around the circle so you can see the beads.
Add your embellishments. I used:
Clip 2: Resize 40%/Free rotate Right 25 degrees
Bug Globe - Resize 50%
Barb wire Heart: Resize 50%
Branch: Resize 80%
Sparkles
Flame
Highlight your white background.
New Raster layer.
Select All.
Copy and paste Paper 12 Into Selection.
Deselect.
Adjust/Blur/Gaussian blur:
Radius: 10
OK
Apply the mask.
Resize 110%.
Merge Group.
Move the mask down slightly. You’ll notice you can see an “edge” to the top of the mask. Make your Eraser Tool active and use these settings:
Run your eraser along the “edge” so that it disappears and blends into the background.
Add your credits.
Add your name.
For my name I typed each letter individually using a different color for each, but kept the Foreground color the same, stroke set on 2.
After all letters in my name were typed I Merged Visible all of them.
Select All/Float/Defloat
Selections/Modify/Contract by 2
Give it the same inner bevel you did for the circle.
Deselect.
Resize all layers 80%.
I hope you enjoyed this tutorial.
I’d love to see your results and show it off in my gallery.
Email me!
Hugs,
Bev
No comments:
Post a Comment