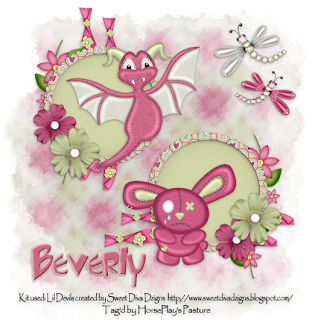
 Clicking on the image will allow you to enlarge for bigger view.
Supplies
Font of Choice - I used Toontime here
Designs by Vaybs Mask 133 here
Brush Strokes - Sprayed Strokes
Eyecandy 3.1 - Glow
“Lil Devils” is a PTU scrap kit created by Brooke of Sweet Diva Dezigns and can be purchased from her store Butterfly Blush Designs. You can visit her blog here.
Thank you Brooke for a kit that’s cuter than cute!!
This tutorial was written assuming you have a working knowledge of PSP.
~♥~ Let’s get started ~♥~
Open up a 700 x 700 blank canvas.
Flood fill white.
Copy and paste Frame 2 as a new layer.
Resize 50%
Click inside of it with your Magic Wand.
Selections/Modify/Expand by 3.
New Raster layer below the frame.
Copy and paste Paper 4 Into Selection.
Deselect.
Close out your white canvas.
Merge Visible.
Reopen your white canvas.
Duplicate the merge layer.
Move both into position - see my tag for reference.
Add your embellishments. I used:
Flower Ribbon 2: Resize 90%/Duplicate
Flower Ribbon 2 again: Resize 90%/Free rotate right 90 degrees/Duplicate
Flower: Resize 60%
Flower 2: Resize 70%
Flower Stem 1: Free rotate Right 90 degrees
Lil Bat 1
Lil Bunny 2: Resize 85%
Dragonfly 1: Resize 50%/Mirror/Duplciate/Resize 70%
Dragonfly 2: Resize 60%
Dragonfly 3: Resize 40%
Highlight your white background.
New Raster layer.
Select All.
Copy and paste Paper 3 Into Selection.
Deselect.
Adjust/Blur/Gaussian Blur:
Radius 6
OK
Apply Brush Stroke - Sprayed Strokes 2x‘s:
Default Settings.
Apply the mask.
Merge Group.
Add your credits.
Add your name.
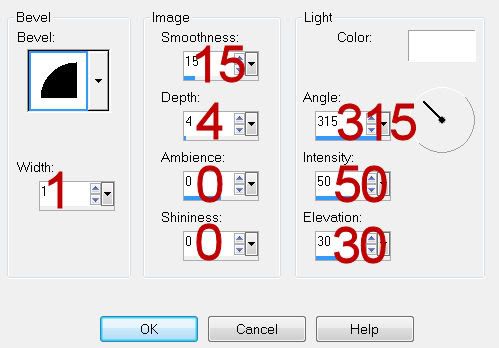
Give it a slight Inner Bevel:

Apply Eyecandy 3.1 - Glow
Width: 3
Opacity: 100
Opacity Drop off: Fat
Color: white
Resize all layers 80%.
I hope you enjoyed this tutorial.
I’d love to see your results and show it off in my gallery.
Email me!
Hugs,
Bev

No comments:
Post a Comment