

Supplies
1 tube of choice – I used the amazing artwork of Anna Marine which can
be purchased from CDO. You must have a license to
use.
Font of choice – I used Lovers
Quarrel here
A Kandee Valentines Collab Template 4-2013
It can be found under Sunday, January 6, 2013
“Hopelessly In Love” is a tagger size scrap kit created by me, Bev of
HorsePlay’s Pasture Designs and can be purchased from either of your favorite stores – Lollipops n Gumdrops or Butterfly Blush Designs or Inspirations of Scrap Friends. You can visit
my designing blog here.
~♥~ Let’s get started ~♥~
Open up the template.
Shift + D.
Close out the original.
Delete the following layers:
The top 2 layers, Darlin’, You, thrill black, thrill white, thrill d/s,
me
Highlight Left Dark Pink Circle layer.
Click on it with your Magic Wand.
New Raster layer.
Copy and paste El 33 Into Selection.
Deselect.
Delete the template layer.
Repeat the above step with Right Dark Pink Circle layer.
Delete Left Dotted Circle layer and Right Dotted Circle layer.
Highlight White Glittered Circle layer.
Click anywhere outside of it with your Magic Wand.
Selections/Invert
New Raster layer.
Copy and paste Paper 7 Into Selection.
Adjust/Add Remove Noise/Add Noise:
Uniform checked
Noise: 34%
OK
Deselect.
Delete the template layer.
Highlight Large Pink Circle layer.
Click on it with your Magic Wand.
New Raster layer.
Copy and paste Paper 13 Into Selection.
Deselect.
Delete the template layer.
Highlight Left Crème Circle layer.
Click on it with your Magic Wand.
New Raster layer.
Copy and paste Paper 4 Into Selection.
New Raster layer.
Copy and paste Paper 12 Into Selection.
Change the Properties to Burn.
Deselect.
Merge Down.
Delete the template layer.
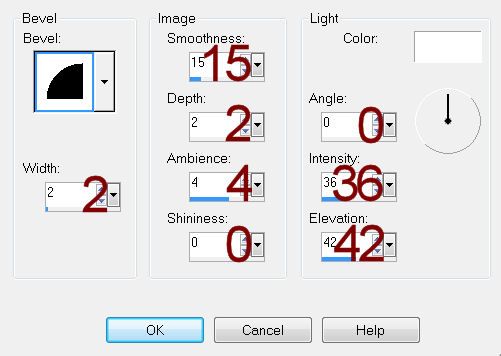
Give it a slight Inner Bevel:
Highlight Right Crème Circle layer.
Repeat the above step.
Highlight Crème Rectangle layer.
Click on the white frame area with your Magic Wand.
New Raster layer.
Copy and paste Paper 7 Into Selection.
Deselect.
Give it a slight Inner Bevel:
Highlight Crème Rectangle template layer again.
Click anywhere outside of it with your Magic Wand.
Selections/Invert
New Raster layer.
Copy and paste Paper 14 Into Selection.
Deselect.
Delete the template layer.
Highlight White Frames layer.
Select All/Float/Defloat
New Raster layer.
Copy and paste Paper 7 Into Selection.
Give it the same slight Inner Bevel.
Deselect.
Delete the template layer.
Highlight X’s with white d/s layer.
Repeat the above step accept DON’T DELETE the template layer.
Tip: the marching lines around
the template layer will appear to go as far out as the drop shadow. It’s ok.
Just the paste the paper Into the Selection. It’ll only attach to the white area of the
x’s.
Highlight Pink Inside Frames layer.
Click on each square with your Magic Wand.
New Raster layer.
Copy and paste Paper 4 Into Selection.
New Raster layer.
Copy and paste Paper 12 Into Selection.
Change the Properties to Burn.
Copy and paste your tube as a new layer – move into position over the
left square: See my tag for reference.
Change the Properties to Soft Light.
Duplicate – move this tube layer into position over the right frame.
Selections/Invert
Highlight each tube layer and tap the delete key.
Deselect.
Delete the template layer.
Color Pallet:
Foreground: #81100a
Highlight Left Glittered Hearts layer.
Make your Target Tool active and change the color of the hearts to the
foreground color.
Repeat the above step with Right Glittered Hearts layer.
Highlight Dotted Lines layer.
Copy and paste El 52 as a new layer.
Resize 40%/Duplicate
Move the element layers to create one long line of eyelet lace.
Merge Visible both eyelet lace layers.
Move this layer in your layers pallet so it it’s just above the big red
circle paper layer.
Position it over the top dotted line layer.
Duplicate – position over the bottom dotted line layer.
Delete the template layer.
Highlight X’s Pink layer.
Select All/Float/Defloat
New Raster layer.
Copy and paste Paper 14 Into Selection.
Deselect.
Delete the template layer.
Highlight White Strips layer.
Click on each one with your Magic Wand.
New Raster layer.
Copy and paste Paper 7 Into Selection.
Deselect.
Delete the template layer.
Give it a slight Inner Bevel.
Color Pallet:
Foreground: #000000
Background: #780c05
Highlight Small Hearts layer.
Make your Color Replacer Tool active.
Double Right Click over the hearts.
They should now be red.
Apply the same noise effect.
Copy and paste your tube as a new layer.
Move into position in front of the center frame – see my tag for
reference.
Add your elements. I used:
El 24: Resize 50%/Duplicate/Mirror
El 61
El 70: Resize 40%
Highlight your white background.
New Raster layer.
Select All.
Copy and paste Paper 7 Into Selection.
Deselect.
Apply the mask.
Merge Group.
Duplicate/Change the Properties to Multiply.
Add your credits.
Color Pallet:
Foreground & Background: #0e0403
Type your name.
Convert to Raster layer.
Select All/Float/Defloat
Selections/Modify/Expand by 2.
Copy and paste Paper 7 Into Selection.
Merge Visible both name layers.
Add your drop shadow.
Resize all layers 80%.
No comments:
Post a Comment