

Supplies
1 tube of choice – I used the wonderful artwork of Victoria Fox which
can be purchased from Up Your Art. You must have
a license to use.
Font of choice – I used Alex
Brush here
“P.S. I Love You” is a tagger size scrap kit created by me, Bev of
HorsePlay’s Pasture Designs and can be purchased from either of your favorite stores – Lollipops n Gumdrops or Butterfly Blush Designs or Inspirations of Scrap Friends. You can visit
my designing blog here.
~♥~ Let’s get started ~♥~
Open up a 700 x 700 blank canvas.
Flood fill white.
New Raster layer.
Make your Selection Tool active set on Circle.
Create a circle approximately 525 pixels – it’s alright if the circle
shape isn’t centered on the canvas.
Copy and paste Paper 15 Into Selection.
Deselect.
Center it on your canvas.
Adjust/Add Remove Noise/Add Noise:
Uniform checked
Noise: 50%
OK
Use your Magic Wand and click anywhere outside of the circle.
Selection/Invert
Selection/Modify/Contract by 5
New Raster layer.
Copy and paste Paper 7 Into Selection.
Deselect.
New Raster layer just about your white canvas.
Make your Selection Tool active set on Rectangle.
Create a rectangle approximately 625 x 300 pixels.
Copy and paste Paper 6 Into Selection.
Deselect.
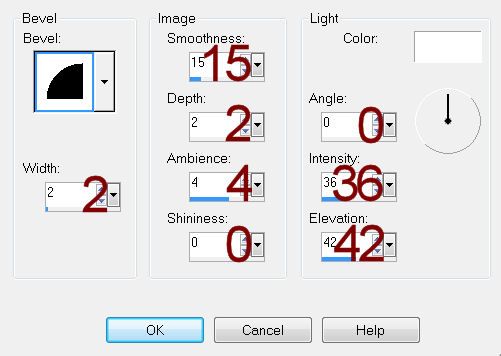
Give it a slight Inner Bevel:
Copy and paste your tube as a new layer – see my tag for placement.
Add your elements. I used:
El 23: Free rotate Left 90
degrees
El 45: Resize 50%/Duplicate 2x’s
for a total of 3.
El 44: Duplicate
El 27: I erased the large Rose
El 1: Resize 30/Duplicate/Mirror
El 17: Resize 80%
El 12: Resize 50/Mirror
El 13: Resize 40%
El 11: Resize 30%/Duplicate
Highlight your white background.
New Raster layer.
Select All.
Copy and paste the image layer Into Selection.
Deselect.
Apply JWY Mask 10 mask.
Use your Pick Tool and pull the sides out.
Merge Group.
Close this layer out for now.
New Raster layer.
Select All.
Copy and paste Paper 16 Into Selection.
Deselect.
Apply the mask.
Resize 110%
Merge Group.
Add your credits.
Add your name.
Color Pallet:
Foreground and Background: #4c2a2c
Stroke: .5
Type your name.
Turn is slightly
Convert to Raster layer.
Resize all layers 80%.
No comments:
Post a Comment