

Supplies
1 tube of choice – I used the wonderful artwork of Alicia Bel which can
be purchased from The PSP Project. You must have
a license to use.
“P.S. I Love You” is a tagger size scrap kit created by me, Bev of
HorsePlay’s Pasture Designs and can be purchased from either of your favorite stores – Lollipops n Gumdrops or Butterfly Blush Designs or Inspirations of Scrap Friends. You can visit
my designing blog here.
~♥~ Let’s get started ~♥~
Open up the template.
Shift + D.
Close out the original.
Image/Canvas Size:
700 x 525
Highlight the background layer.
Flood fill white.
Delete the top 4 layers.
Highlight Left Rectangle layer.
Click on it with your Magic Wand.
New Raster layer.
Copy and paste Paper 17 Into Selection.
Flip.
Deselect.
Delete the template layer.
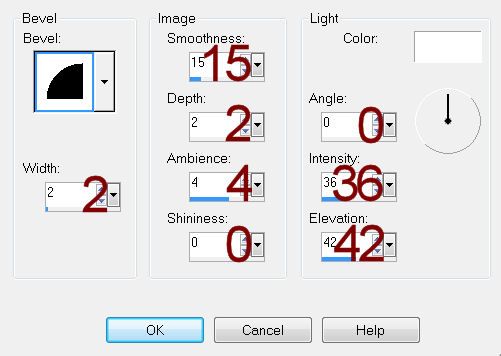
Give it a slight Inner Bevel:
Highlight Right Rectangle layer.
Repeat the above step.
Highlight Box layer.
Click on it with your Magic Wand.
New Raster layer.
Copy and paste Paper 16 Into Selection.
Deselect.
Delete the template layer.
Give it the same slight Inner Bevel.
Copy and paste El 38 as a new layer.
Resize 50%
Move into position over Left Circle template layer.
Duplicate the frame/Mirror
Move into position over Right Circle template layer.
Delete both template layers.
To each frame:
Highlight the frame layer.
Click inside of it with your Magic Wand.
Selections/Modify/Expand by 4.
New Raster layer below the frame.
Copy and paste Paper 7 Into Selection.
Deselect.
Highlight Center Circle layer.
Click on it with our Magic Wand.
New Raster layer.
Copy and paste El 15 Into Selection.
Deselect.
Delete the template layer.
Highlight Center Square layer.
Click on it with your Magic Wand.
New Raster layer.
Copy and paste Paper 17 Into Selection.
Copy and paste your tube as a new layer.
Change the Properties to Soft Light.
Move into position over the paper layer – see my tag for reference.
Selections/Invert
Tap the delete key.
Deselect.
Delete the template layer.
Highlight Center Frame layer.
Select All/Float/Defloat
New Raster layer.
Flood fill with #2e3a76
Adjust/Add Remove Noise/Add Noise:
Random & Monochrome checked:
Noise: 43%
OK
Deselect.
Delete the template layer.
Copy and paste your tube as a new layer.
Move into position in front of the frame – see my tag for reference.
Add your elements. I used:
El 51: Resize 50%
El 27: Resize
50%/Duplicate/Mirror
El 14: Resize 50%
El 30: Resize 50%
El 32: Resize 60%
El 9 & 10: Resize 30%
El 9 & 10 each: Resize 45%
El 1: Resize
30%/Duplicate/Mirror/Resize 70%
El 53: Resize
60%/Duplicate/Mirror
Highlight your white background.
New Raster layer.
Select All.
Copy and paste Paper 16 Into Selection.
Deselect.
Apply the mask.
Resize 115%
Merge Group.
Add your credits.
Add your name.
Resize all layers 80%.
No comments:
Post a Comment