Supplies
1 tube of choice and 1 image – I used the adorable artwork of Lisa
Victoria which can be purchased from UpYour Art. You must have a license to use.
The elements you see in my tag are on separate layers that come with
this particular tube.
Tracy F. Designz Easter Template 3 here
Plug Ins used:
Greg’s Factory Output Vol. II – Pool Shadow
~♥~ Let’s get started ~♥~
Open up the template.
Shift + D.
Close out the original.
Image/Canvas Size:
700 x 600
OK
New Raster layer.
Send to bottom.
Flood fill white.
Delete the top 2 layers, Small Rectangle, and Glitter Small Rectangle.
Highlight Rectangle layer.
Click on it with your Magic Wand.
New Raster layer.
Flood fill with #132c46
Change the Properties to Multiply
Apply Greg’s Factory Output Vol. II – Pool Shadow:
Use Default Settings.
Deselect.
DO NOT delete the template layer.
Highlight Rectangle 2 layer.
Flood fill with the same color.
Apply the same Pool Shadow effect.
Deselect.
Delete the template layer.
Highlight Circle 2 layer.
Click anywhere outside of it with your Magic Wand.
Selections/Invert
New Raster layer.
Copy and paste your image Into Selection.
Duplicate
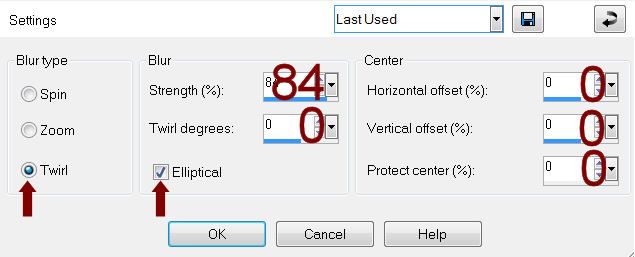
Adjust/Blur/Radial Blur:
Match your settings to mine –

Merge Down
Deselect for now.
DO NOT delete the template layer.
Copy this merged layer.
Highlight Circle 1 layer.
Click on it with your Magic Wand.
New Raster layer.
Paste Into Selection.
Selections/Modify/Expand by 5.
New Raster layer below the template layer.
Flood fill with #ffffff
Adjust/Add Remove Noise/Add Noise:
Random and Monochrome checked
Noise: 52%
OK
Deselect.
Delete the template layer.
Copy and paste your tube as a new layer – see my tag for placement.
If you’re using the tube I did use the layer labeled “Tube LV0073 Owl
Moon” and resize 80%
I activated my Pick Tool (Press K on your keyboard) and stretched the
tube lengthwise just a tad.
For the leaves that are at the top and right area of the circle:
Make your tube image active.
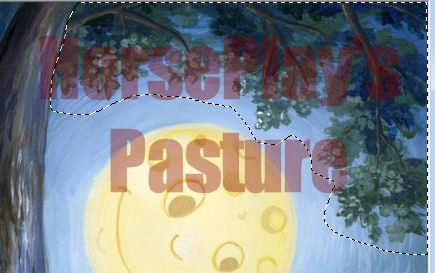
Use your Freehand section Tool and section out the area of the leaves:

Make your working canvas active and paste as a new layer.
Move it into position within the circle – see my tag for reference.
Use your Magic Wand and click anywhere outside of the leaves you just
pasted.
Selection/Modify/Inside Outside/Feather
Both checked
Feather amount: 30
OK
Tap the delete key as many times as you like until you like the
feathered effect.
Deselect.
Highlight Circle 2 Template layer.
Click anywhere outside of it with your Magic Wand.
Highlight the leaves layer.
Tap the delete key.
Deselect.
Copy and paste the branch layer labeled “Tube (e) LV0073 Owl Moon”
Resize 40%
Duplicate 2 times and mirror one of those branch layers – see my tag for placement of
all branch layers.
Highlight your white background.
New Raster layer.
Select All.
Copy and paste the image layer Into Selection.
Deselect.
Apply JWY Mask 10 mask.
Use your Pick Tool and pull the sides out.
Merge Group.
Close this layer out for now.
New Raster layer.
Select All.
Paste (your image) Into Selection.
Deselect.
Apply Vix 451 mask.
Merge Group.
Duplicate
Merge Down.
Resize 105%
Move this mask layer so that it sits nicely behind the large glittered
circle.
Duplicate/Resize 75%
Move this mask behind the smaller glittered circle you made.
Reopen the JWY mask layer.
Add your credits.
Color Pallet:
Foreground and Background: #000000
Use the Wretched Font and type
The best dreams happen when you’re awake
See my tag for word placement.
Add your name.
Color Pallet:
Foreground: #d6b878
Background: #f6efbc
Stroke: .5
Be sure the Font direction is set to go vertical.
I had to reset the kerning of the font to -200 so the letter spacing
were closer together. Your program may
vary from mine so toy with the number until you like the font spacing in your
name.
Type your name.
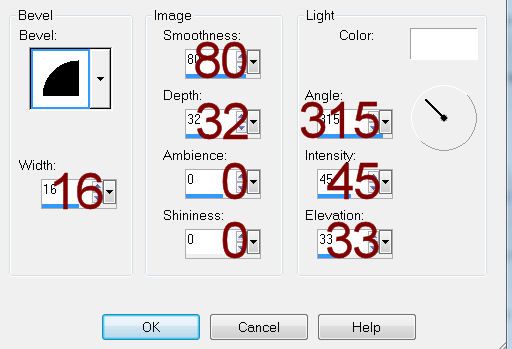
Give it a slight Inner Bevel:

Resize all layers 80%.


No comments:
Post a Comment