

Supplies
1 tube of choice – I used the gorgeous artwork of Greg Andrews which
can be purchased from Up Your Art. You must have
a license to use.
Font of choice – I used Aquarelle
here
A Kandee Valentines Collab Template 6 -2013
It can found under Sunday, January 6, 2013
“Vintage Romance” is a full size scrap kit created by Scrapkit Creationz
and can be purchased from HeartbeatzCreationz. Thank you Deb and Tezza
for such a beautiful kit.
~♥~ Let’s get started ~♥~
Open up the template.
Shift + D.
Close out the original.
Delete the top 4 layers.
Highlight Hearts layer.
Click on all the hearts with your Magic Wand.
New Raster layer.
Copy and paste Paper 3 Into Selection.
Deselect.
Delete the template layer.
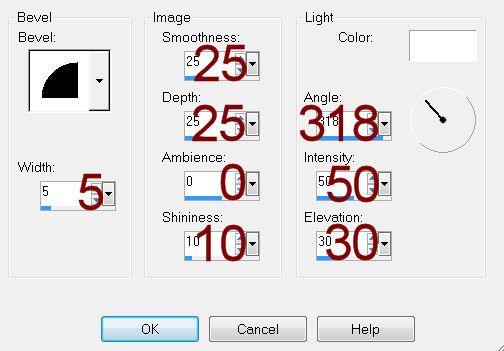
Give it a slight Inner Bevel:
Highlight Heart Outline layer.
Select All/Float/Defloat.
New Raster layer.
Paste Paper 3 Into Selection.
Deselect.
Delete the template layer.
Give it the same Inner Bevel.
Highlight Right Coral Square layer.
Click on it with your Magic Wand.
New Raster layer.
Paste Paper 3 Into Selection.
Deselect.
Delete the template layer.
Give it a slight Inner Bevel:
Highlight Left Coral Square.
Repeat the above step.
Highlight Top Left Pink Square layer.
Click on it with your Magic Wand.
New Raster layer.
Paste Paper 3 Into Selection.
Deselect.
Delete the template layer.
Give it the same slight Inner Bevel.
Highlight Bottom Right Pink Square layer.
Repeat the above step.
Open up Paper 1.
Ctrl + D.
Close out the original.
We’re going to darken the color of the paper -
Ctrl + B
The Brightness/Contrast box will appear.
Brightness: -22
Contrast: 13
OK
Copy
Highlight Bottom Left Pink Square layer.
Click on it with your Magic Wand.
New Raster layer.
Paste Paper 1 Into Selection.
Deselect.
Delete the template layer.
Highlight Top Right Pink Square layer.
Repeat the above step.
Highlight White Frames layer.
Click on each frame with your Magic Wand.
New Raster layer.
Paste Paper 1 Into Selection.
Deselect.
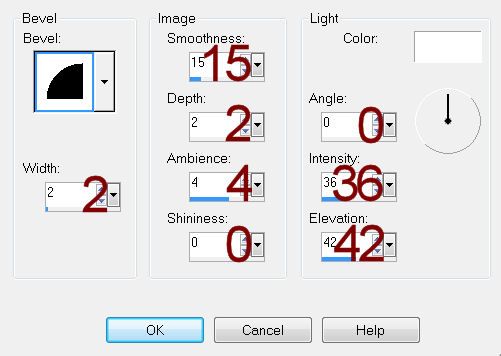
Give it the same Inner Bevel you used last.
Adjust/Add Remove Noise/Add Noise:
Uniform and Monochrome checked
Noise: 65%
OK
Delete the template layer.
Highlight Left Crème Rectangle layer.
Click on it with your Magic Wand.
New Raster layer.
Copy and paste Paper 2 Into Selection.
Deselect.
Delete the template layer.
Give it the same slight inner Bevel.
Repeat the above step with Right Crème Rectangle layer.
Highlight Dark Pink Squares layer.
Click on each square with your Magic Wand.
New Raster layer.
Paste Paper 2 Into Selection.
Deselect.
Copy and paste your tube as a new layer – move it into position over
the top square.
Change the Properties of the tube to Burn.
Highlight the Dark Pink Squares Template layer.
Only click on the top square.
Selections/Invert
Highlight the tube layer.
Tap the delete key.
Deselect.
Repeat the above step with the bottom dark pink square.
Delete Dark Pink Squares template layer.
Paste your tube again and position it in front of the center square –
see my tag for reference.
Copy and paste Stick Pin as a new layer.
Resize 20%
Free rotate Right 20 degrees
Use your Eraser Tool and erase the center area of the stick pin.
Move the stick pin into the exact position you want it – see my tag for
reference.
Make your Lighten/Darken Tool active – match your settings to mine:
Open up Silver Lace Ribbons.
Use your Selection Tool set on Rectangle and section out a ribbon of
your choice. It was a hard decision, but
I chose the top one.
Copy
Paste the ribbon on your working canvas.
Resize 10%
Tap the letter K on your keyboard to activate the Pick Tool.
Pull up on the bottom until the ribbon is quite thin – see my tag for
reference.
Duplicate
Move both ribbons into position.
Copy and paste Double Bow as a new layer.
Resize 10%
Use your Target Tool and change to color #750002.
Duplicate/Mirror
Move both bows into position – see my tag for reference.
Add your elements. I used:
Rose: Resize 10% and 80%/Duplicate/Flip/Resize
70%
Envelope: Resize
10/Duplicate/Free rotate Left 35 degrees
Heart Bow: Resize 10% and
60%/Duplicate/Free rotate Right 20 degrees
Pillar Page Border: Resize 15%
and 80%
Highlight your white background.
New Raster layer.
Select All.
Copy and paste Paper 6 Into Selection.
Deselect.
Apply the mask.
Resize 110%
Merge Group.
Add your credits.
Add your name.
Resize all layers 80%.
No comments:
Post a Comment