
Supplies
Font of choice - I used Chicken Basket. I’m sorry, I couldn’t find a link.
Insatiable Dreams Mask 30 here
Designs by Ali Template 174 here
DSB Flux - Bright Noise
Van Der Lee - Snowflakes
Animation Shop
“Down in the Hollow” is a PTU tagger size scrap kit created by Tamsin of Tamsin McAtee Studios and can be purchased at Kreative Kreations Korner. You can visit her site here.
Thank you Tamsin for a fabulous kit!
This tutorial was written assuming you have a working knowledge of PSP.
~♥~ Let’s get started ~♥~
Open up the template.
Delete Raster 10, 9, Copy of Raster 9, and Raster 8.
Highlight Raster 2.
Select All/Float/Defloat
New Raster Layer.
Copy and paste a paper of choice Into Selection.
Deselect.
Delete the template layer.
Open up the Grass element.
Use your Selection Tool and outline the first piece of grass.
Paste it onto your working canvas.
Resize 35%.
Once you have all the grass pieces copied, pasted, and resized arrange them in the circle - duplicate as you like, mirror as you like.
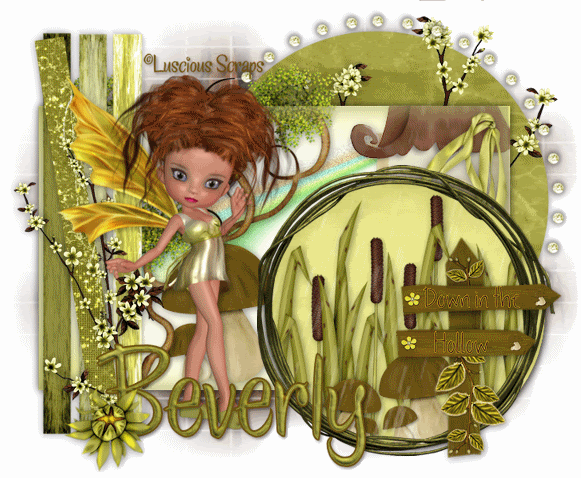
See my tag for reference.
Once you have all the grass pieces in position close out all your layers accept the grass pieces and merge visible.
Reopen all the layers.
Highlight the circle paper.
Select All/Float/Defloat
Selections/Invert
Highlight the merged grass layer and tap the delete key.
DO NOT DESELECT.
Create 3 new Raster layers above the merged grass layer.
Rename them Rain 1, 2, and 3.
Highlight Rain 1.
Apply Van Der Lee Snowflakes: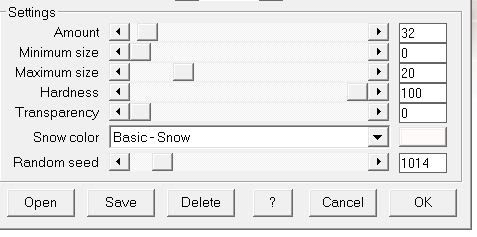
Adjust/Blur/Motion Blur: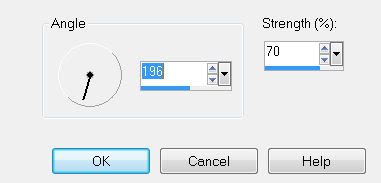
Adjust/Sharpness/Sharpen
Repeat the above steps with Rain 2 accept move the Random Seed bar to change the numbers.
Repeat the above step with Rain 3.
Once you have all 3 layers of rain made - deselect.
Highlight Raster 3 layer.
Select All/Float/Defloat
Copy and paste a paper of choice Into Selection.
DO NOT DESELECT.
Copy and paste Fairy House as a new layer.
Move into position - see my tag for reference.
Selections/Invert
Tap the delete key.
Deselect.
Copy and paste the Rainbow as a new layer.
Move into position - see my tag for reference.
Arrange below the Fairy House in your layers pallet.
Duplicate twice for a total of 3 layers.
Rename them Rainbow 1, 2, and 3.
Highlight Rainbow 1.
Apply DSB Flux - Bright Noise: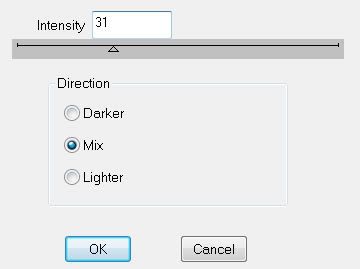
Highlight Rainbow 2.
Apply Bright Noise accept hit the mix button twice.
Highlight Rainbow 3.
Apply Bright Noise accept hit the mix button 3 times.
Highlight Raster 2 layer.
Select All/Float/Defloat
Copy and paste a paper of choice Into Selection.
Deselect.
Delete the template layer.
Highlight Raster 6 layer.
Select All/Float/Defloat
Copy and paste a paper of choice Into Selection.
Deselect.
Delete the template layer.
Repeat the above step with Raster layers 5, Copy of Raster 5, and Raster 4.
Add your embellishments. I used:
Crystal Frame 1: Resize 75%
Frame 1: Resize 85%
Bow 4: Resize 70%
Tree: Resize 60%
Blossom: Resize 70%. Duplicate/Resize 70%
Sign: Resize 60%
Fairy 7 without Rose: Resize 55%. Mirror/Erase the credit.
Bud 1: Resize 50%
Highlight your white background.
New Raster layer.
Select All.
Copy and paste a paper of choice Into Selection.
Deselect.
Apply the mask.
Merge Group.
Add your copyrights
Place the fairy’s credit on your tag.
Add your name.
Give it an inner bevel:
Resize all layers 80%.
Close out Rainbow layers 2 & 3.
Close out Rain layers 2 & 3.
Copy Merge.
~Time to Animate~
Open up Animation Shop.
Edit/Paste/As New Animation.
Go back into PSP.
Close out Rain 1 and open up Rain 2.
Close out Rainbow 1 and open up Rainbow 2.
Copy Merge.
Carry Into AS.
Edit/Paste/After Current Frame.
Back into PSP.
Close out Rain 2 and open up Rain 3.
Close out Rainbow 2 and open up Rainbow 3.
Copy Merge.
Carry Into AS.
Edit/Paste/After Current Frame.
View your animation.
If you’re happy then save.
I hope you enjoyed this tutorial.
I’d love to see your results.
Email me!
Hugs,
Bev
wonderful tut , am going to link it to my store blog , I love it :-) thanks for a wonderful job
ReplyDeleteThank you Tamsin:)
ReplyDelete