Supplies
1 tube of choice, 2 close up images - I’m using the artwork of Jennifer Janesko which you can purchase here.
Font of Choice - I’m using Pavane here.
My Template 79 here.
Becky Mask 22 here
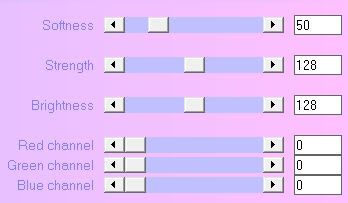
Xerox - Porcelain
“Antiqued Butterscotch” is an exclusive PTU tagger size scrap kit created by Terry of Treasure’s by Terry and can be purchased at MPT here. You can visit Terry’s blog here.
Thank you Terry for a very beautiful kit!
This tutorial was written assuming you have a working knowledge of PSP.
~♥~ Let’s get started ~♥~
Open up the template.
Shift + D.
Close out the original.
Delete the credit layer.
Highlight Rectangle layer.
Select All/Float/Defloat
Copy and paste a paper of choice as a new layer.
Selections/Invert
Tap the delete key.
Deselect.
Delete template layer.
Copy and paste your tube as a new layer.
Highlight Double Vertical Lines layer.
Select All/Float/Defloat
New Raster layer.
Flood fill with a color that will match your tube.
(I used the dark color from one of the papers).
Deselect.
Delete the template layer.
Repeat the above step with Single Vertical Line layer.
Highlight Top Diamond layer.
Select All/Float/Defloat
New Raster layer.
Copy and paste a paper of choice Into Selection.
DO NOT DESELECT.
Copy and paste your close up image as a new layer.
Move into position over the diamond layer.
Selections/Invert
Tap the delete key.
Selections/Modify/Feather
Number of Pixels:
42
OK
Tap the delete key until you have a nice feathered effect.
Deselect.
Delete the template layer.
Selections/Invert
Tap the delete key.
Selections/Modify/Feather
Number of Pixels:
42
OK
Tap the delete key until you have a nice feathered effect.
Deselect.
Delete the template layer.
Apply the Xero - Porcelain effect:

Repeat the above step with Bottom Diamond layer using a different close up image.
Highlight Top Lines layer and repeat the same steps you used for the Double Vertical lines layer.
Copy and paste Flower 8 as a new layer.
Position it behind the rectangle layer.
Duplicate/Flip/Mirror.
Paste Flower 8 again.
Resize 50%
Position behind the diamond.
Duplicate/Mirror as you like.
Add your embellishments. I used:
Cushion 1: Resize 50%
Butterfly 3 & 4: Resize 40% Free rotate 30 degrees
Bow 8: Resize 50%
Highlight your white background.
New Raster layer.
Select All.
Copy and paste a paper of choice Into Selection.
Deselect.
Apply the mask.
Merge Group.
Add your copyrights.
Add your name.
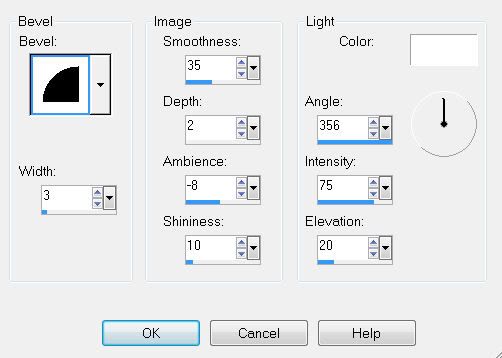
Give it a slight inner bevel:

Adjust/Add Remove Noise/Add Noise
Gaussian and Monochrome checked
Noise: 20%
OK
Save your tag.
I hope you enjoyed this tutorial.
I’d love to see your results and show it off in my Show Arena.
Email me!
Hugs,
Bev


No comments:
Post a Comment