
.jpg)
Clicking on the image will enlarge to full view.
Supplies
1 tube of choice - I’m using the wonderful artwork of Al Rio which you can purchase here.
Font of Choice - I used Papyrus which came with my PC.
Scrapity Scrap and More Template 17 here.
Weescotlass Mask 297 here
“Beach St” is a tagger size scrap kit created by Kelly of KC Kits and can be purchased at Scraps with Attitude. You can visit Kelly’s blog here.
Thank you Kelly for a kit that will make anyone yearn for the summer!
This tutorial was written assuming you have a working knowledge of PSP.
~♥~ Let’s get started ~♥~
Open up the template.
Shift + D.
Close out the original.
Delete the credit layer.
Resize all layers 120%
Image/Canvas Size
700 X 500
Flood Fill Raster 1 white.
Highlight Raster 3.
Select All/Float/Defloat
New Raster layer.
Copy and paste a paper of choice Into Selection.
Deselect.
Delete the template layer.
Repeat the above step with Raster 4, 6, Copy of Vector 1, Copy of Raster 7.
Highlight Raster 7.
Select All/Float/Defloat
New Raster layer.
Flood fill with a gradient of your choice.
Deselect.
Delete the template layer.
Copy and paste Tag Ribbon 3 as a new layer.
Resize 25%
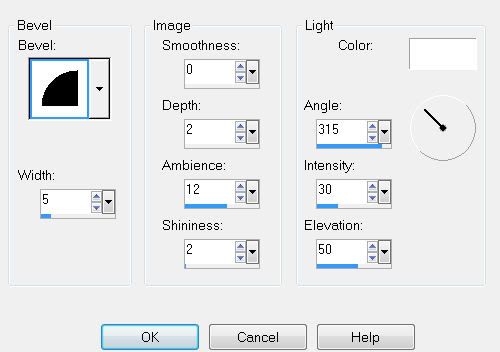
Give it a slight inner bevel:
Position it over the top line of Raster 5.
Duplicate - position it over the bottom line.
Delete the template layer.
Add your embellishments. I used:
Tree: Resize 55%. Duplicate/Mirror/Resize 80%. Duplicate/Resize 80%
Tag Clip 5: Resize 70% Free rotate right 30 degrees. Use your eraser tool and erase the center of the clip so it gives the effect it’s clipped on the paper.
Chip Star 1: Resize 30%
Chip Star 2: Resize 25% and 80%
Button 1, 2, and 5: Resize 25% and 30%
Flower 2: Resize 25% and 50%
Pebble 2: Resize 25% and 25%
Flower 3: Resize 25% and 40%
Pebble 3: Resize 25%, 25%, and 80%
Flourish 2: Resize 40%
Beach Ball: Resize 50%
Starfish: Resize 30%
Starfish 1: Resize 30%
Shell 2: Resize 30%
Copy and paste your tube as a new layer.
Highlight your white background.
New Raster layer.
Select All.
Copy and paste a paper of choice Into Selection.
Deselect.
Apply the mask.
Merge Group.
Add your copyrights.
Add your name.
I hope you enjoyed this tutorial.
I’d love to see your results and show it off in my Show Arena.
Email me!
Hugs,
Bev
No comments:
Post a Comment